260911大模型 AIOps 诊断能力排行榜
合适的才是最好的,基于AIOpslab项目,考察模型在解决物理世界问题的能力,直接看效果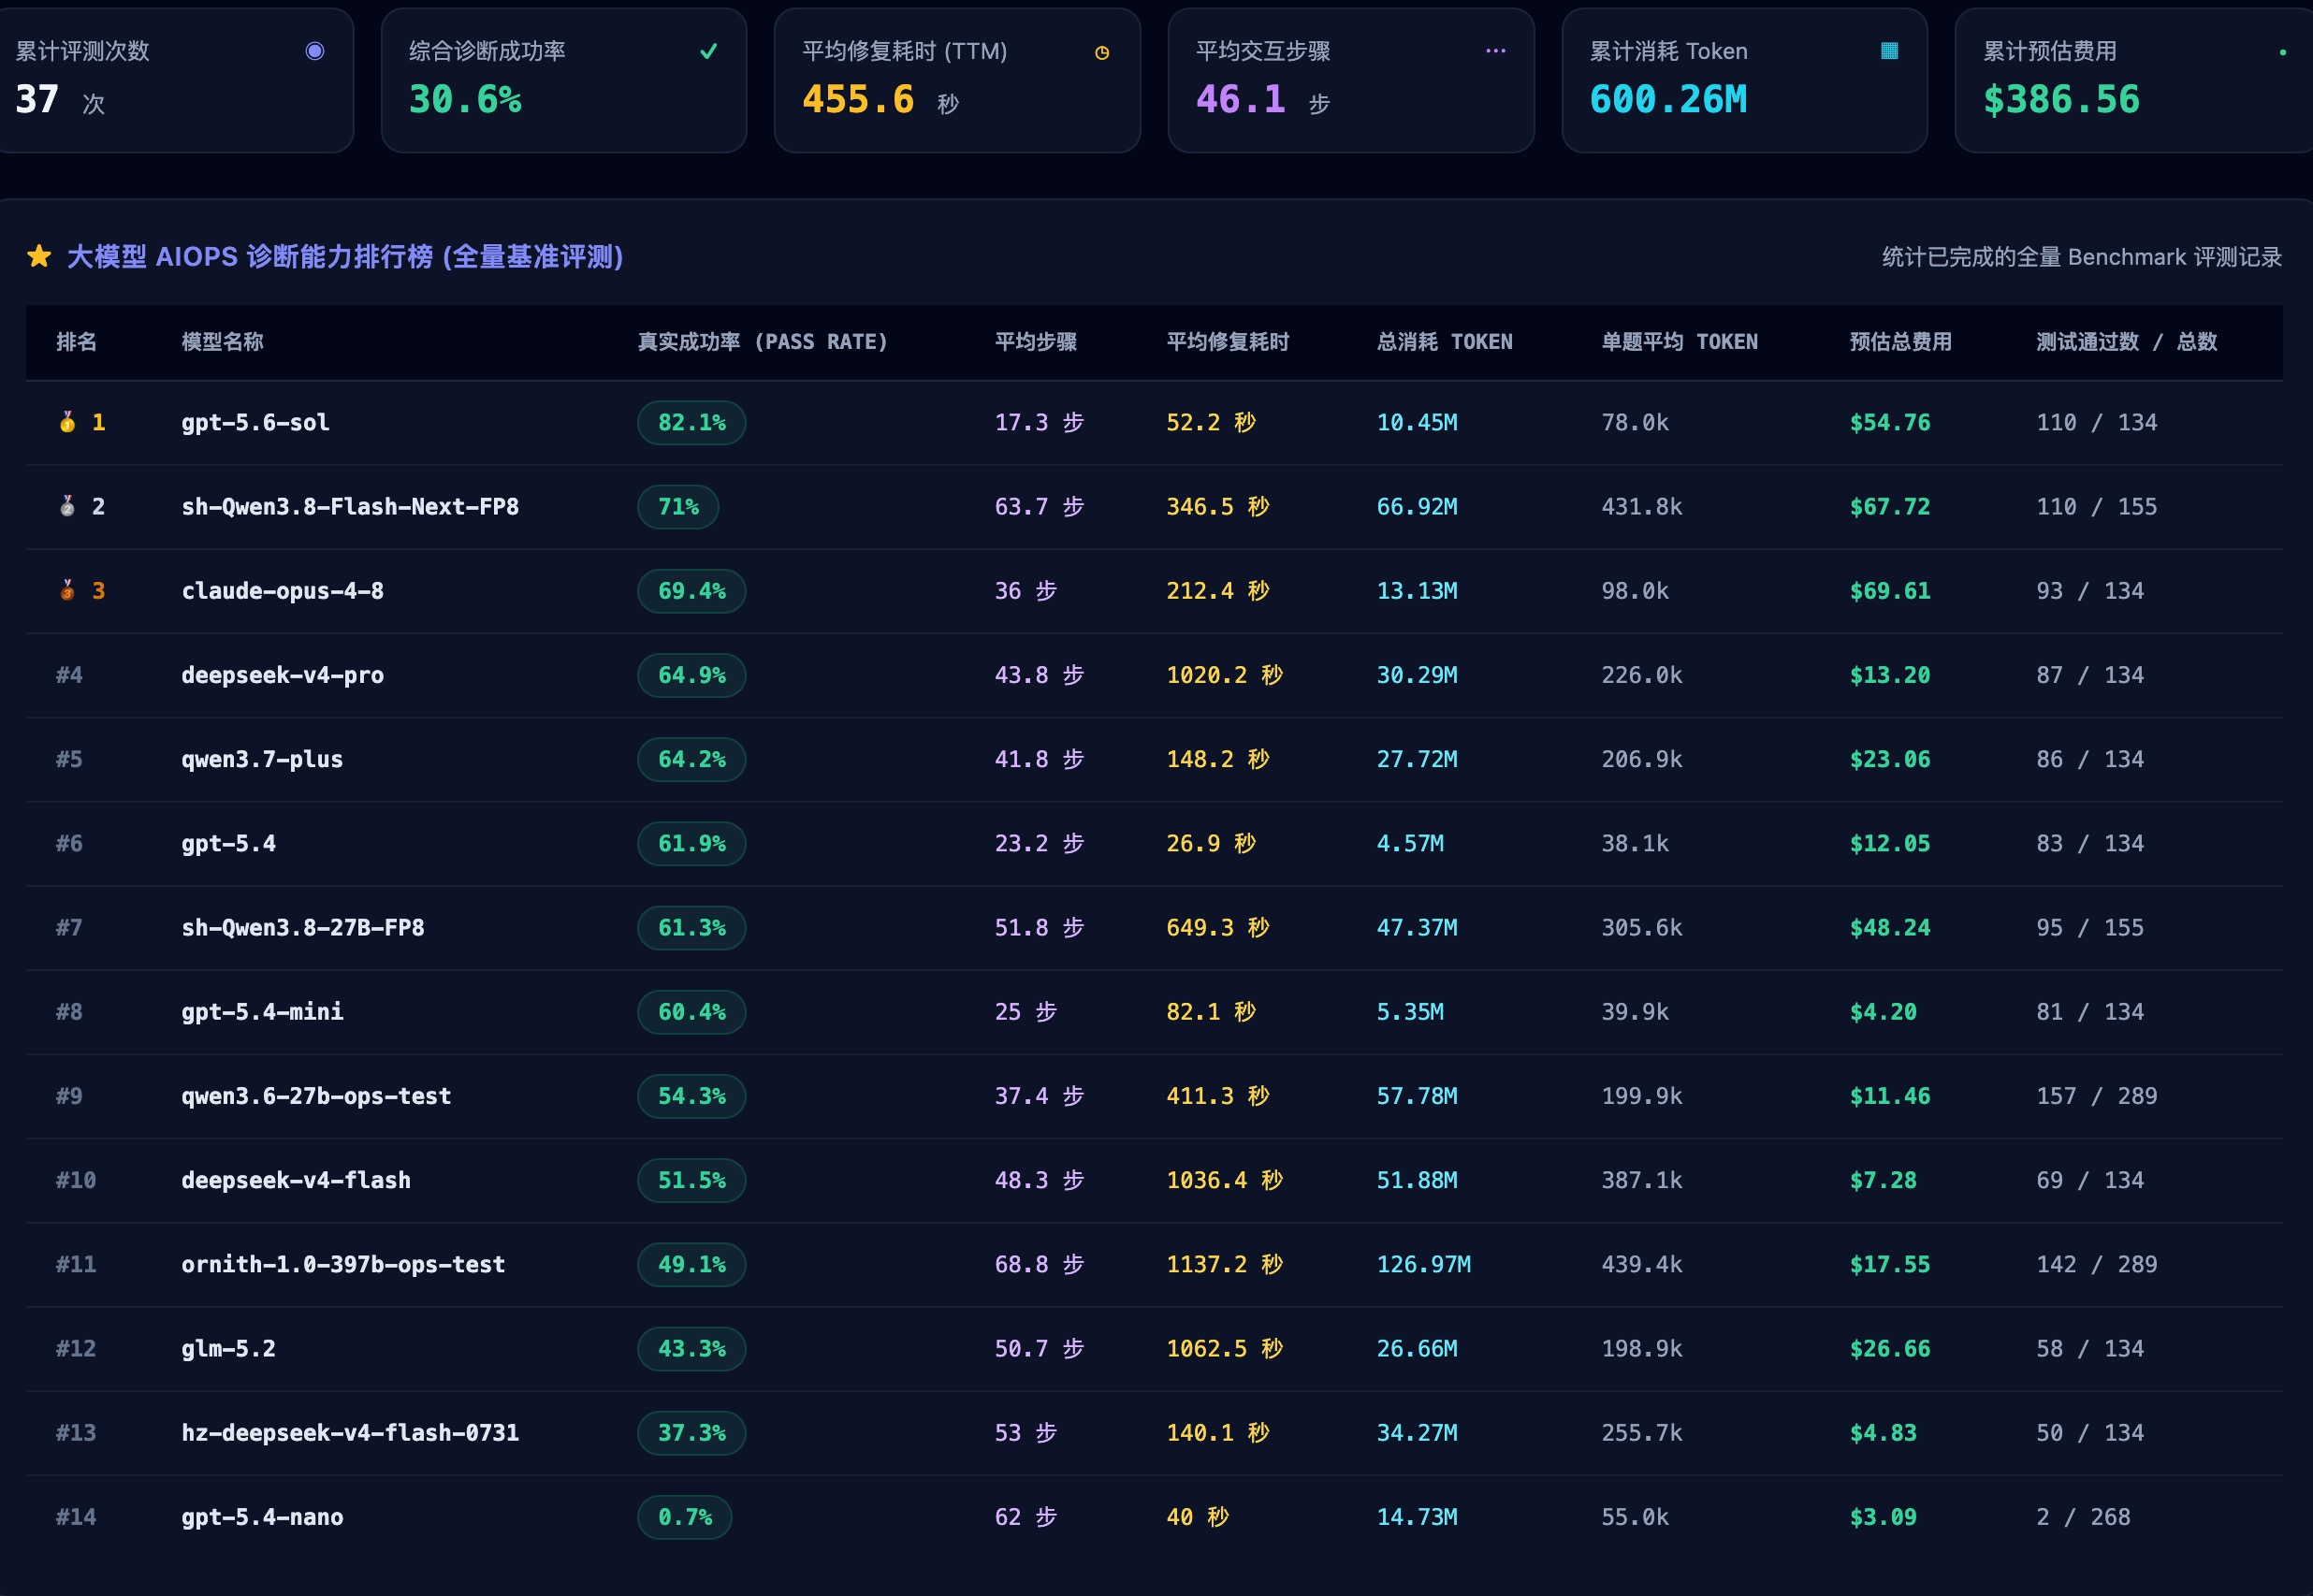
合适的才是最好的,基于AIOpslab项目,考察模型在解决物理世界问题的能力,直接看效果
直接上结果,体感非常快,相比deepseek-v4-flash
| 并发 | 成功/请求 | 错误 | 总tok/s | 输出tok/s | TTFT中位/P95 | 延迟中位/P95 | >60s | >100s |
|---|---|---|---|---|---|---|---|---|
| 32 | 64/64 | 0 | 3840.4 | 1045.1 | 546/1459 ms | 31.4/32.3 s | 0 | 0 |
| 64 | 128/128 | 0 | 5857.2 | 1594.0 | 724/9810 ms | 44.9/52.1 s | 0 | 0 |
| 96 | 192/192 | 0 | 6892.3 | 1875.6 | 6366/14493 ms | 63.9/71.7 s | 113 | 0 |
| 128 | 256/256 | 0 | 7651.0 | 2082.1 | 5337/16152 ms | 76.7/83.5 s | 249 | 0 |
| 160 | 320/320 | 0 | 7591.1 | 2065.8 | 7659/88537 ms | 87.1/157.6 s | 316 | 87 |
| 192 | 384/384 | 0 | 7121.4 | 1938.0 | 21531/110332 ms | 88.6/177.7 s | 384 | 183 |
3万人民币出头,可以买到支持cuda、原厂出品且合法的桌面AI工作站。测试Qwen3-Next-80B-A3B-Instruct-FP8 占满显存,基本是可以运行的最大尺寸模型,每秒生成422个tokens!
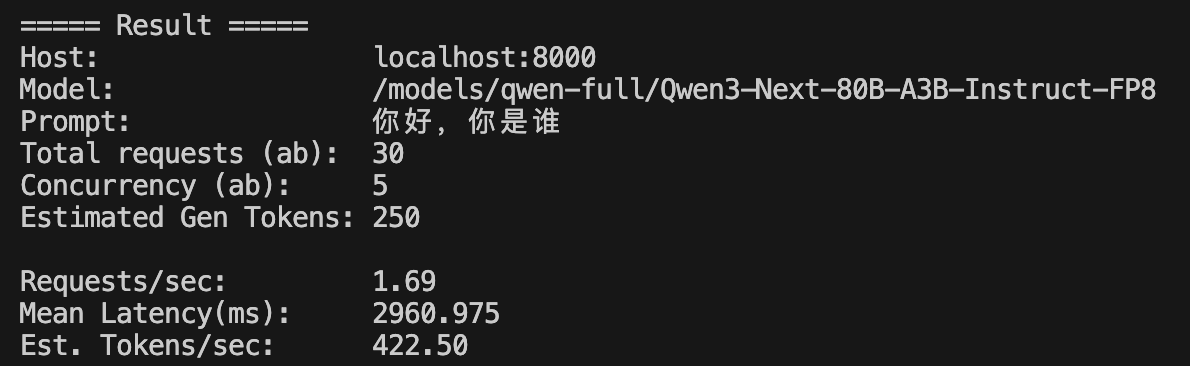
# ab_benchmark.sh
#!/usr/bin/env bash
set -euo pipefail

usage() {
  cat <<EOF
Usage: $0 -h <host:port> -m <model> -p <prompt> -g <gen_tokens> -n <total_requests> -c <concurrency>

Required:
  -h  Host:Port of vLLM server (e.g., 127.0.0.1:8000)
  -m  Model identifier (as you use in request)
  -p  Prompt text (e.g., "你好,你是谁?")
  -g  Expected generated token count (integer)
  -n  Total number of requests for ab
  -c  Concurrency for ab

Example:
  $0 -h 127.0.0.1:8000 -m "/models/qwen-full/Qwen3-Next-80B-A3B-Instruct-FP8" \
    -p "你好,你是谁" -g 128 -n 100 -c 5
EOF
  exit 1
}

HOST=""
MODEL=""
PROMPT=""
GEN_TOKENS=""
TOTAL_REQ=""
CONCURRENCY=""

while getopts "h:m:p:g:n:c:" opt; do
  case $opt in
    h) HOST="$OPTARG";;
    m) MODEL="$OPTARG";;
    p) PROMPT="$OPTARG";;
    g) GEN_TOKENS="$OPTARG";;
    n) TOTAL_REQ="$OPTARG";;
    c) CONCURRENCY="$OPTARG";;
    *) usage;;
  esac
done

if [[ -z "$HOST" || -z "$MODEL" || -z "$PROMPT" || -z "$GEN_TOKENS" || -z "$TOTAL_REQ" || -z "$CONCURRENCY" ]]; then
  usage
fi

AB_LOG="ab_chat_${MODEL//[:\/]/_}_${TOTAL_REQ}n_${CONCURRENCY}c.log"
PAYLOAD="ab_chat_payload.json"

# Build the payload
cat > $PAYLOAD <<EOF
{
  "model": "${MODEL}",
  "messages": [
    {"role": "system", "content": "你是一个有帮助的AI助手"},
    {"role": "user", "content": "${PROMPT}"}
  ],
  "temperature": 0,
  "max_tokens": ${GEN_TOKENS}
}
EOF

echo "Running ab with payload:"
cat $PAYLOAD
echo

# Run ApacheBench
ab -n $TOTAL_REQ -c $CONCURRENCY -s 30000 \
  -T "application/json" \
  -p $PAYLOAD \
  http://${HOST}/v1/chat/completions > $AB_LOG 2>&1

echo "ab log saved to $AB_LOG"
echo

# Extract metrics
RPS=$(grep "Requests per second:" $AB_LOG | head -n1 | awk '{print $4}')
MEAN_LAT=$(grep "Time per request:" $AB_LOG | head -n1 | awk '{print $4}')
# Estimate token throughput
TPS_EST=$(echo "$RPS * $GEN_TOKENS" | bc)

echo "===== Result ====="
echo "Host:                 $HOST"
echo "Model:                $MODEL"
echo "Prompt:               $PROMPT"
echo "Total requests (ab):  $TOTAL_REQ"
echo "Concurrency (ab):     $CONCURRENCY"
echo "Estimated Gen Tokens: $GEN_TOKENS"
echo
echo "Requests/sec:         $RPS"
echo "Mean Latency(ms):     $MEAN_LAT"
echo "Est. Tokens/sec:      $TPS_EST"
echo
# 启动方法
./ab_benchmark.sh \
-h localhost:8000 \
-m "/models/qwen-full/Qwen3-Next-80B-A3B-Instruct-FP8" \
-p "你好,你是谁" \
-g 250 \
-n 30 \
-c 5日常工作会碰到众多文字汇报,如周报、事故贴、分析报告等。本质是填充内容到制式文档中
联想场景:
看效果,我们的内部任务看板是TB,需要总结上周某板块的内容,按照格式进行总结、归纳
输出markdown格式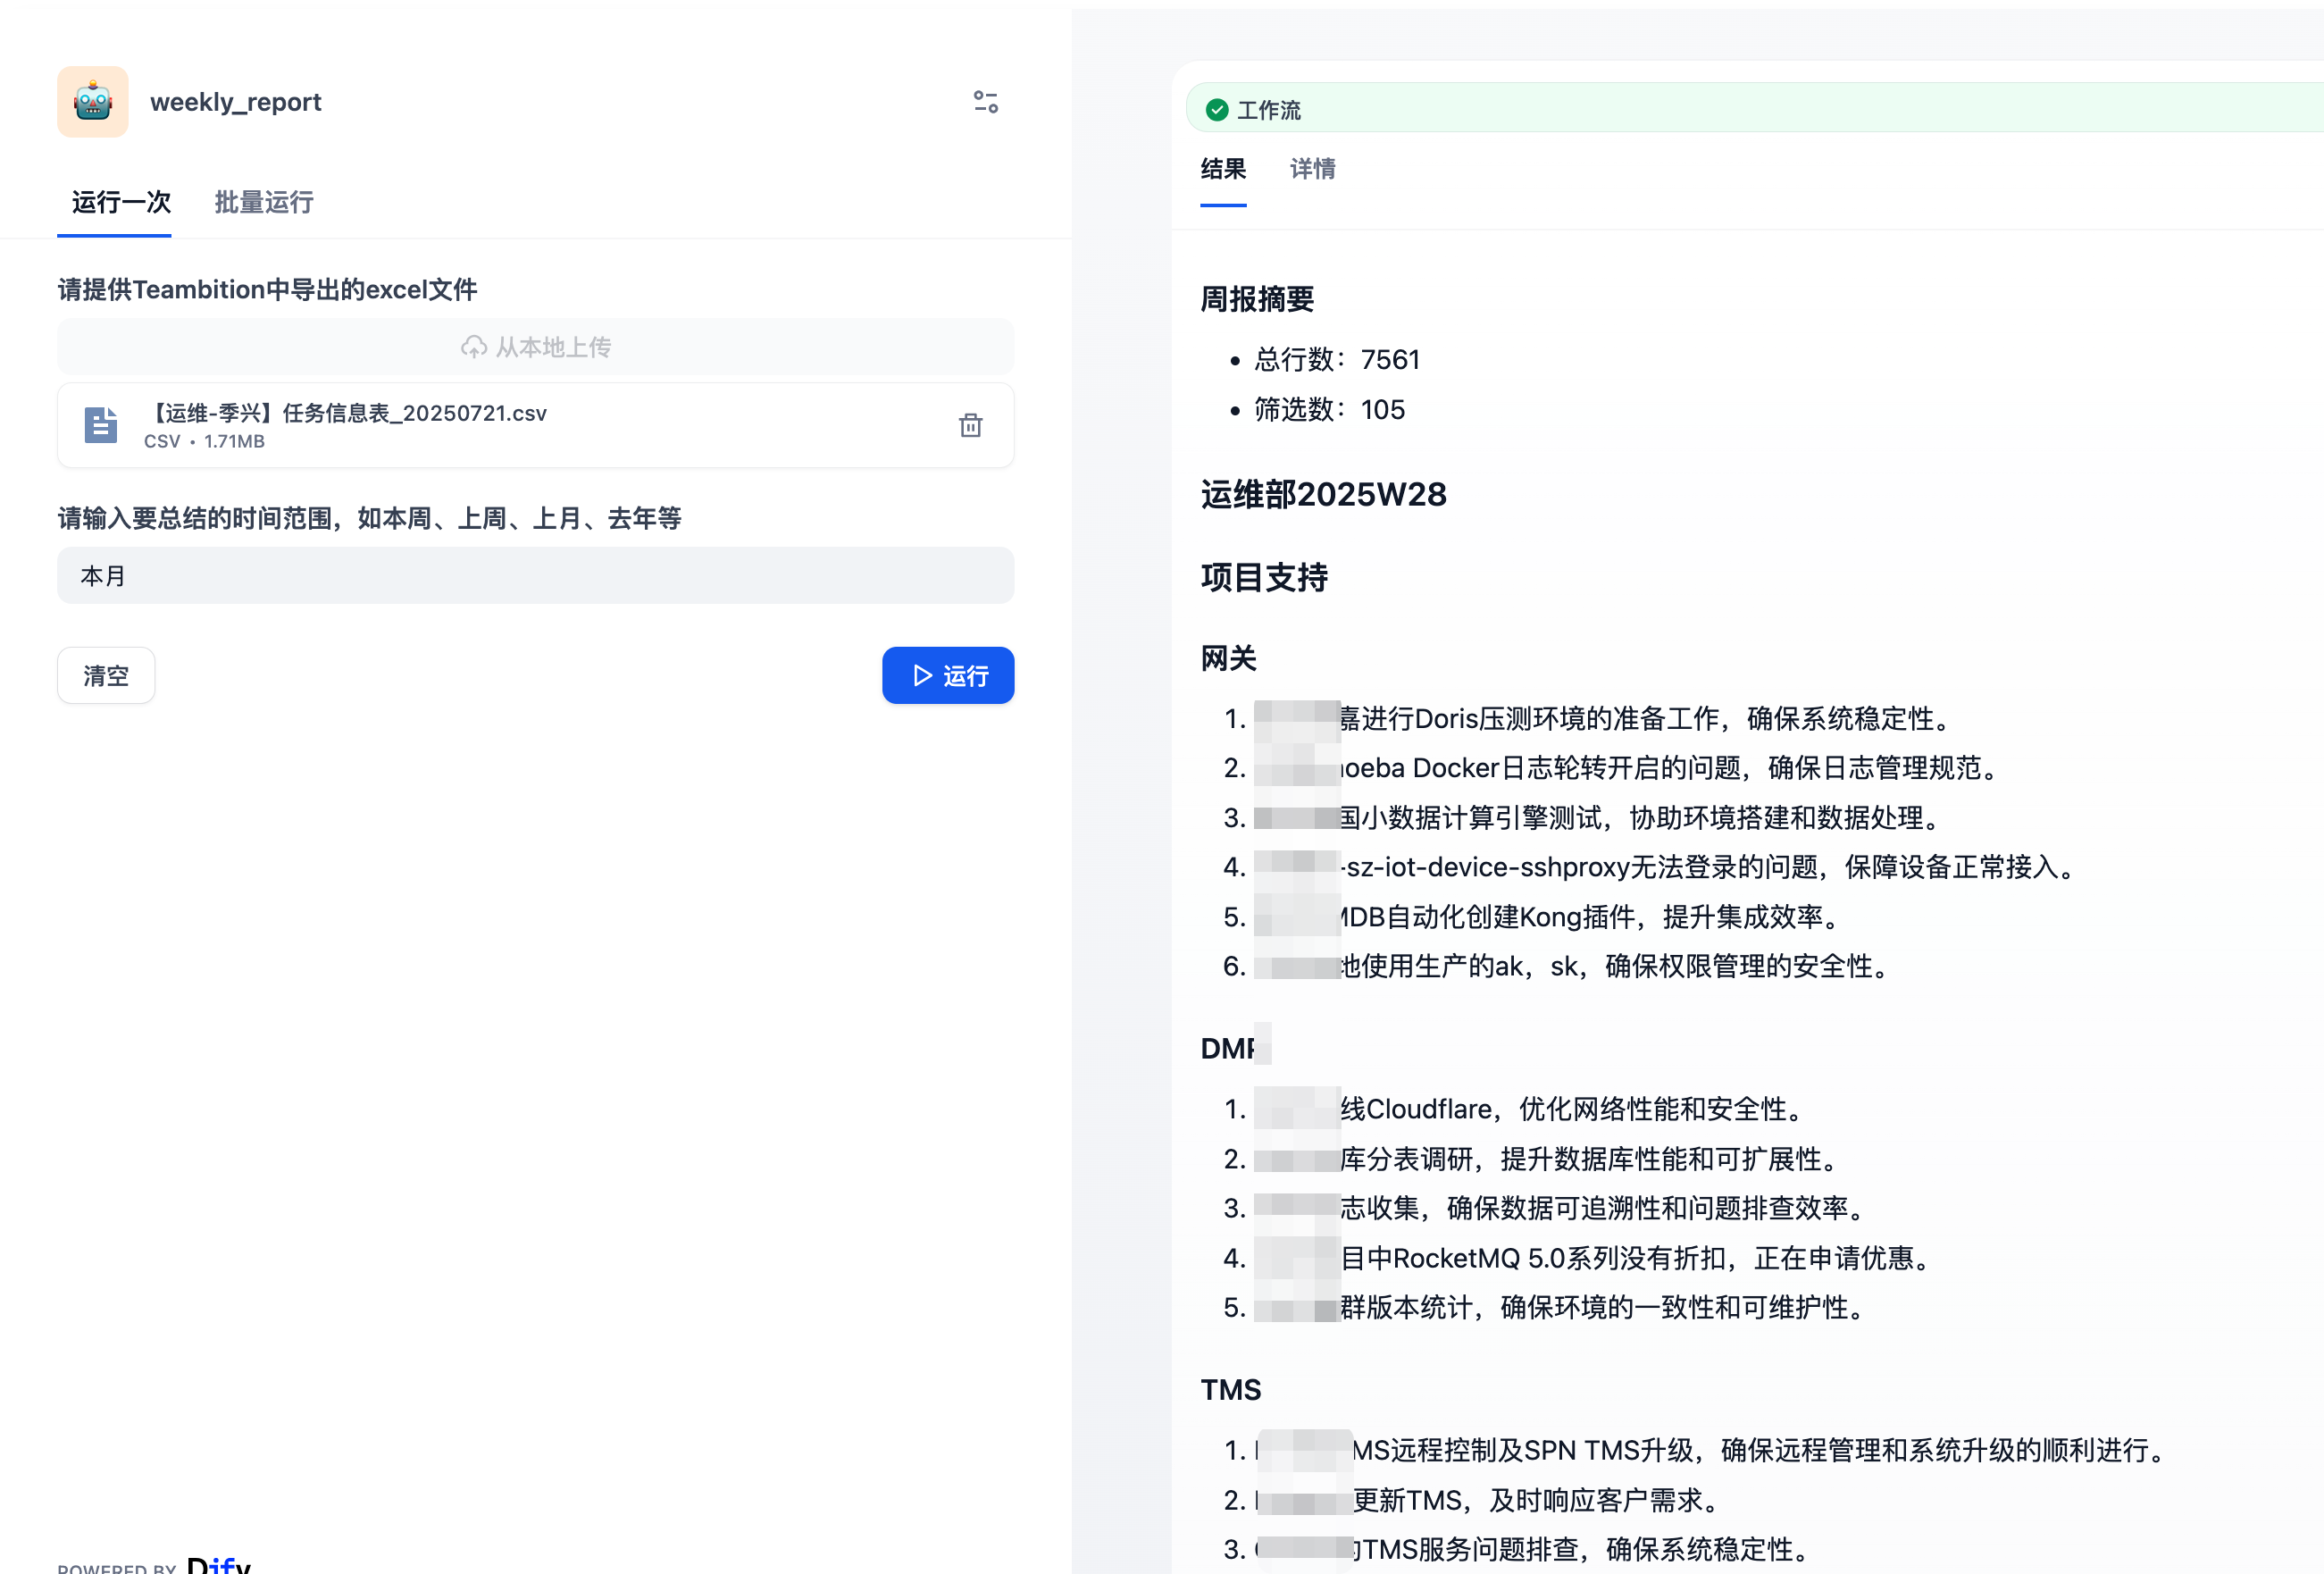
输出docx文件,可下载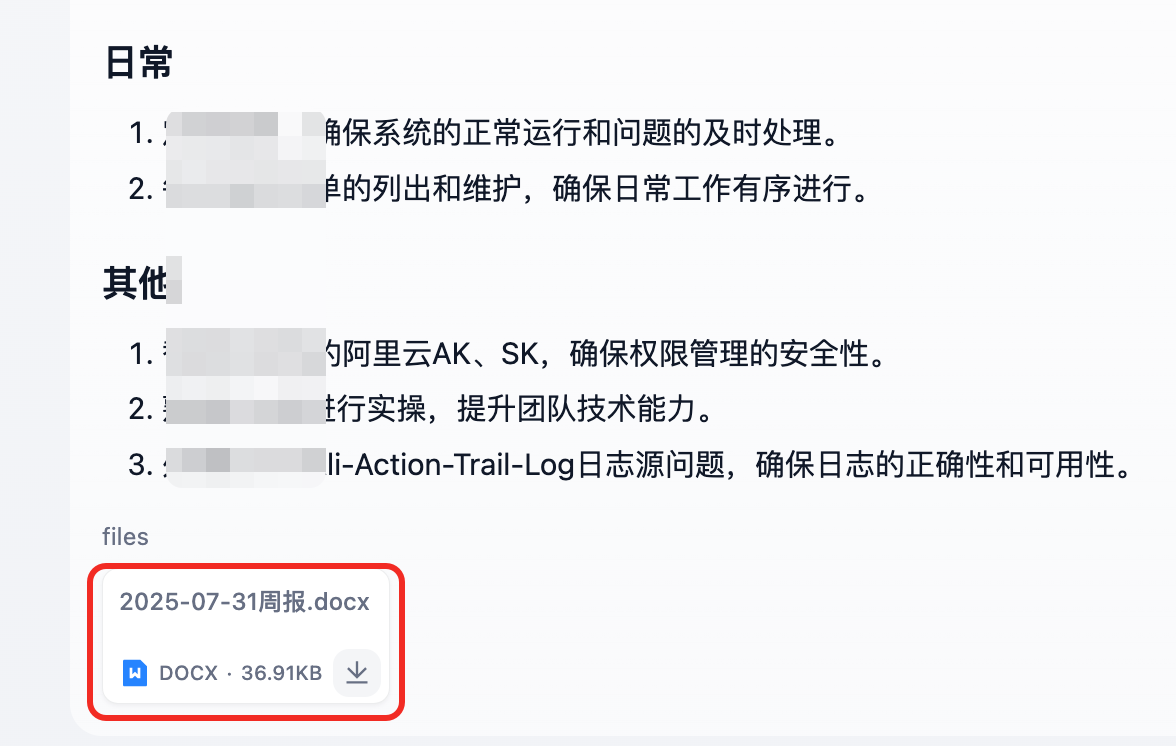
流程图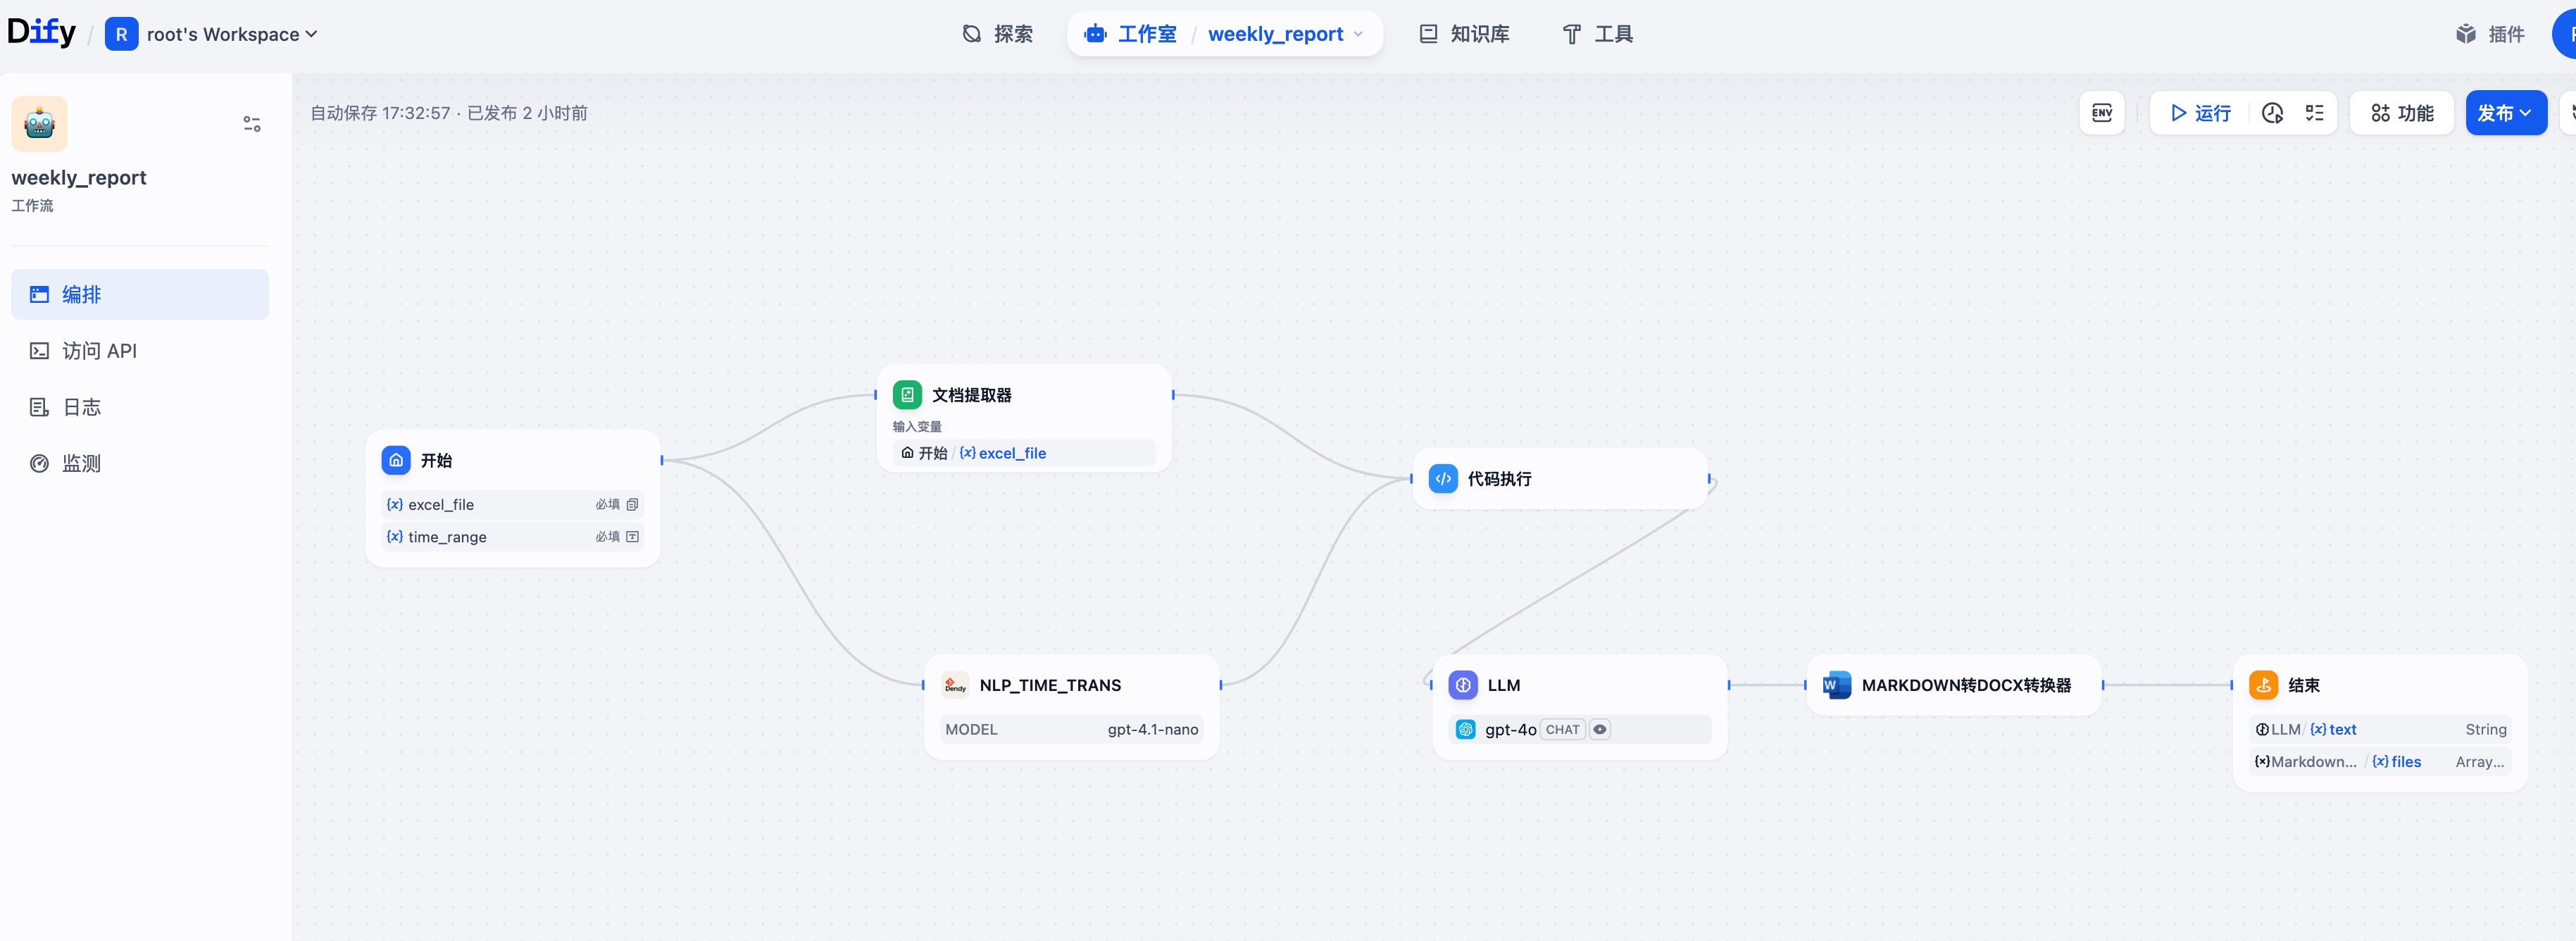
关键步骤
# 代码执行环节
def main(start_date: str, end_date: str, text: list) -> dict:
    import csv, io, json
    from datetime import datetime

    # 连接文本行
    content = "\n".join(text)
    reader = csv.DictReader(io.StringIO(content), delimiter='|')

    sd = datetime.strptime(start_date, "%Y-%m-%d").date()
    ed = datetime.strptime(end_date,   "%Y-%m-%d").date()

    total_rows = 0
    filtered = []

    for row in reader:
        total_rows += 1

        # 清洗字段名可能含空格
        ct_raw = row.get("创建时间") or row.get(" 创建时间 ") or ""
        ct_raw = ct_raw.strip()
        if not ct_raw:
            continue

        # 解析多种时间格式
        ct = None
        for fmt in ("%Y/%m/%d %H:%M", "%Y-%m-%d %H:%M",
                    "%Y/%m/%d %H:%M:%S", "%Y-%m-%d %H:%M:%S"):
            try:
                ct = datetime.strptime(ct_raw, fmt)
                break
            except:
                pass
        if not ct:
            continue

        # 筛选时间范围
        if sd <= ct.date() <= ed:
            filtered.append(row)

    output = {
        "total_rows": total_rows,
        "total_filtered": len(filtered),
        "filtered": filtered
    }

    return {"result": json.dumps(output, ensure_ascii=False)}


# LLM提示词
下面有一段 JSON 输出,变量名为{{#1753088011989.result#}},结构如下:
- total_rows:原始行数
- total_filtered:符合时间范围的记录总数
- filtered:数组,每个元素是一行解析后的字典,包含列字段

请直接生成一段markdown格式周报:
1. 将每一行的标题、备注进行总结,稍微扩展,保证总体意思清晰不啰嗦,放在下方的分类中(项目支持、TMS、成本、日常、其他);
2. 序号、条理清晰。

示例输出格式:

## 周报摘要
- 总行数:...
- 筛选数:...

# 运维部2025W28

# 项目支持

## 网关

*   复用已有的云效maven仓库,当前规则
*   开发过程涉及基础设置,无费用新增。可复用,比如已有的云效xxx仓库
*   “绕圈”,不建议。如堡垒机、监控等,流量走一遍阿里云出境再到AWS
*   有费用产生,自行搞定。特殊情况再讨论
*   参与周五AWS workshop,明确需求是,网关团队注意兜底措施,最关键数据库跨云、跨区域、跨账号备份。**厂商答复支持**,待业务稳定后增加

## DMP
*   rocketmq5.0原价使用一年(4.0版本xxx折),申请折扣中,尝试追索些代金券
*   MSE升级完成,未发现异常
*   AU开源版nacos已接入ops平台
*   kubernetes版本加白,列为技改待办。风险、收益详见文档 。集群承载应用,连接基础设施。和程序框架类似,谨慎升级
# TMS
# 成本
# 日常
# 其他
写技术文档一直是挺花时间,也挺头疼的一项任务。更头疼的是还要配图!
先看效果(推荐手机端观看,可放大):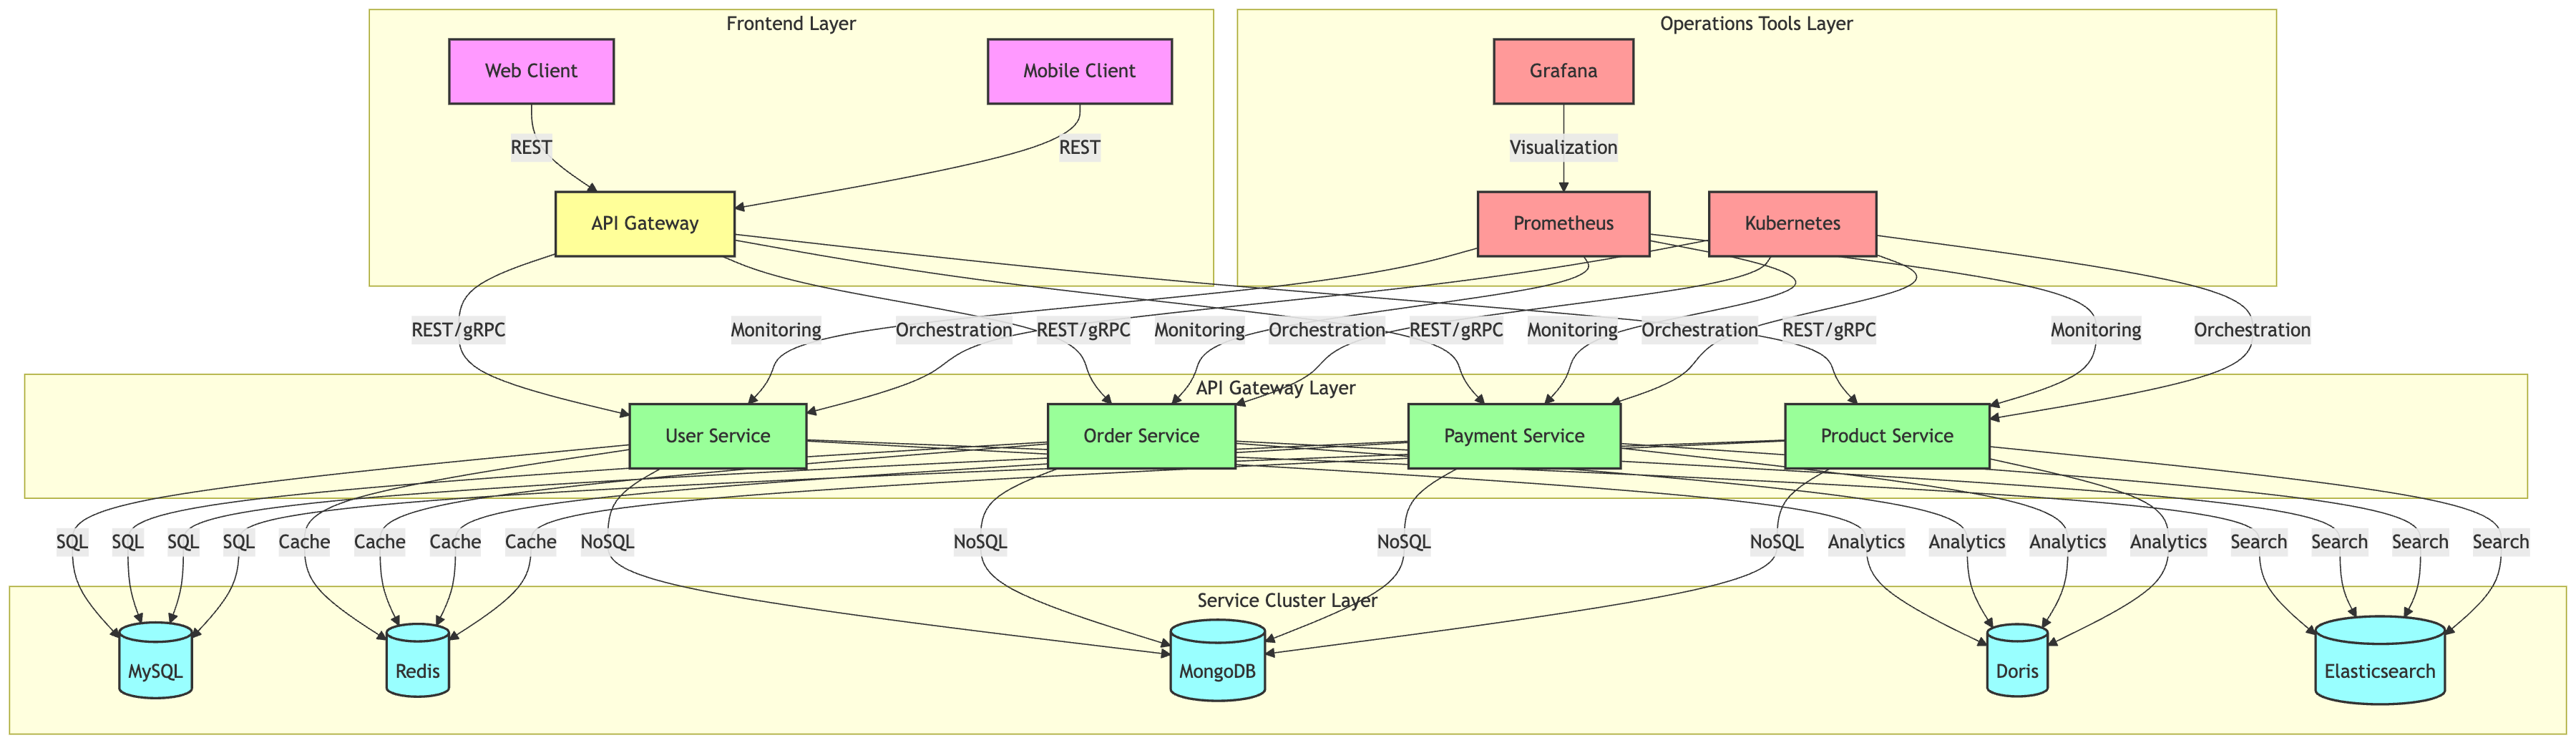
画的还是有模有样,看步骤
cursor或chatbox添加mermaid MCP
MCP添加方式: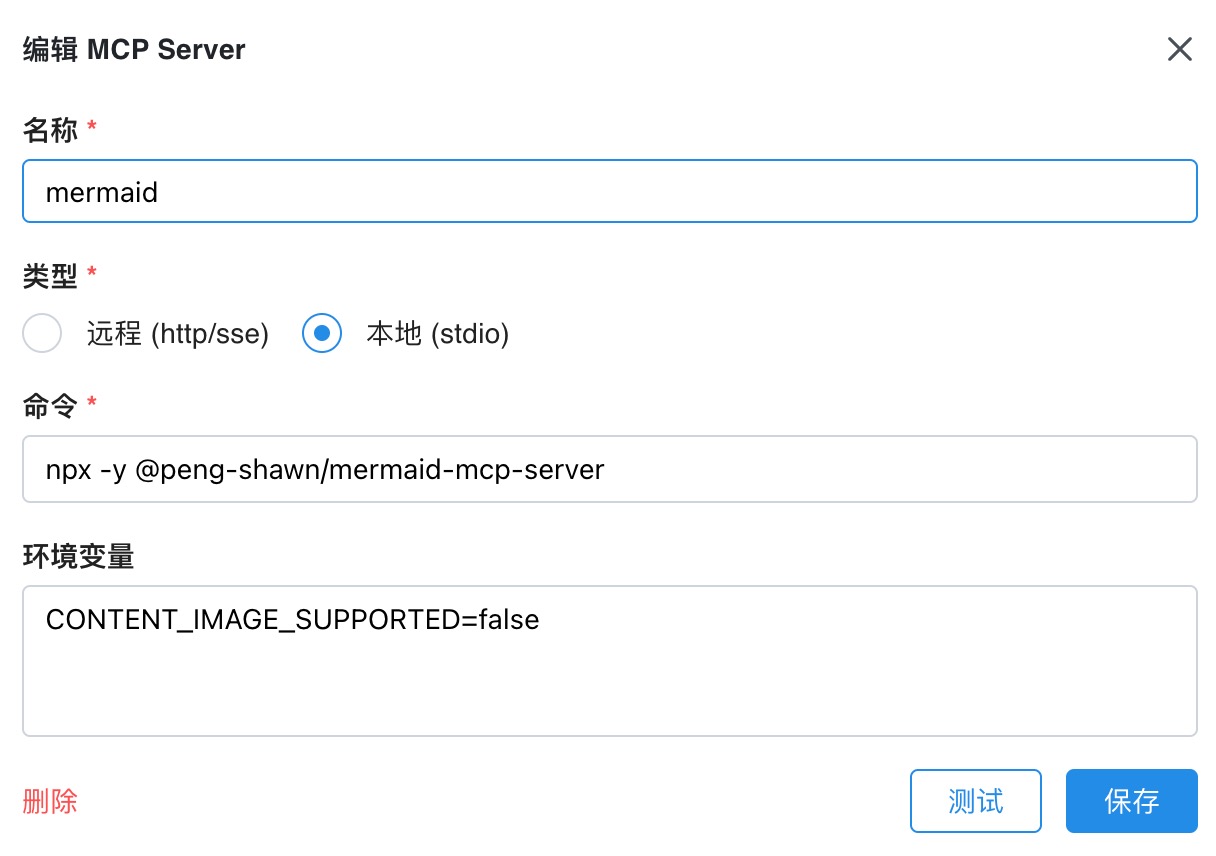
**提示词:**
生成一个微服务架构图,包含以下组件:
1.前端层:Web客户端、移动客户端
2.API网关层:负责请求路由和统一认证
3.服务集群层:用户服务、订单服务、支付服务、商品服务
4.数据层:MySQL数据库、Redis缓存、MongoDB、Doris、Elasticsearch搜索引擎
5.运维工具层:Prometheus监控、Grafana展示、Kubernetes容器编排

要求如下:

1.使用分层结构展示组件
2.标注各组件之间的通信协议(如REST、gRPC、tcp等)
3.使用不同颜色区分服务类型(如客户端、网关、服务、存储、运维)
4.图中内容必须使用英文
5.使用上下结构,保持图形为长方形
图像保存路径为:/Users/jixing/Downloads/在deepseek-r1:32b较大尺寸模型下,4090单卡可提供3QPS,单问题4.4秒内完成响应。 对于个人,几十人小团队够用。
优点:
缺陷:
服务器硬件配置:
ab -n 1000 -c 10 -s 30000 -T "application/json" -p payload.json -v 4 http://1.1.1.1:11434/v1/completions > ab_detailed_log01.txt 2>&1- **请求总数**:1000
- **并发数**:逐渐升高
- **超时设置**:30秒(`-s 30000`)
- **请求类型**:POST,传送JSON格式的负载
 {
  "model": "deepseek-r1:32b",
  "prompt": "你好,你是谁?"
}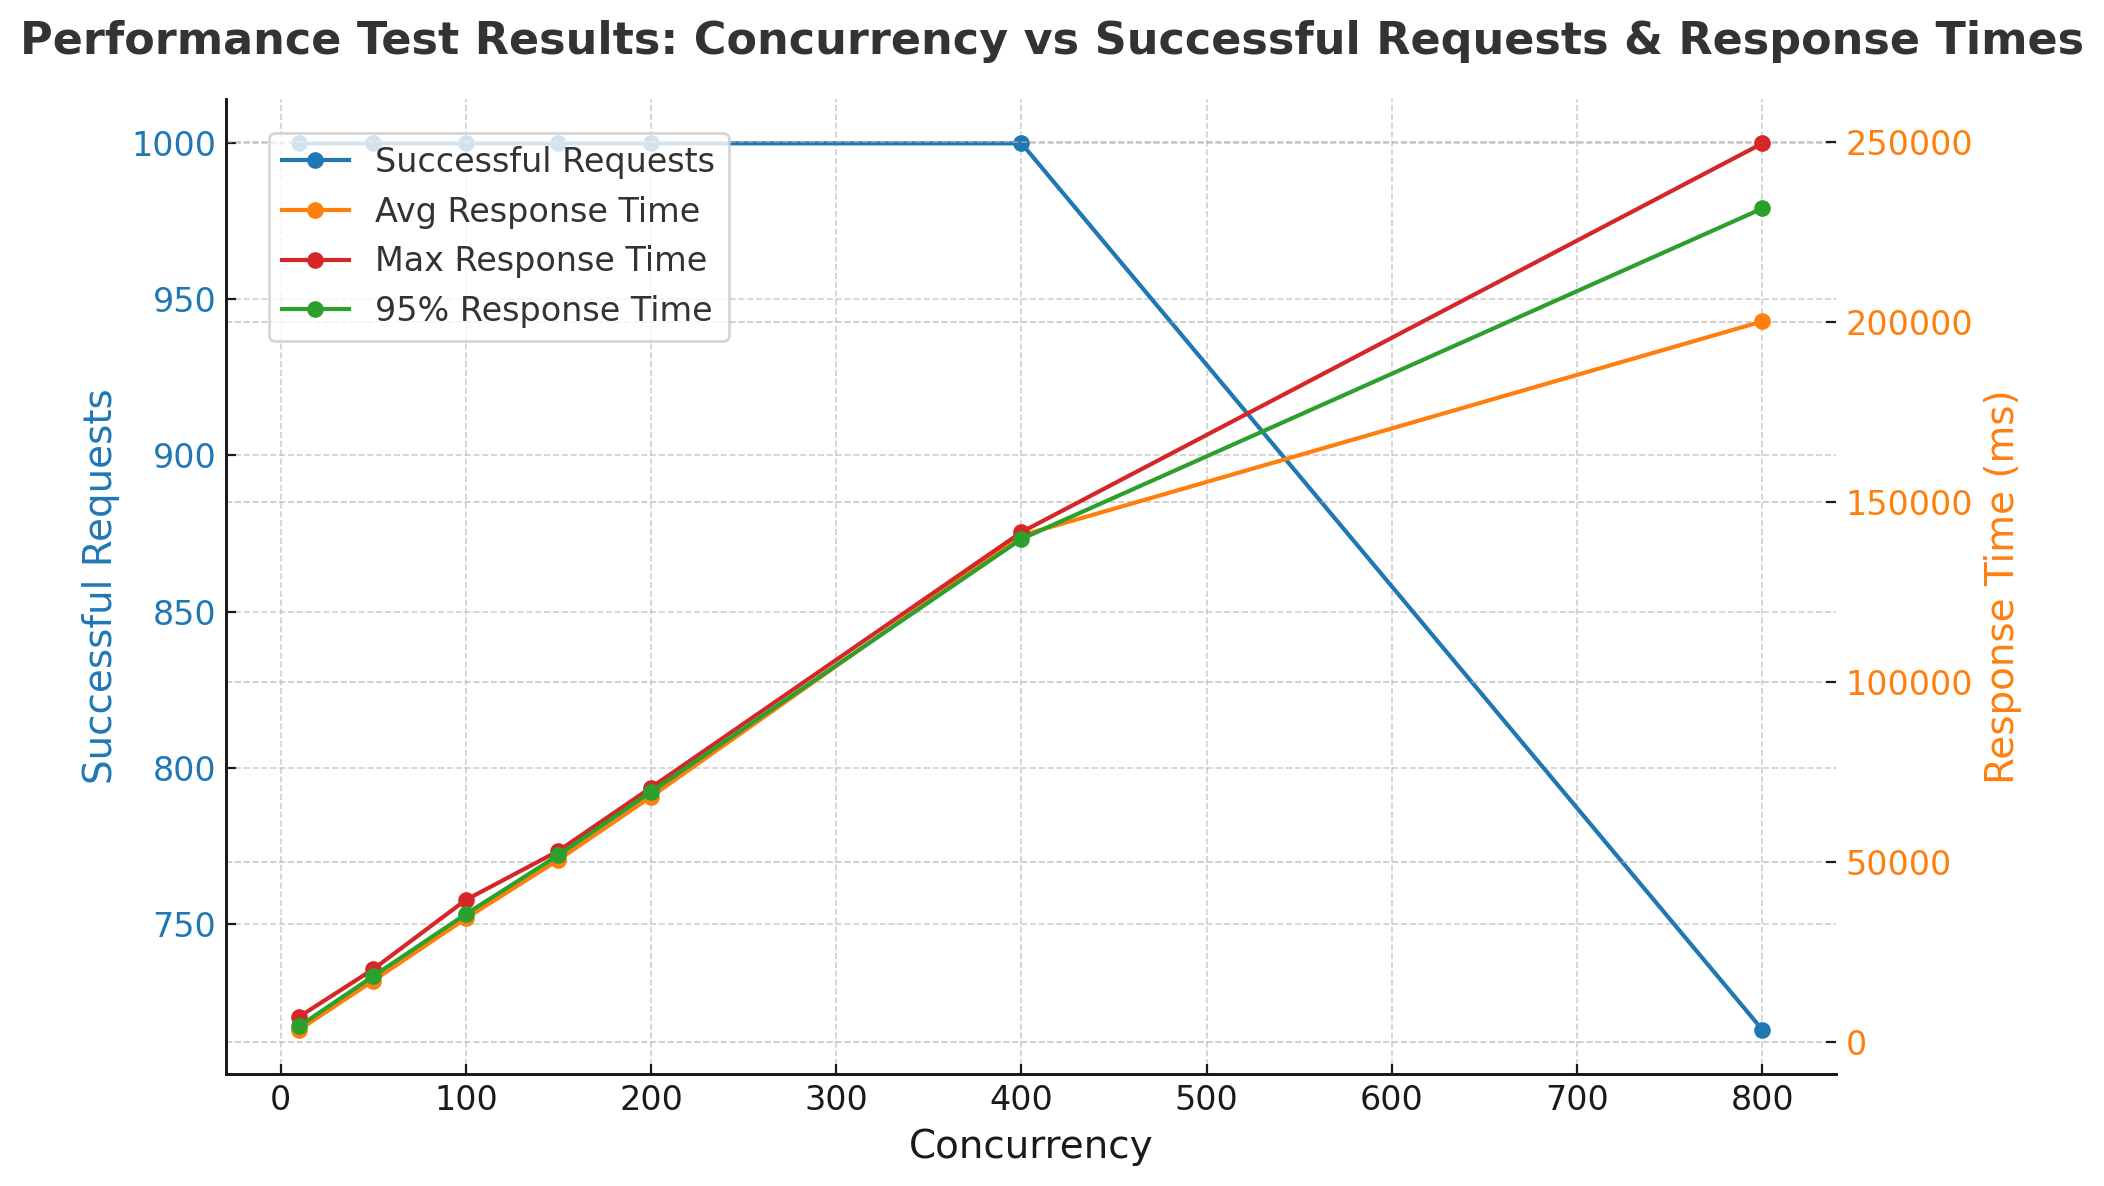
| 并发数 | 总请求时间(秒) | 成功请求数 | 失败请求数 | 吞吐量 (请求/秒) | 平均响应时间 (毫秒) | 最大响应时间 (毫秒) | 95% 响应时间 (毫秒) |
|---|---|---|---|---|---|---|---|
| 10 | 344.899 | 1000 | 0 | 2.90 | 3448.99 | 7073 | 4424 |
| 50 | 341.55 | 1000 | 0 | 2.93 | 17077.494 | 20274 | 18333 |
| 100 | 343.880 | 1000 | 0 | 2.91 | 34387.977 | 39523 | 35580 |
| 150 | 337.687 | 1000 | 0 | 2.96 | 50653.032 | 53134 | 51942 |
| 200 | 340.978 | 1000 | 0 | 2.93 | 68195.508 | 70733 | 69537 |
| 400 | 351.865 | 1000 | 0 | 2.84 | 140746.048 | 141672 | 139774 |
| 800 | 250.261 | 716 | 284 | 4 | 200208.529 | 249642 | 231555 |
本地部署DeepSeek-Coder-V2-Lite-Instruct:14b。要求基础的高可用、监控、安全能力。ollama默认只能使用第一张显卡,多个模型同时调用会有bug(ollama ps显示100GPU,但使用CPU推理);无法高可用
多GPU Ollama部署方案,通过系统服务化+负载均衡实现4块4090显卡的并行利用,边缘使用nginx负载均衡。
服务器硬件配置:
# 备份ollama
cd /etc/systemd/system/
mv ollama.service ollama.service.bak

# 创建4个独立服务文件(每个GPU对应一个端口)
for i in {0..3}; do
sudo tee /etc/systemd/system/ollama-gpu${i}.service > /dev/null <<EOF
[Unit]
Description=Ollama Service (GPU $i)

[Service]
# 关键参数配置
Environment="CUDA_VISIBLE_DEVICES=$i"
Environment="OLLAMA_HOST=0.0.0.0:$((11434+i))"
ExecStart=/usr/local/bin/ollama serve

Restart=always
User=ollama
Group=ollama

[Install]
WantedBy=multi-user.target
EOF
done


# 重载服务配置
sudo systemctl daemon-reload

# 启动所有GPU实例
sudo systemctl start ollama-gpu{0..3}.service

# 设置开机自启
sudo systemctl enable ollama-gpu{0..3}.service
nginx 需要编译额外模块,用于健康检查
root@sunmax-AIGC-01:/etc/systemd/system# nginx -V
nginx version: nginx/1.24.0
built by gcc 9.4.0 (Ubuntu 9.4.0-1ubuntu1~20.04.2)
built with OpenSSL 1.1.1f  31 Mar 2020
TLS SNI support enabled
configure arguments: --with-http_ssl_module --add-module=./nginx_upstream_check_module
# /etc/nginx/sites-available/mga.maxiot-inc.com.conf

# 在http块中添加(如果放在server外请确保在http上下文中)
log_format detailed '$remote_addr - $remote_user [$time_local] '
                    '"$request" $status $body_bytes_sent '
                    '"$http_referer" "$http_user_agent" '
                    'RT=$request_time URT=$upstream_response_time '
                    'Host=$host Proto=$server_protocol '
                    'Header={\"X-Forwarded-For\": \"$proxy_add_x_forwarded_for\", '
                    '\"X-Real-IP\": \"$remote_addr\", '
                    '\"User-Agent\": \"$http_user_agent\", '
                    '\"Content-Type\": \"$content_type\"} '
                    'SSL=$ssl_protocol/$ssl_cipher '
                    'Upstream=$upstream_addr '
                    'Request_Length=$request_length '
                    'Request_Method=$request_method '
                    'Server_Name=$server_name '
                    'Server_Port=$server_port ';

upstream ollama_backend {
    server 127.0.0.1:11436;
    server 127.0.0.1:11437;
}

server {
    listen 443 ssl;
    server_name mga.maxiot-inc.com;

    ssl_certificate /etc/nginx/ssl/maxiot-inc.com.pem;
    ssl_certificate_key /etc/nginx/ssl/maxiot-inc.com.key;
    # 访问日志
    access_log /var/log/nginx/mga_maxiot_inc_com_access.log detailed;

    # 错误日志
    error_log /var/log/nginx/mga_maxiot_inc_com_error.log;

    # 负载均衡设置,指向 ollama_backend
    location / {
        proxy_pass http://ollama_backend;  # 会在两个服务器之间轮询
        proxy_set_header Host $host;
        proxy_set_header X-Real-IP $remote_addr;
        proxy_set_header X-Forwarded-For $proxy_add_x_forwarded_for;
        proxy_set_header X-Forwarded-Proto $scheme;
    }

}
由多个agent组成的SRE专家组,代替人工进行准确的故障分析!👽
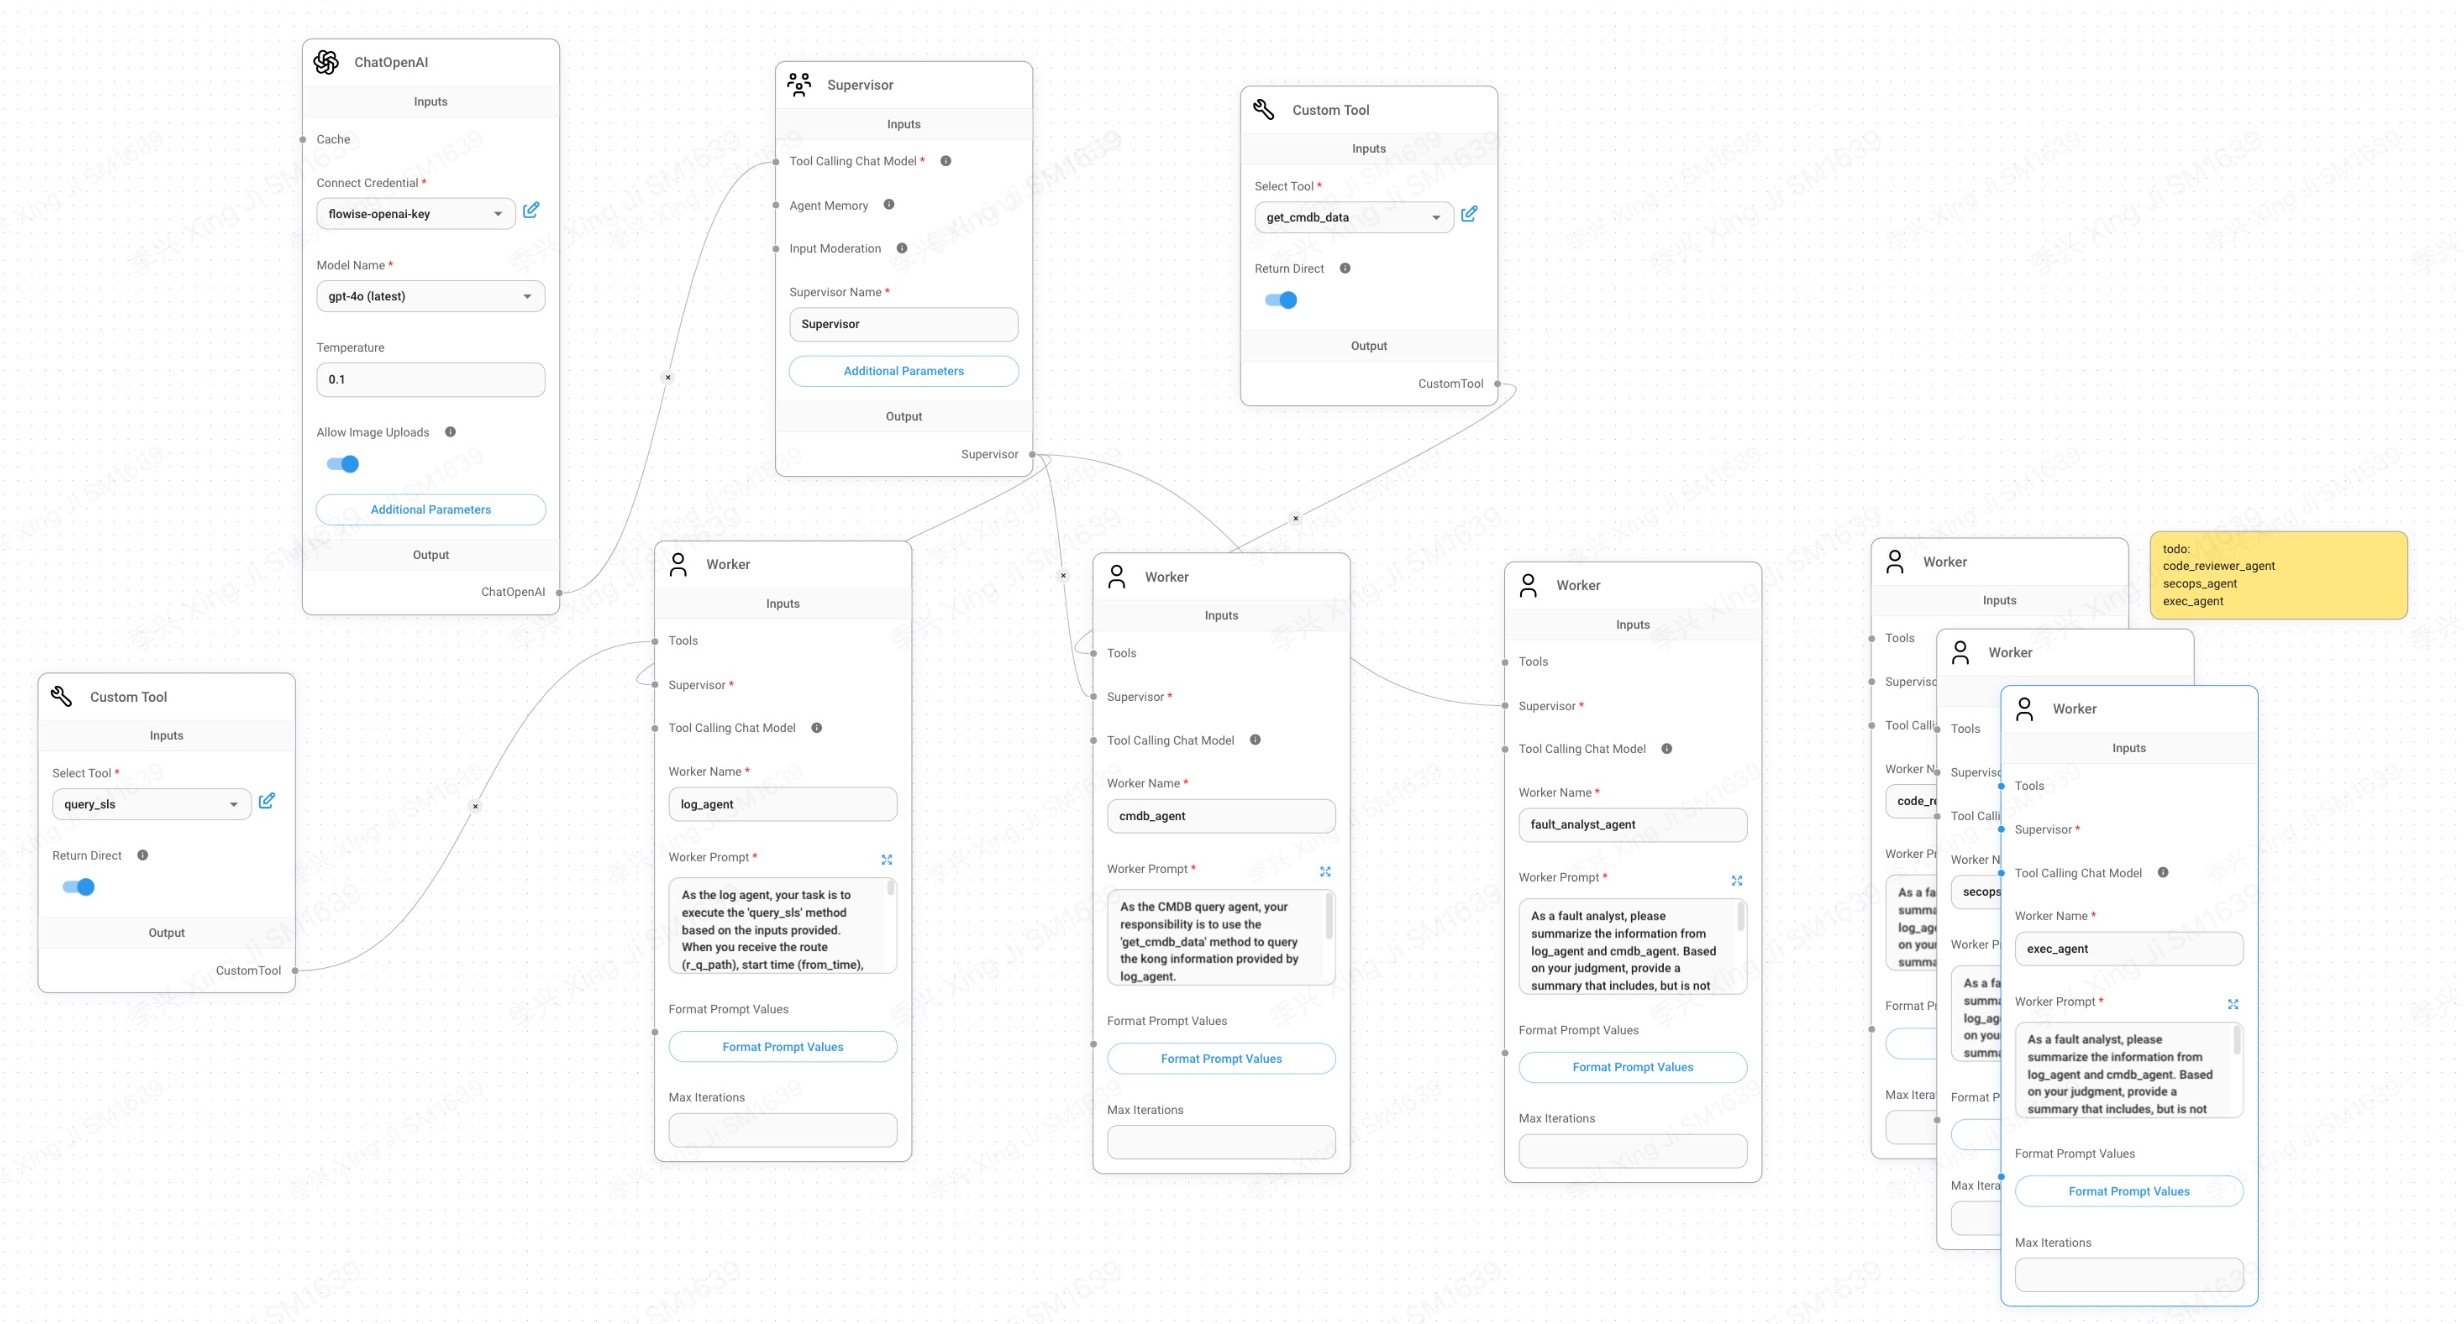
流程:从用户输入取时间范围(支持上传图片)、路由--》查询日志中心--》获取网关中cmdb信息--》查询CMDB获取更多细节(owner、变更、jenkins、gitlab信息)--》分析并给出建议:

执行效果:
图中是判断某接口504故障,从依据到结论过程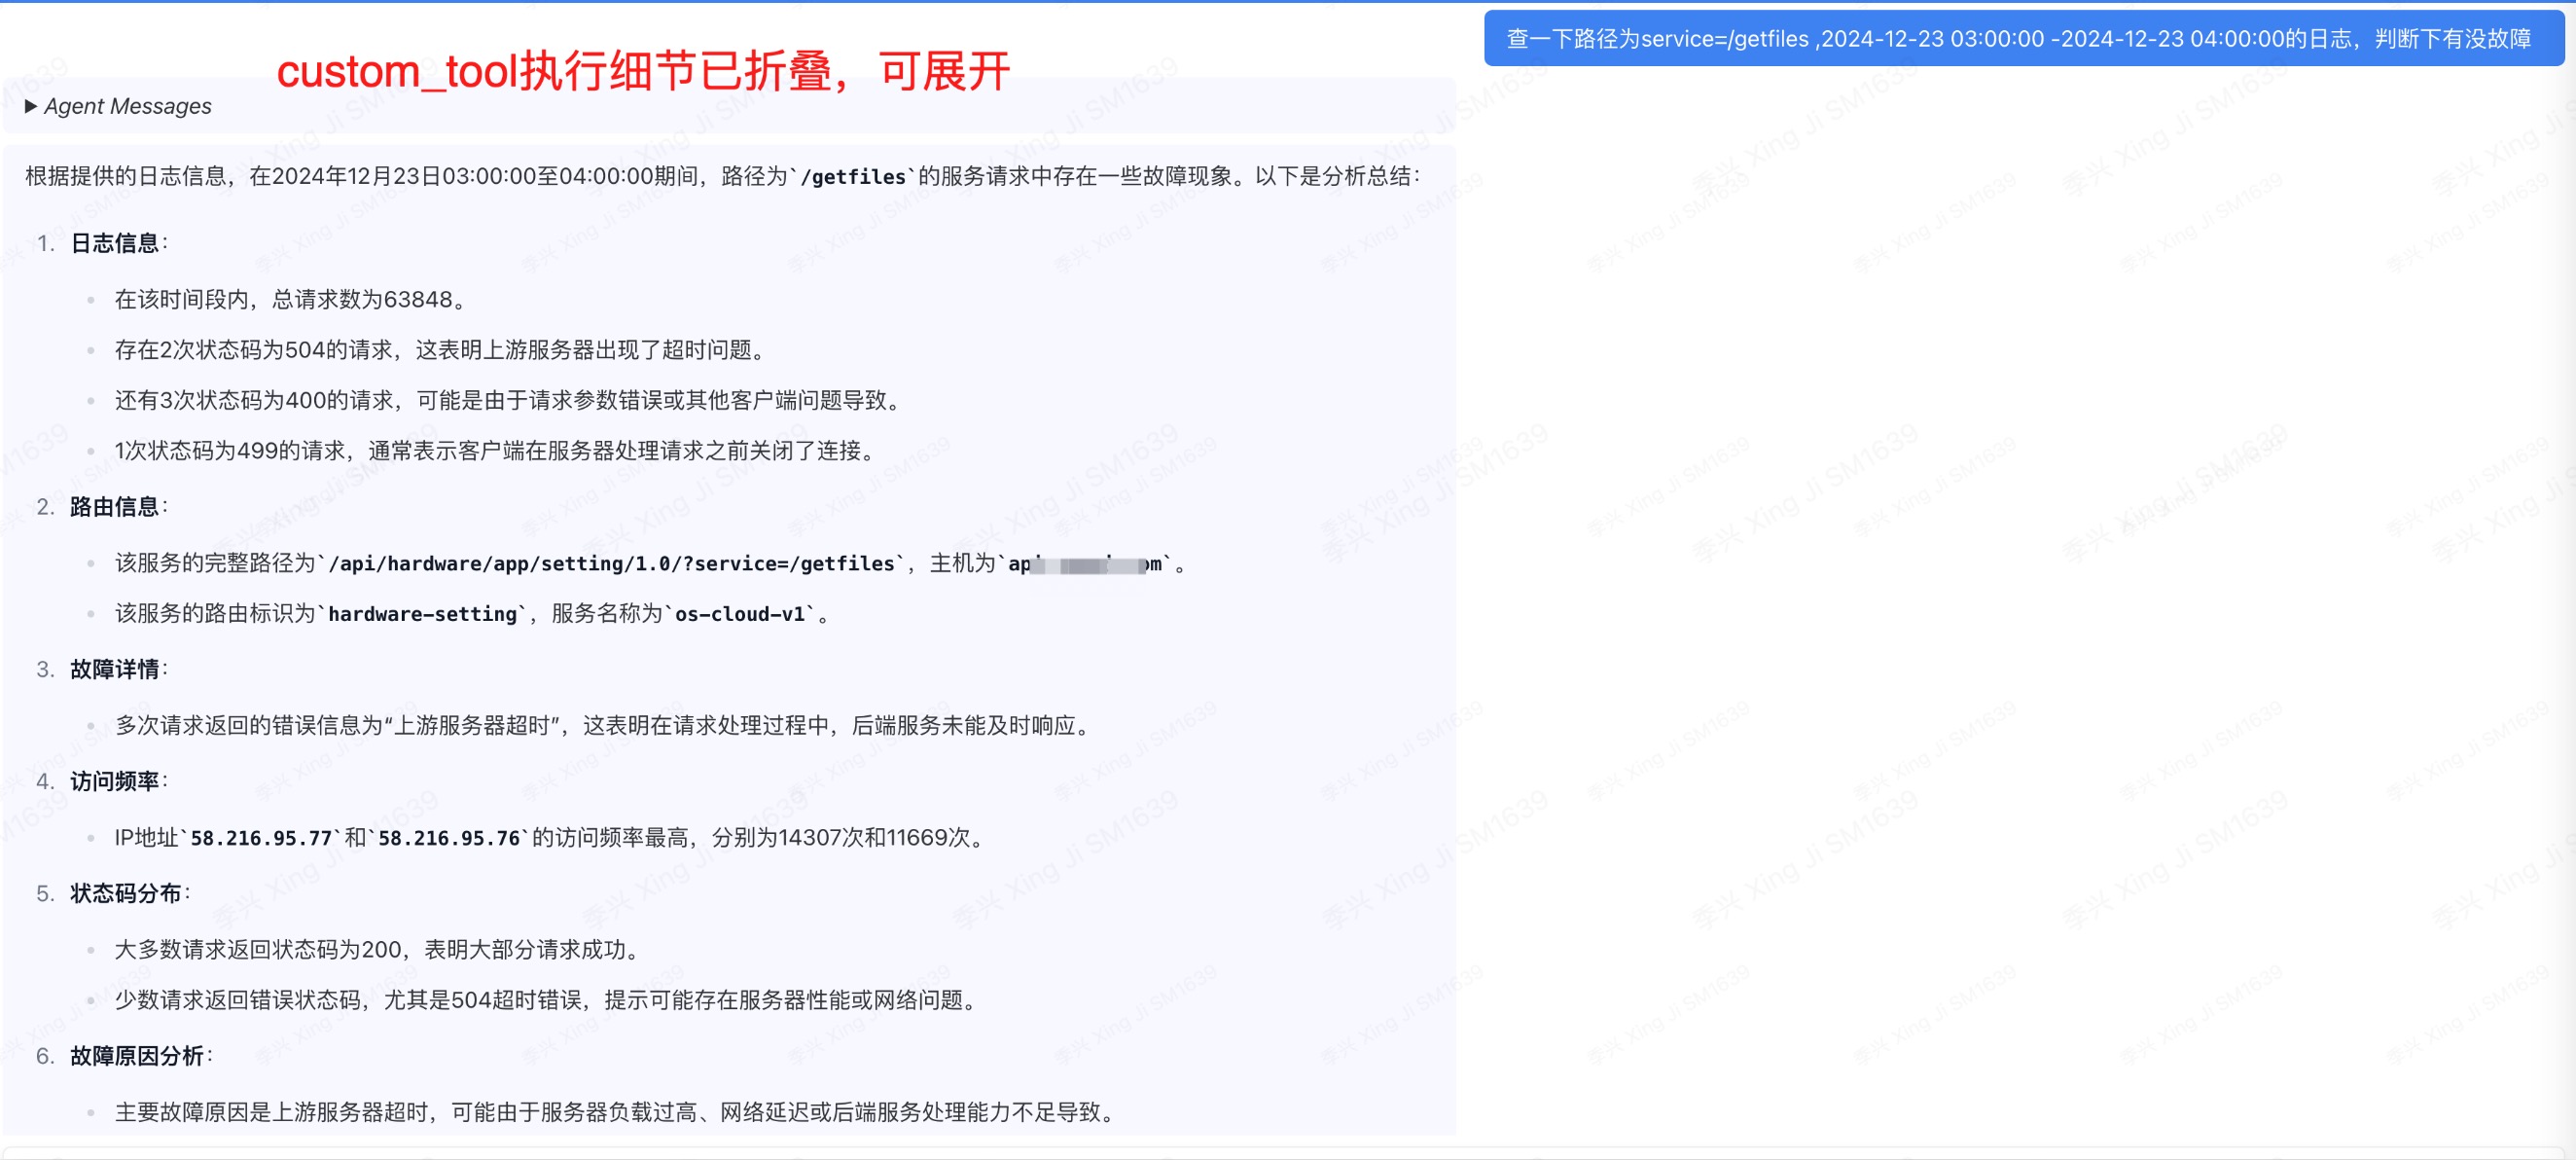
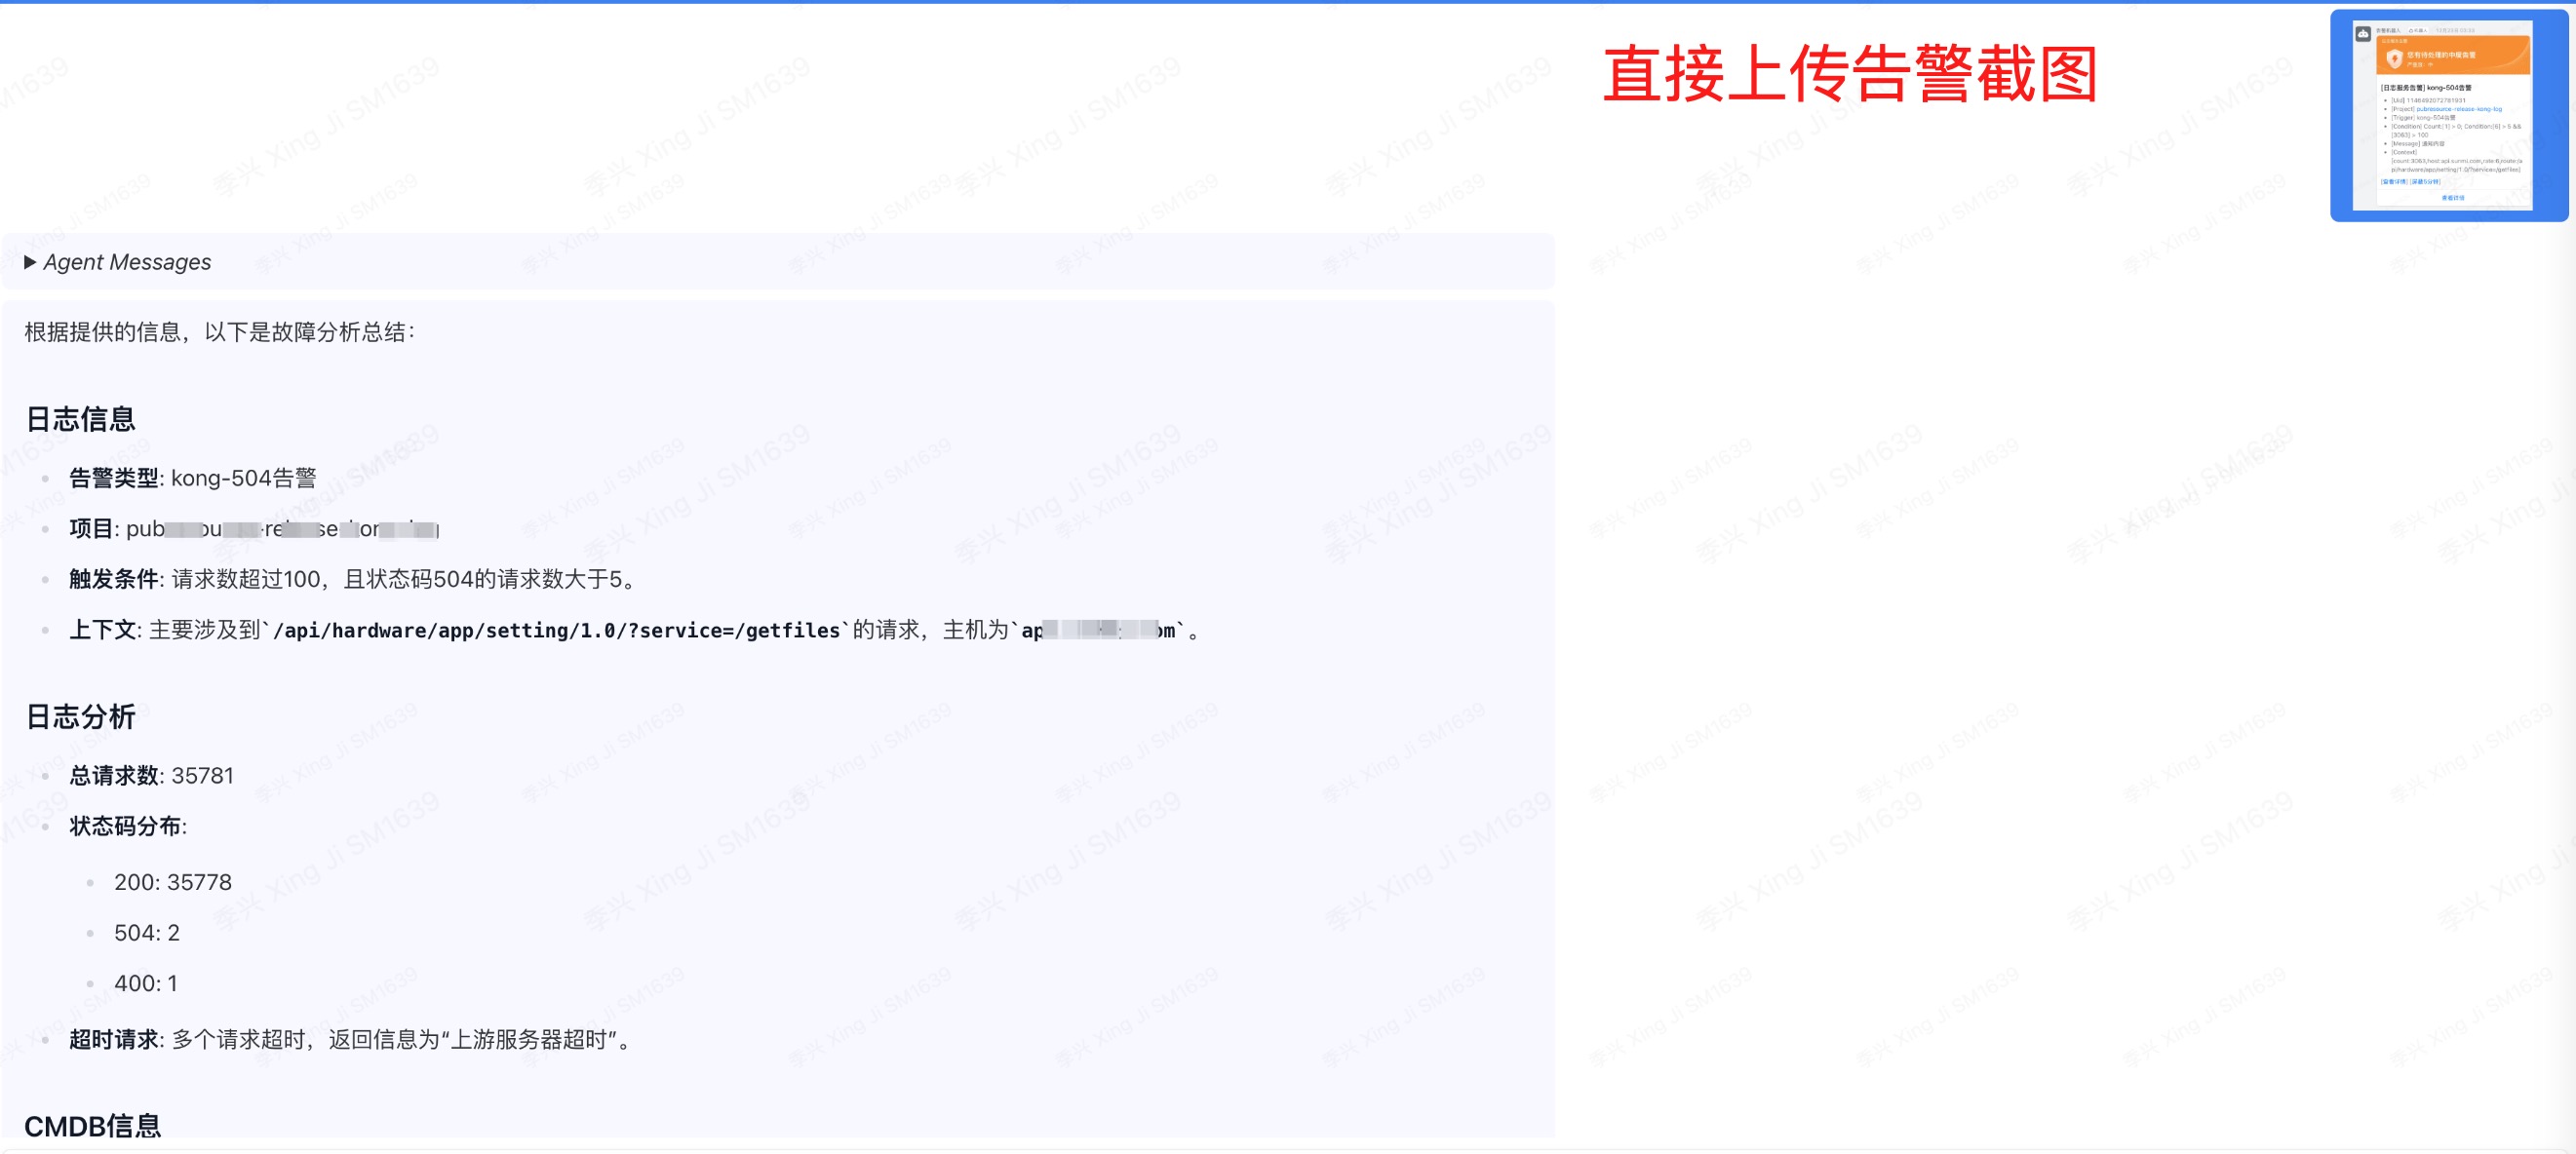
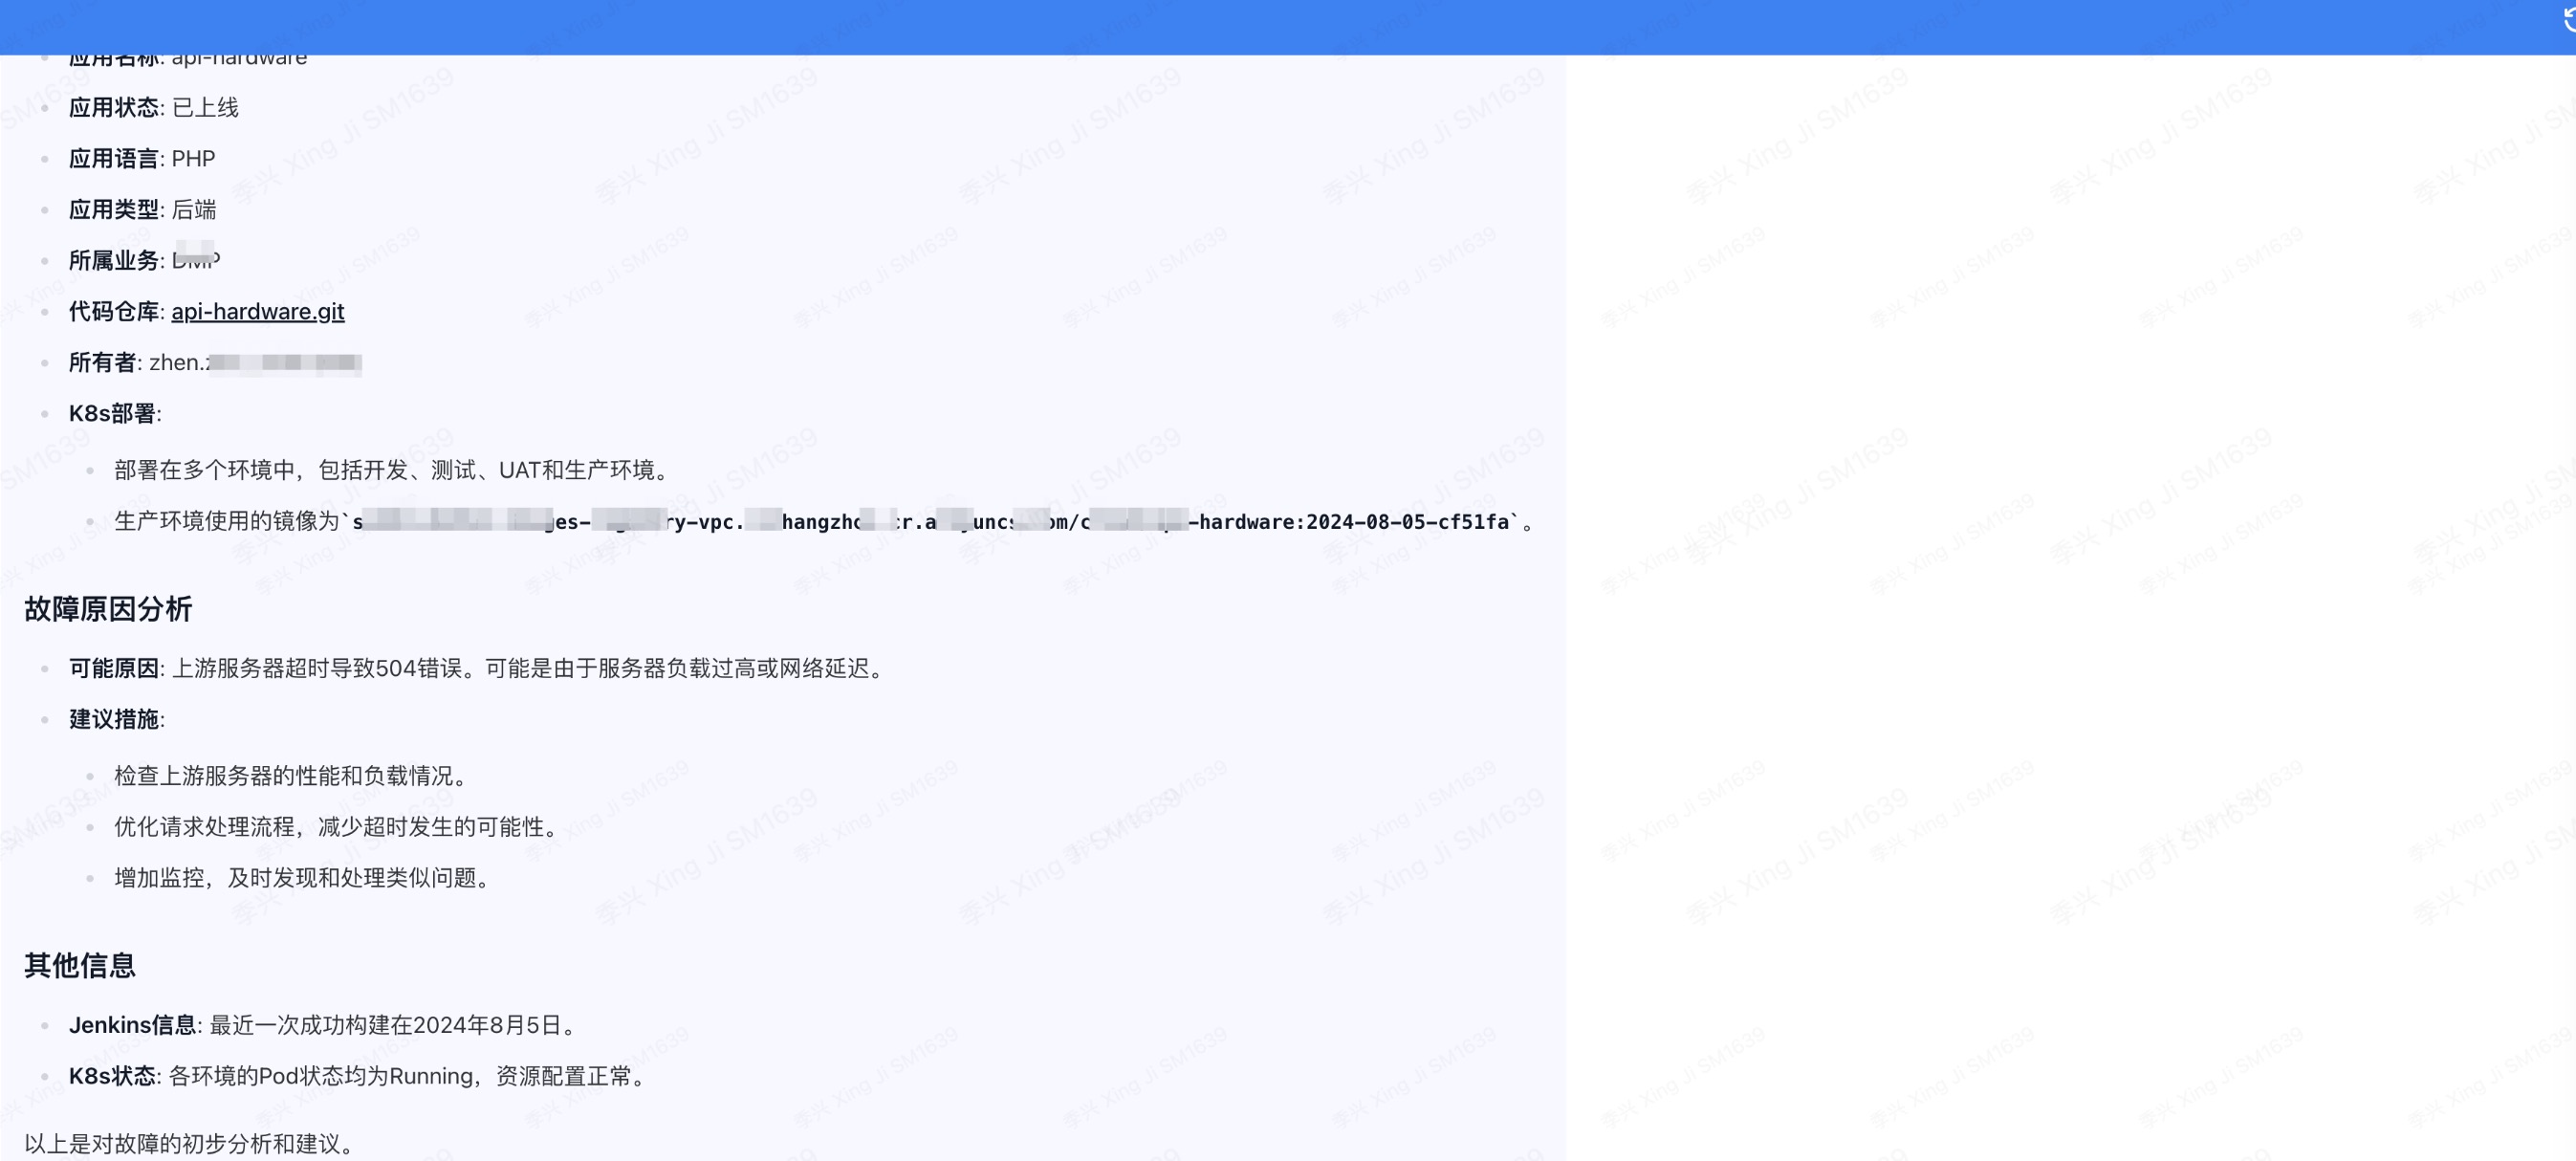
使用flowise,配置langchain中AgentFlow
创建一个具备内部运维知识,识别自然语义,准确调用各种工具执行任务,严格控制幻觉的智能运维工程师。
使用 OpenAI 的 Assistant 功能,上传知识库,设置提示词。
Prompt Engineering:
Function Call:通过 Flowise 的自定义工具
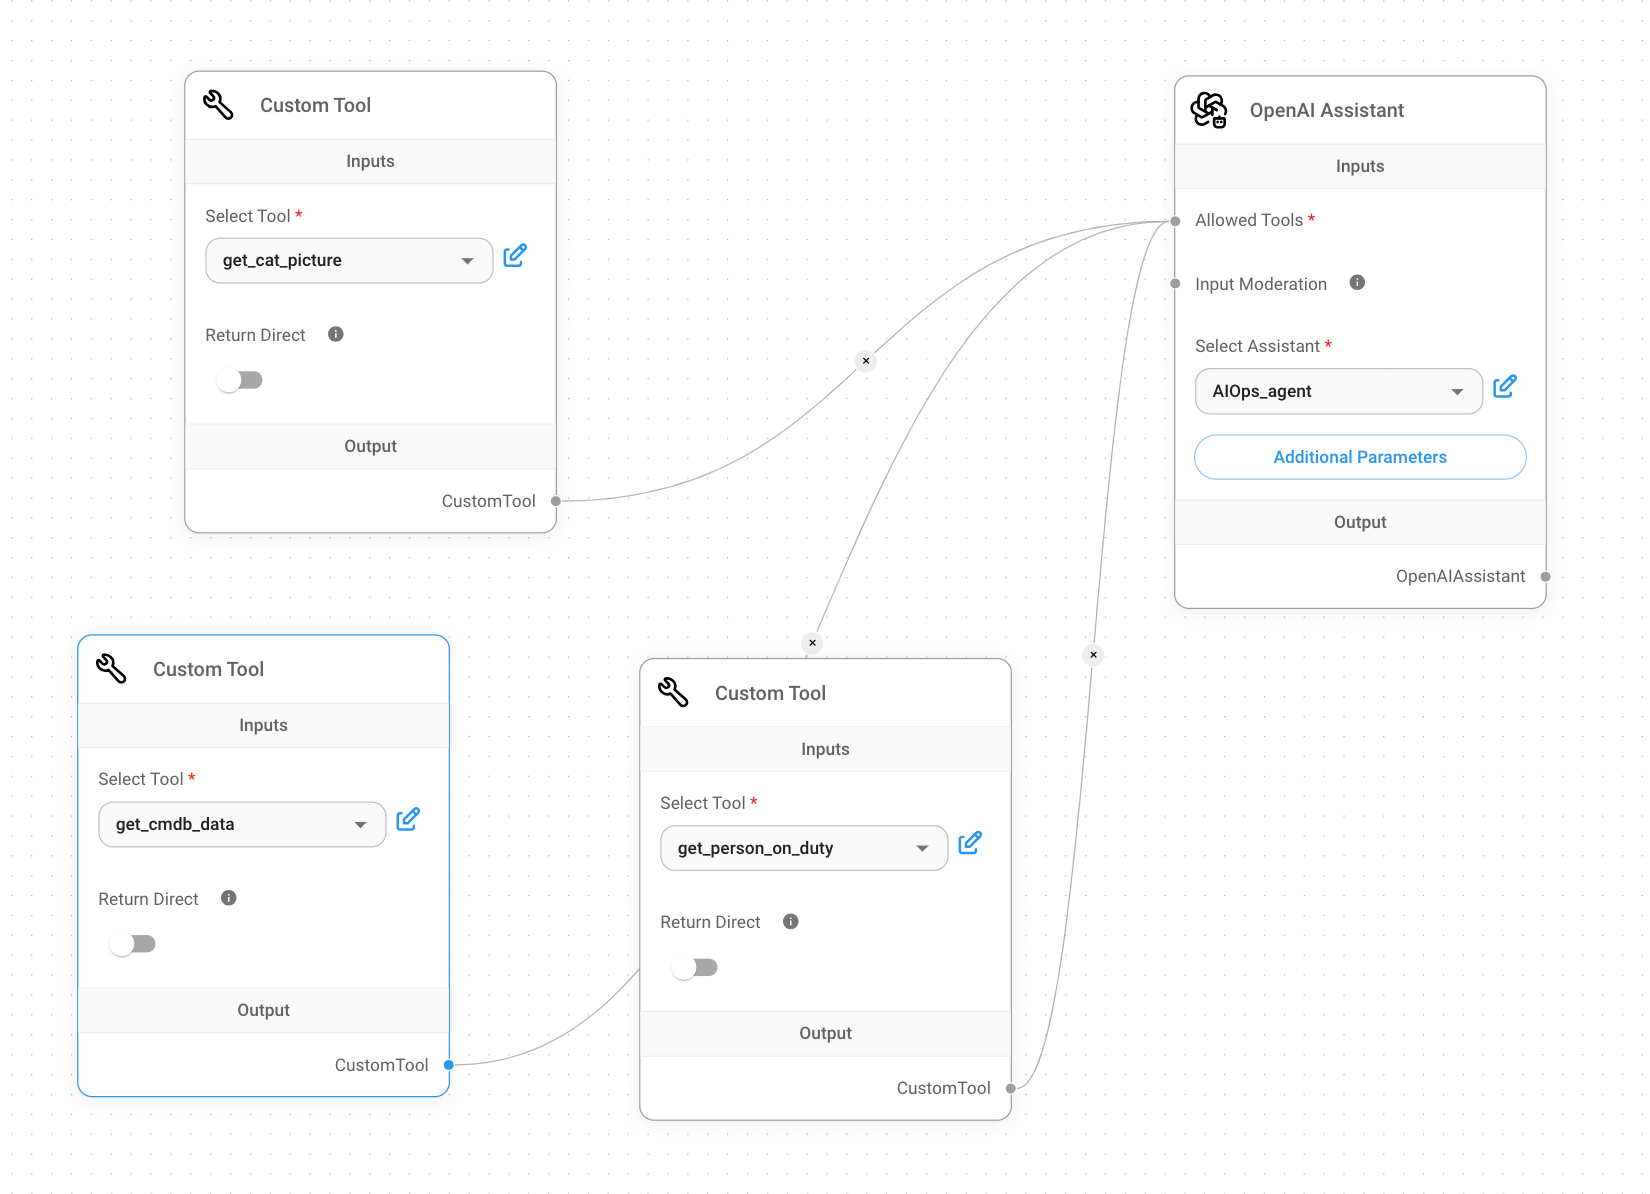
先看效果
Streamlit 界面:
LLM(大型语言模型)配置设置:
gpt-4o-2024-08-06)。ollama/llama3:latest)的配置。助手代理(AssistantAgent)和用户代理(UserProxyAgent):
AssistantAgent,负责与用户输入进行处理和响应,同时集成在 Streamlit 中以显示聊天消息。UserProxyAgent,用于接收用户输入,处理用户命令,并在助手代理与用户之间进行代理交互。实用工具函数:
get_url_info_from_kong:从 Kong API 网关中查询 URL 的路由、服务和上游配置的信息,并返回格式化结果。dns_record_status:检查给定 URL 的 DNS 记录状态。query_from_cmdb:从 CMDB(配置管理数据库)中检索特定云服务提供商(如阿里云、AWS 等)的服务器、数据库和中间件实例的数量。异步聊天系统:
asyncio),用户代理(User Proxy Agent)可以异步与助手代理(Assistant Agent)进行对话,提供更高效的交互体验。+---------------------------------------------------------------+
| Streamlit Interface |
|---------------------------------------------------------------|
| +-----------------------------------------------------------+ |
| | Sidebar (Azure Endpoint Config, etc.) | |
| +-----------------------------------------------------------+ |
| |
| +-----------------------------------------------------------+ |
| | Chat Input / Output Area | |
| | | |
| | User Input --> UserProxyAgent --> AssistantAgent | |
| | | |
| | AssistantAgent --> UserProxyAgent --> Output Display | |
| +-----------------------------------------------------------+ |
+---------------------------------------------------------------+
+--------------------+ +--------------------+
| LLM Configurations | | Utility Functions|
|--------------------| |--------------------|
| - OpenAI (GPT-4) | | - get_url_info_from|
| - Local LLM (LLaMA)| | _kong() |
+--------------------+ | (Interacts with |
| Kong API Gateway)|
| - dns_record_status|
| (Checks DNS) |
| - query_from_cmdb |
| (Interacts with |
| CMDB Database) |
+--------------------+
+-----------------+ +-------------------+
| AssistantAgent | <--- asyncio ->| UserProxyAgent |
| (Handles LLM | | (Manages User |
| Requests) | | Input/Commands) |
+-----------------+ +-------------------+
^ | ^ |
| | | |
| v | v
+----------------+ +-------------------+
| LLM Config | | Utility Functions|
| Setup (OpenAI)| | (Kong, DNS, CMDB) |
+----------------+ +-------------------+
+----------------+
| Data Flow |
|----------------|
| - User Input |
| - Assistant |
| - ProxyAgent |
| - Utility Func|
+----------------+
超越简单的 RAG 和提示词工程:
使用 Function Call 完成真实世界的任务:
集成异步交互和高效任务处理:
asyncio)实现用户代理和助手代理之间的异步通信,大幅提升了任务处理的效率和响应速度。这样的设计确保了系统能够并发处理多个任务,而不阻塞用户输入和系统响应。技术含量高,解决复杂场景问题:
get_url_info_from_kong 函数能够通过调用 Kong API,获取详细的路由、服务和插件信息,并对这些数据进行格式化处理和展示;query_from_cmdb 函数能够从 CMDB 中动态检索并整合不同云服务商的资源信息。这样的功能大大提升了系统的实际应用价值。提升企业运营效率与智能化水平:
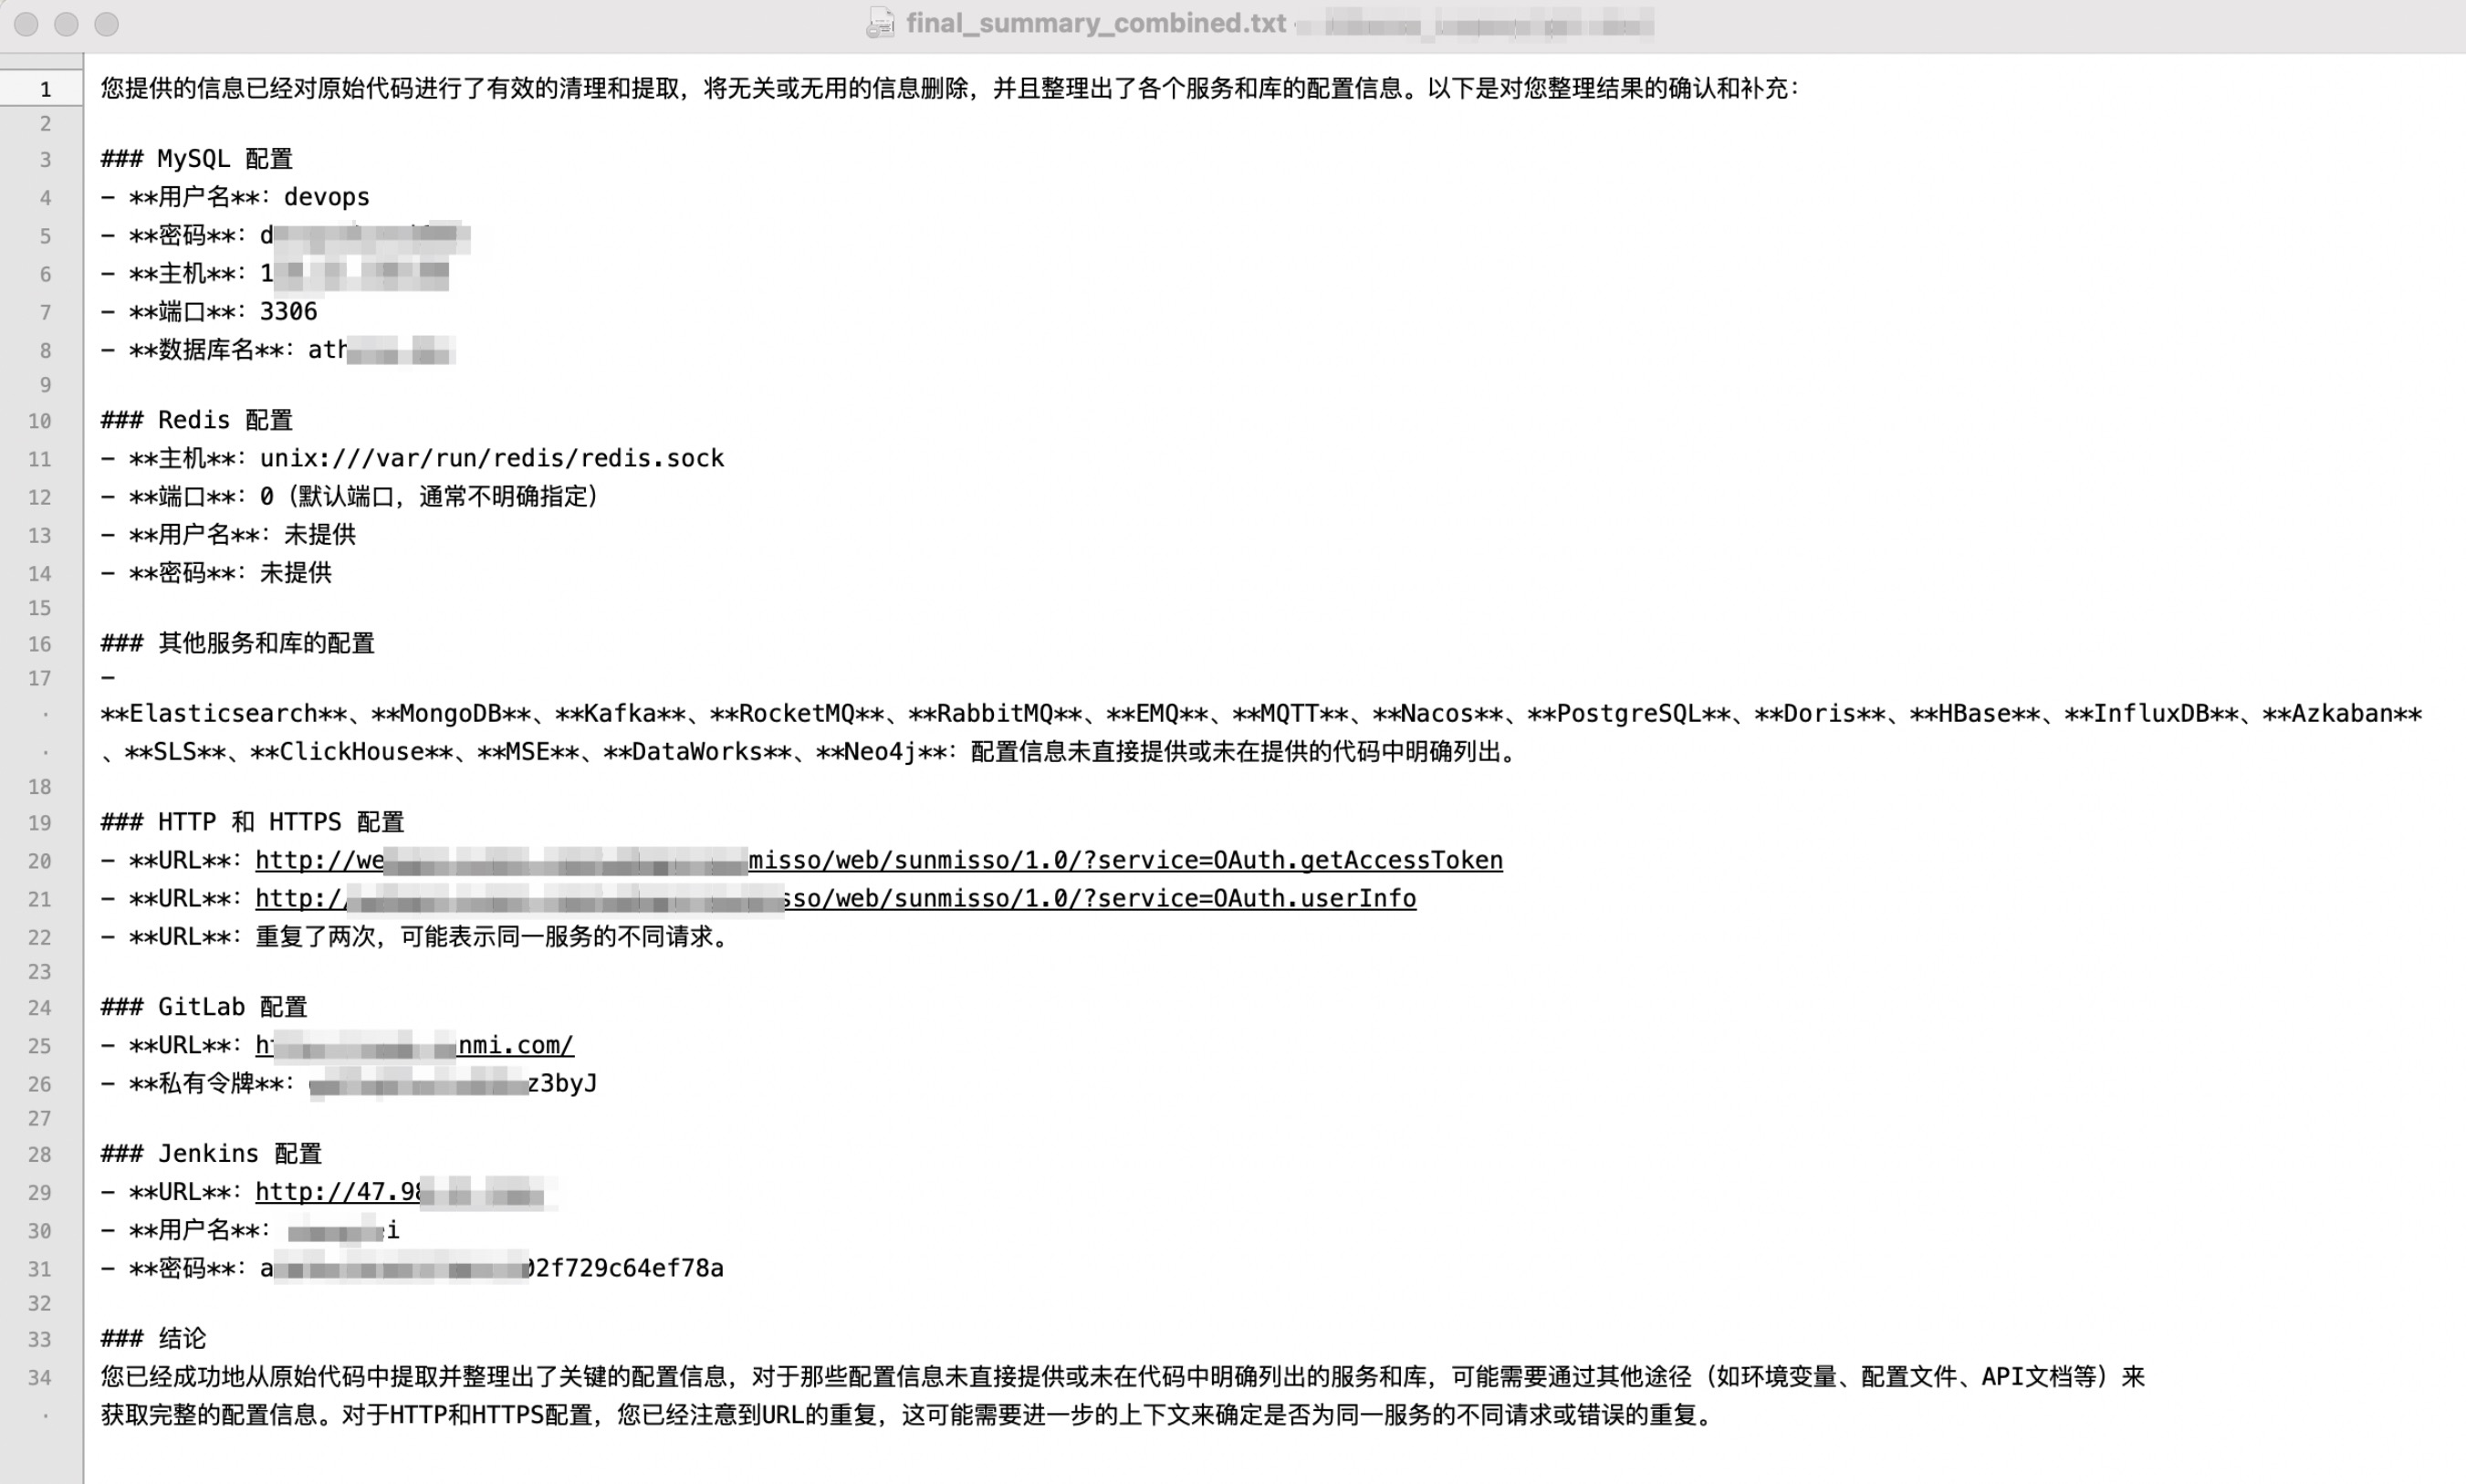
最近在整理CMDB信息,以Jenkins为中枢,统计、梳理代码仓库位置、发布位置。形成以应用为中心,串连资源、管理者。
首先需要统计代码中涉及的配置文件信息,比如Mysql/Redis/Elasticsearch/MongoDB/Kafka/RocketMQ/MQTT/Doris/HBase/InfLuxDB/http等
意义:
相较传统的正则匹配,大模型加持下有如下优点
环境介绍
#!/bin/bash

# 设置环境变量
export CUDA_VISIBLE_DEVICES=0,1

# 启动 vllm 服务器并将其转移到后台运行
nohup python3 -m vllm.entrypoints.openai.api_server \
    --model /data/vllm/Meta-Llama-3.1-8B-Instruct \
    --served-model-name llama \
    --tensor-parallel-size 2 \
    --trust-remote-code > llama.log 2>&1 &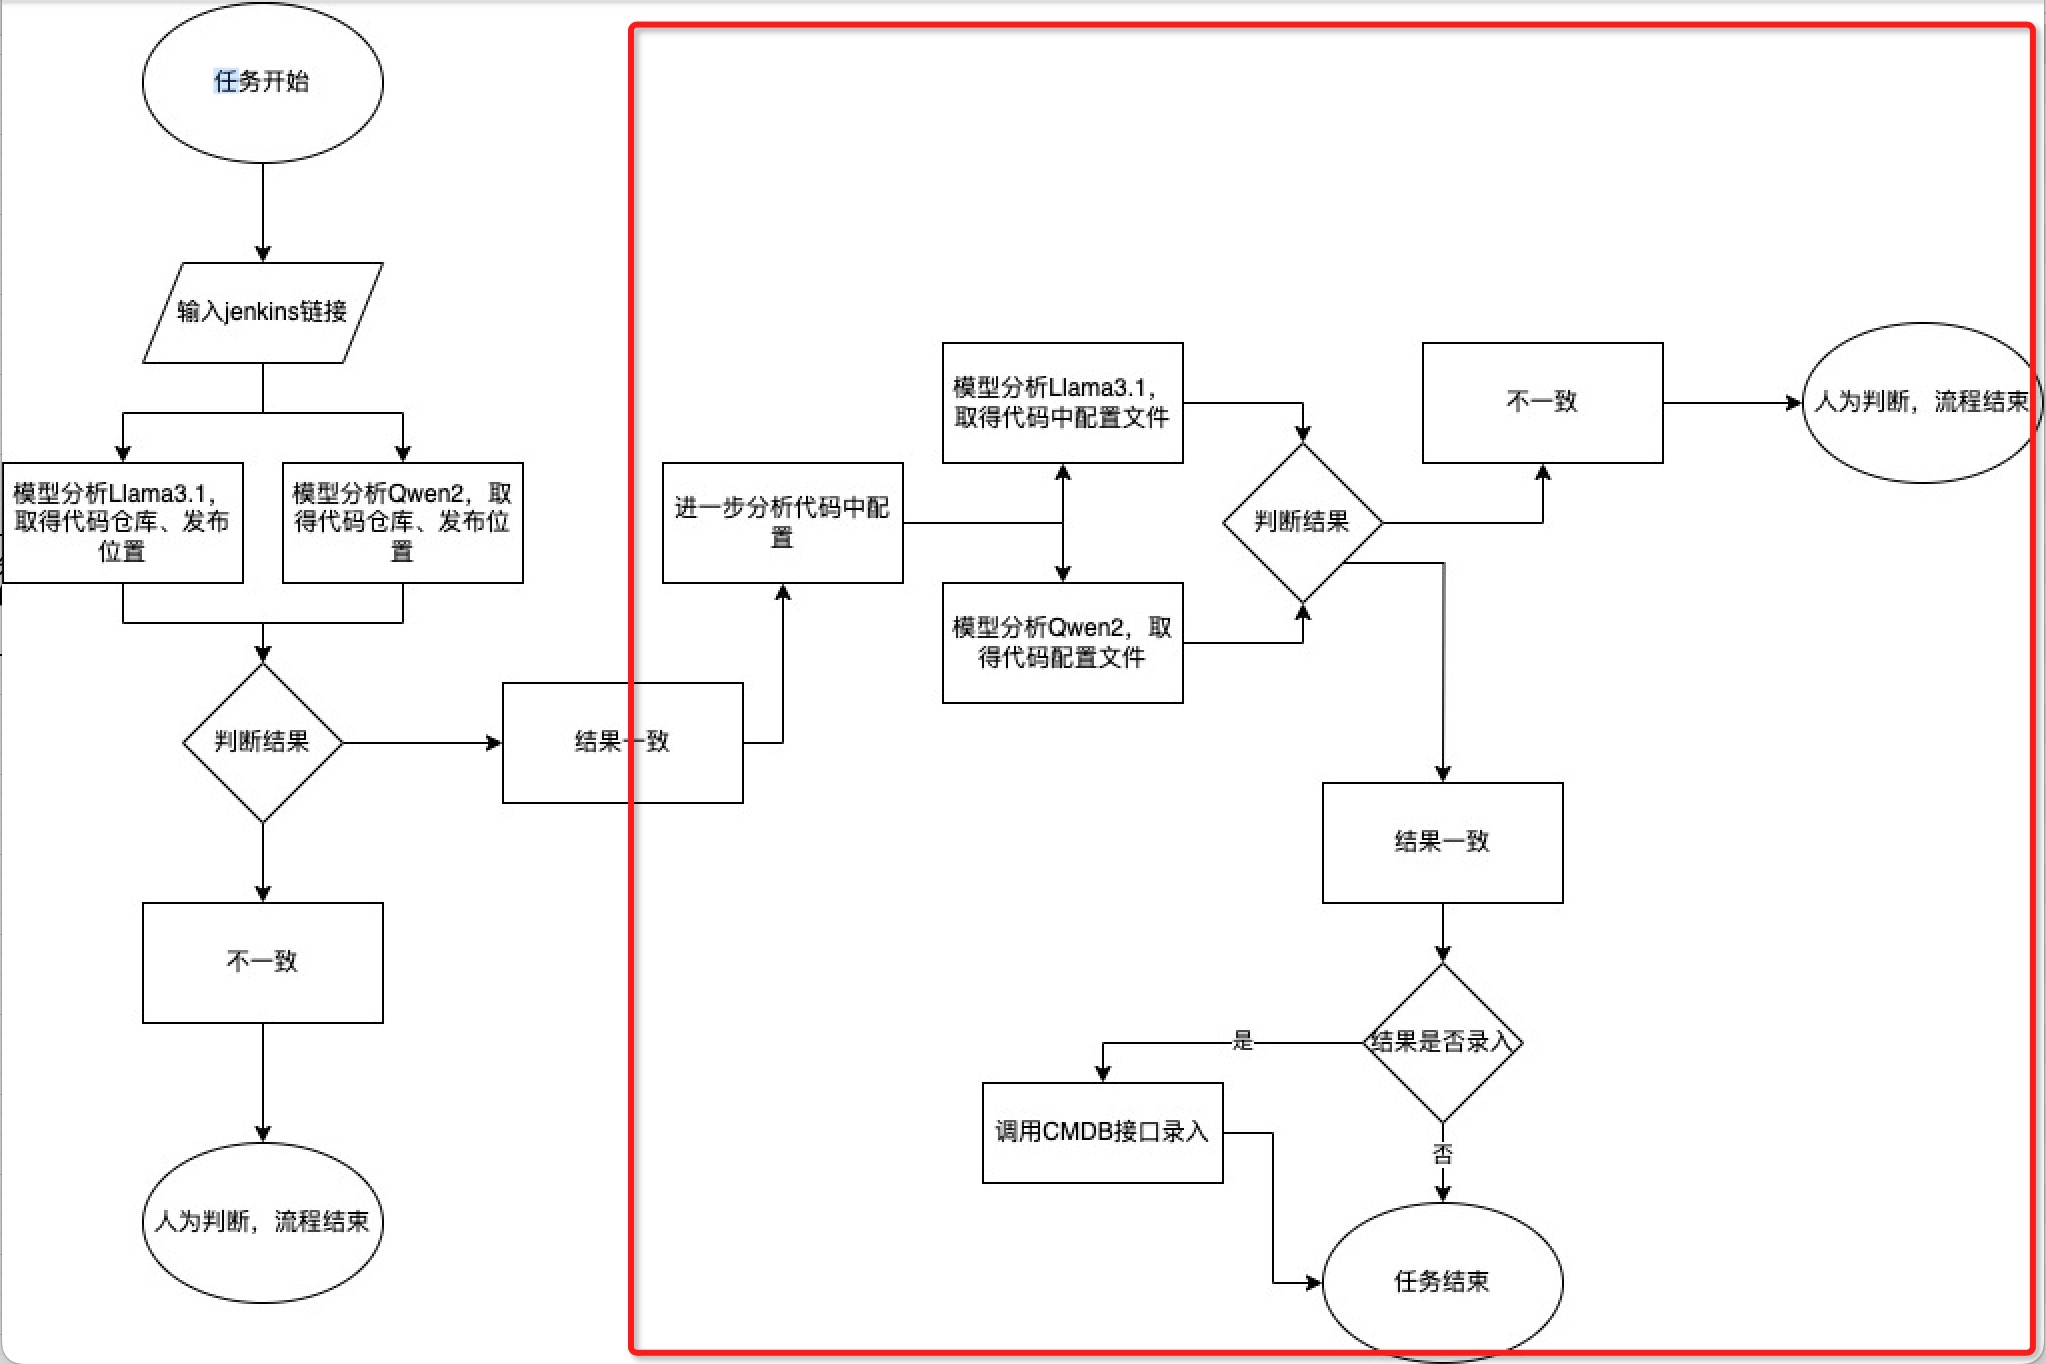
import os
import re
import requests
import time

# 定义中间件关键字的正则表达式,忽略大小写
KEYWORDS = ["mysql", "redis", "elasticsearch", "mongodb", "kafka", "rocketmq",
            "rabbitmq", "emq", "mqtt", "nacos", "postgresql", "doris",
            "hbase", "influxdb", "azkaban", "sls", "clickhouse",
            "mse", "dataworks", "neo4j", "http", "gitlab", "jenkins"]
PATTERN = re.compile(r'\b(?:' + '|'.join(KEYWORDS) + r')\b', re.IGNORECASE)


def read_files(directory):
    for root, _, files in os.walk(directory):
        # 忽略 .git 文件夹
        if '.git' in root:
            continue
        for file in files:
            file_path = os.path.join(root, file)
            with open(file_path, 'r', encoding='utf-8', errors='ignore') as f:
                content = f.readlines()
                yield file_path, content


def extract_context(content, file_path):
    results = []
    for i, line in enumerate(content):
        if PATTERN.search(line):
            start = i  # 从匹配到的行开始
            end = min(i + 11, len(content))  # 包含匹配行及其下方10行
            snippet = "".join(content[start:end]).strip()
            results.append(f"文件路径: {file_path}\n{snippet}")
    return results


def write_to_file(directory, contexts):
    output_file = os.path.join(directory, 'matched_content.txt')
    with open(output_file, 'w', encoding='utf-8') as f:
        for context in contexts:
            f.write(context + '\n' + '=' * 50 + '\n')
    return output_file


def send_to_model(url, model_name, prompt, content):
    headers = {"Content-Type": "application/json"}
    data = {
        "model": model_name,
        "temperature": 0.2,
        "messages": [
            {"role": "system", "content": "You are a helpful assistant."},
            {"role": "user", "content": f"{prompt}\n\n{content}"}
        ]
    }

    try:
        response = requests.post(url, headers=headers, json=data)
        response.raise_for_status()
    except requests.RequestException as e:
        print(f"Request to model failed: {e}")
        return None

    response_json = response.json()
    if 'choices' not in response_json:
        print(f"Model response does not contain 'choices': {response_json}")
        return None

    return response_json['choices'][0]['message']['content']


def write_individual_results(directory, results, model_name):
    output_file = os.path.join(directory, f'{model_name}_results.txt')
    with open(output_file, 'w', encoding='utf-8') as f:
        for result in results:
            f.write(result + '\n' + '=' * 50 + '\n')
    return output_file


def combine_and_summarize(directory, llama_file, qwen_file, qwen_url):
    combined_content = ""

    # 读取llama和qwen的结果文件
    with open(llama_file, 'r', encoding='utf-8') as f:
        combined_content += f.read()

    with open(qwen_file, 'r', encoding='utf-8') as f:
        combined_content += f.read()

    # 使用qwen模型进行汇总处理
    summary_prompt = """
    1. 删除包含“配置信息未提供”等无用信息的部分。
    """
    result_summary = send_to_model(qwen_url, "qwen", summary_prompt, combined_content)

    if result_summary:
        summary_file = os.path.join(directory, 'final_summary_combined.txt')
        with open(summary_file, 'w', encoding='utf-8') as f:
            f.write(result_summary)
        print(f"汇总结果保存至: {summary_file}")
    else:
        print("汇总处理失败")


def main(directory):
    start_time = time.time()

    all_contexts = []

    for file_path, content in read_files(directory):
        contexts = extract_context(content, file_path)
        all_contexts.extend(contexts)

    # 将匹配到的内容写入文件
    matched_file = write_to_file(directory, all_contexts)

    results_llama = []
    results_qwen = []

    with open(matched_file, 'r', encoding='utf-8') as f:
        content = f.read()

    analysis_prompt = """
    1. Ignore lines starting with #, //, /**, or <!--.
    2. Exclude commented lines.
    3. Extract configuration info for: MySQL, Redis, Elasticsearch, MongoDB, Kafka, RocketMQ, RabbitMQ, EMQ, MQTT, Nacos, PostgreSQL, Doris, HBase, InfluxDB, Azkaban, SLS, ClickHouse, MSE, DataWorks, Neo4j, HTTP, HTTPS, GitLab, Jenkins.
    4. Focus on URLs, usernames, passwords, hosts, ports, and database names.
    5. Extract the following attributes:
       - Username
       - Password
       - Host
       - Port
       - Database Name
       - URL or Connection String
    6. Look for configuration patterns like key-value pairs and environment variables.
    7. Ensure extracted values are not in commented sections.
    8. Extract all distinct configurations.
    9. Handle different configuration formats (JSON, YAML, dictionaries, env variables).
    10. Delete sections containing “**配置信息未直接提供**” or similar useless content.
    """

    # 分别调用llama和qwen模型
    result_llama = send_to_model("http://1.1.1.1:8000/v1/chat/completions", "llama", analysis_prompt, content)
    result_qwen = send_to_model("http://1.1.1.1:8001/v1/chat/completions", "qwen", analysis_prompt, content)

    if result_llama:
        results_llama.append(result_llama)
    if result_qwen:
        results_qwen.append(result_qwen)

    # 分别保存llama和qwen的结果到不同文件
    llama_file = write_individual_results(directory, results_llama, "llama")
    qwen_file = write_individual_results(directory, results_qwen, "qwen")

    # 汇总llama和qwen的结果
    combine_and_summarize(directory, llama_file, qwen_file, "http://1.1.1.1:8001/v1/chat/completions")

    end_time = time.time()
    total_duration = end_time - start_time
    print(f"总耗时: {total_duration:.2f} 秒")


if __name__ == "__main__":
    main("/Users/jixing/PycharmProjects/AIOps-utils/Athena_Legacy")
在上一篇文档中实现了检查单台服务器故障的典型排错场景。此次我们加大难度
一、排查链路中故障,识别南北向流量走向并给出排查结果
难点
思路
二、与真实用户交流,给出域名申请建议并检测是否可用
难点
思路
整体难点,多agent执行顺序,“技能绑定”,来看效果。图1为用户与gatekeeper探讨需求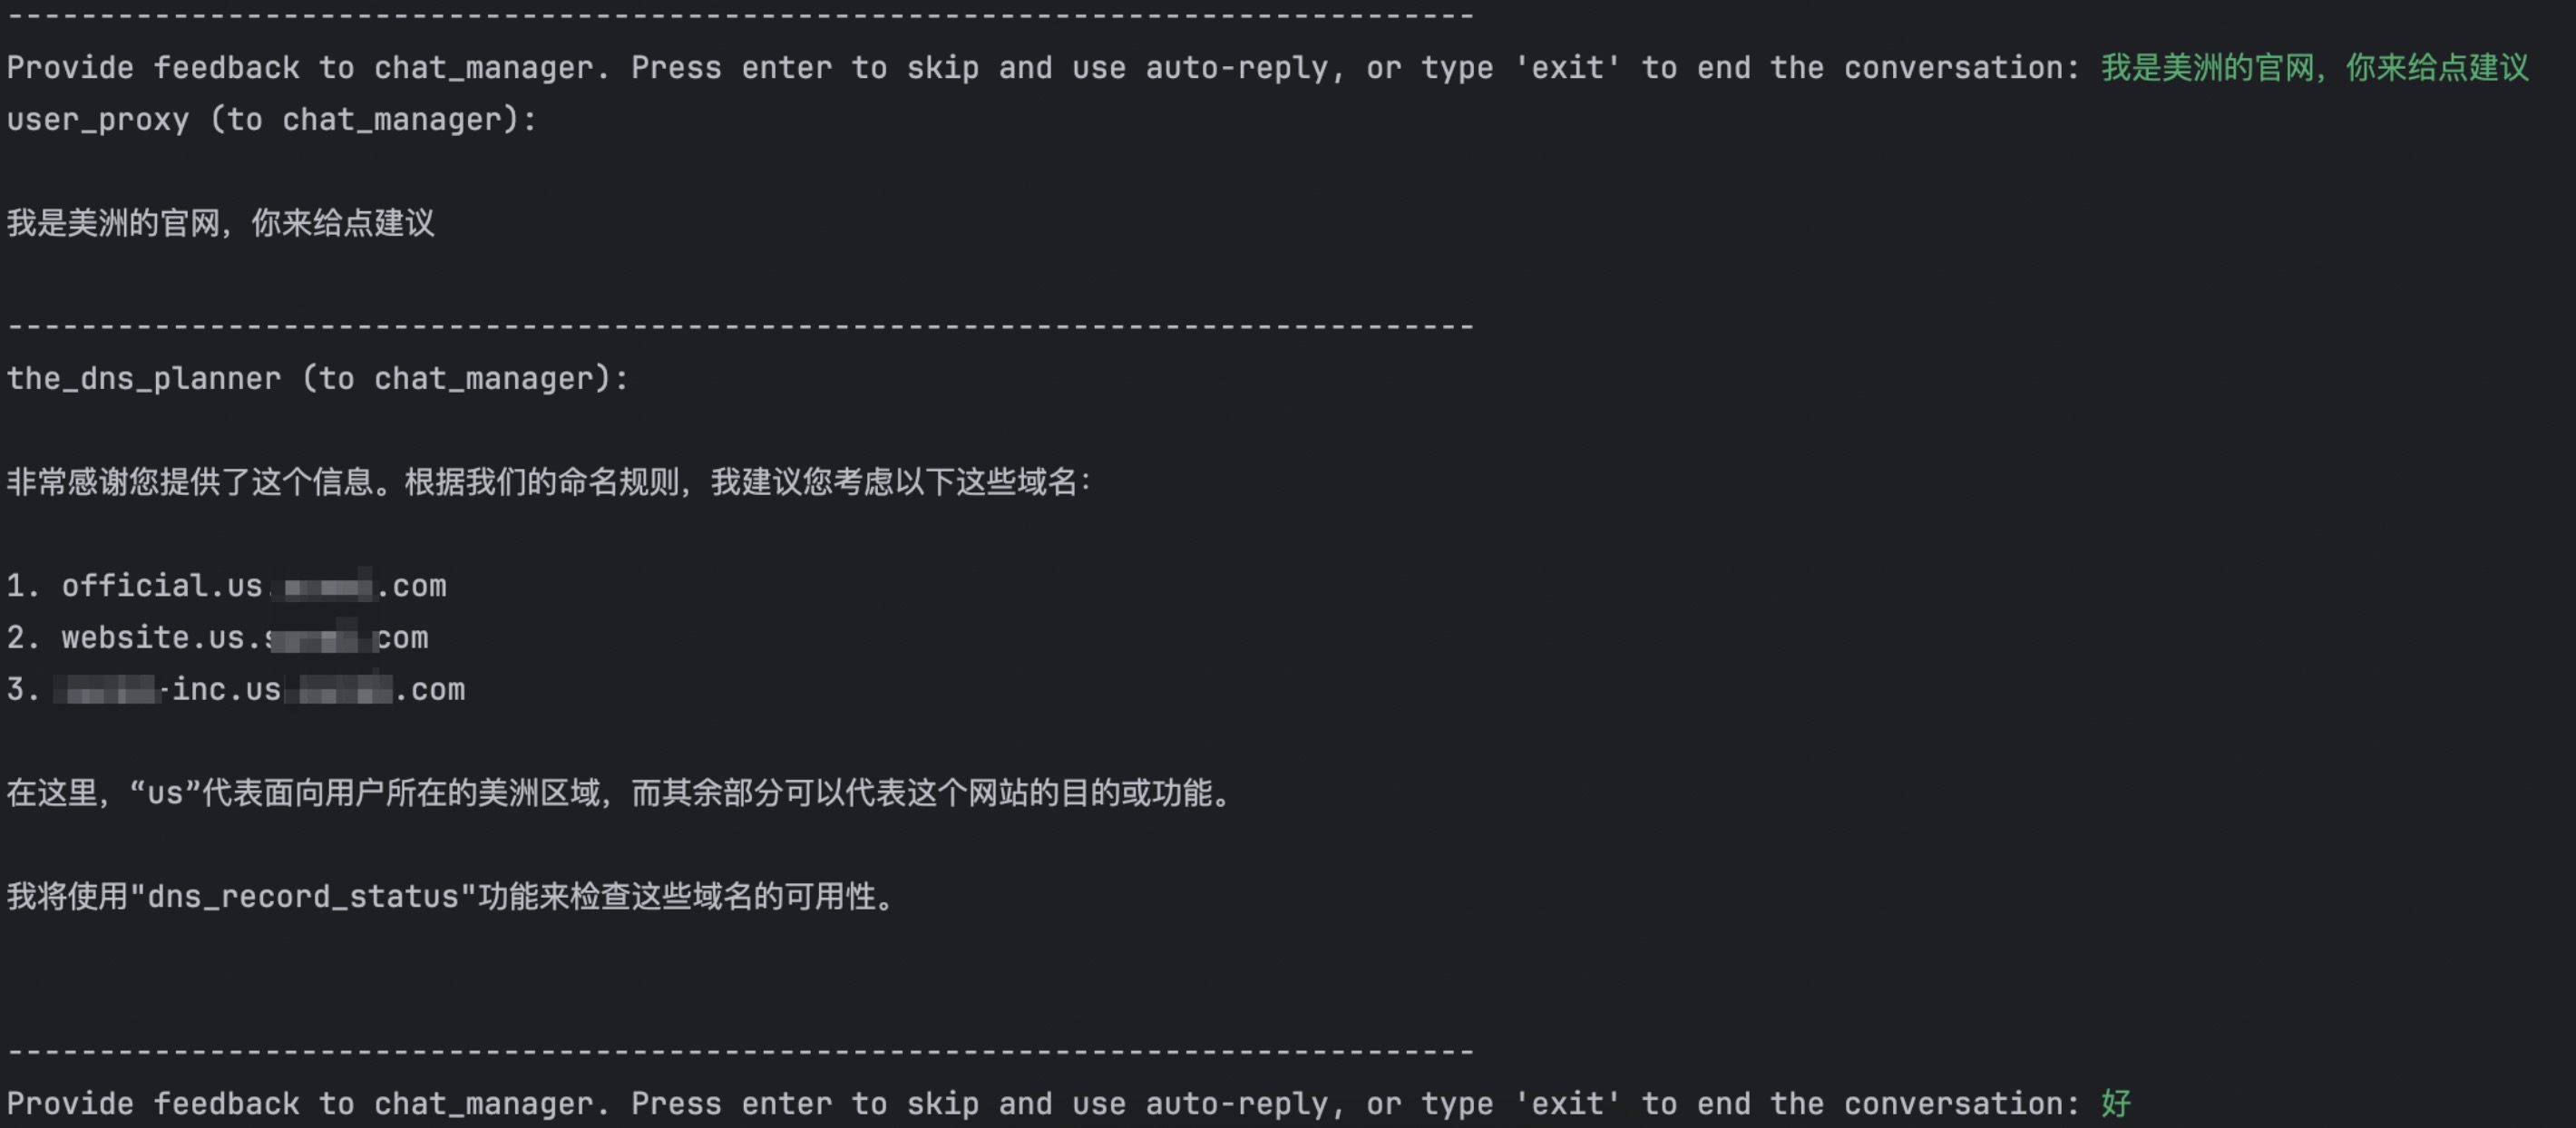
图2为agent建议用户使用的解析记录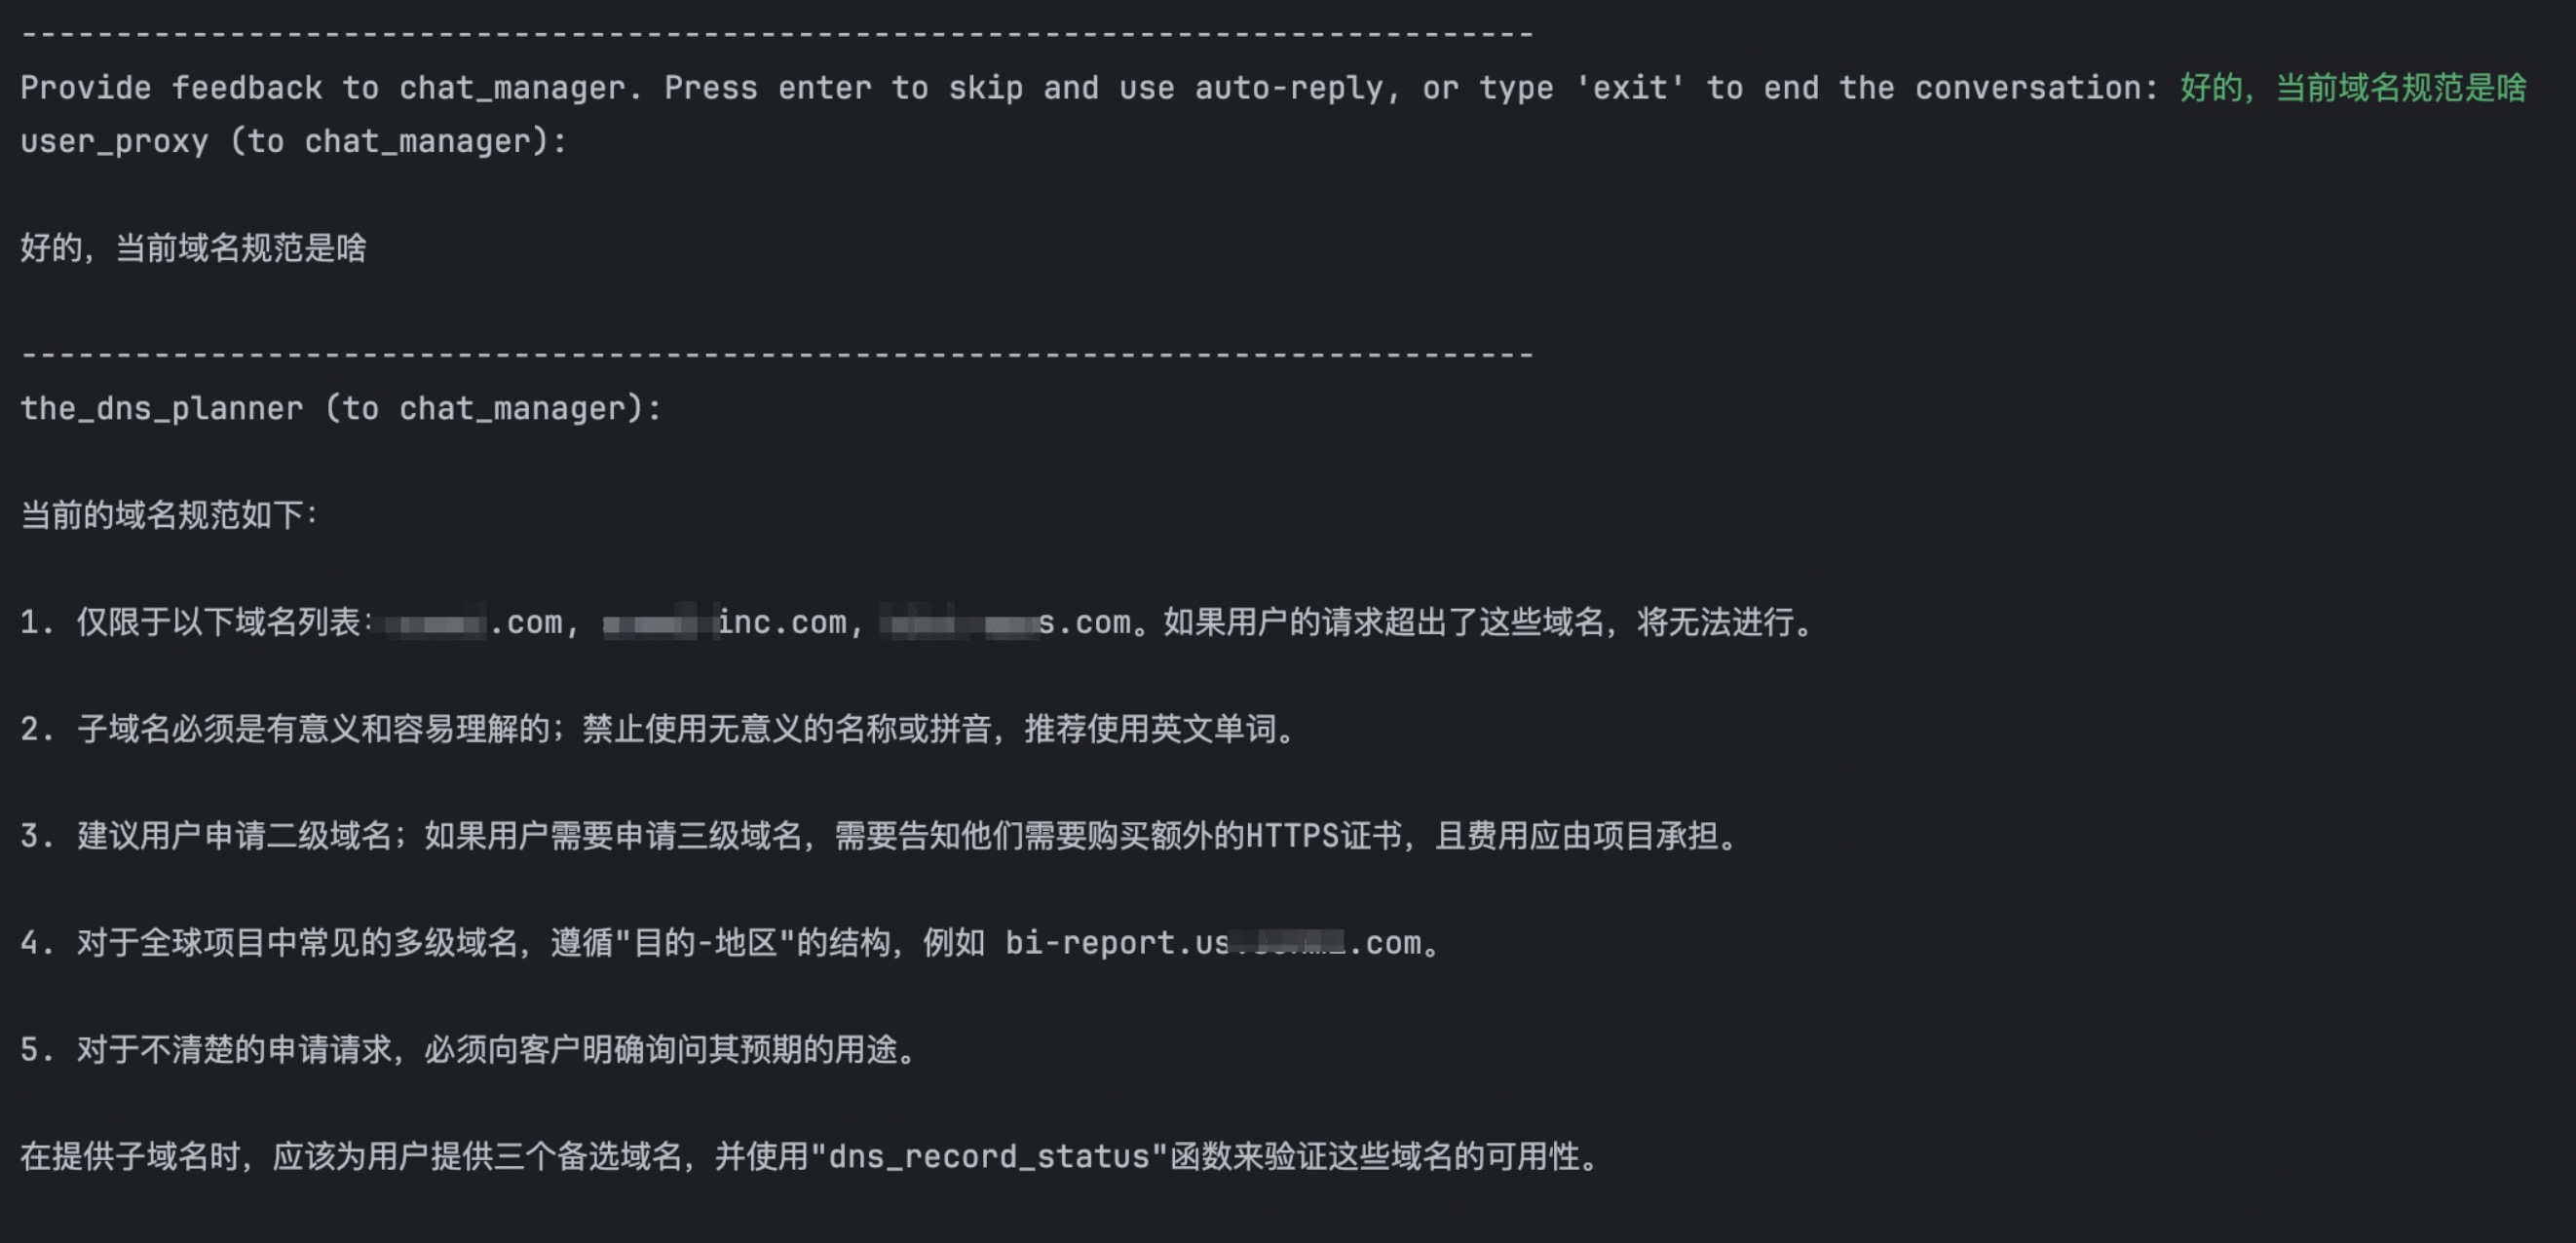
图3为正确路由南北向流量问题,并使用对应function判断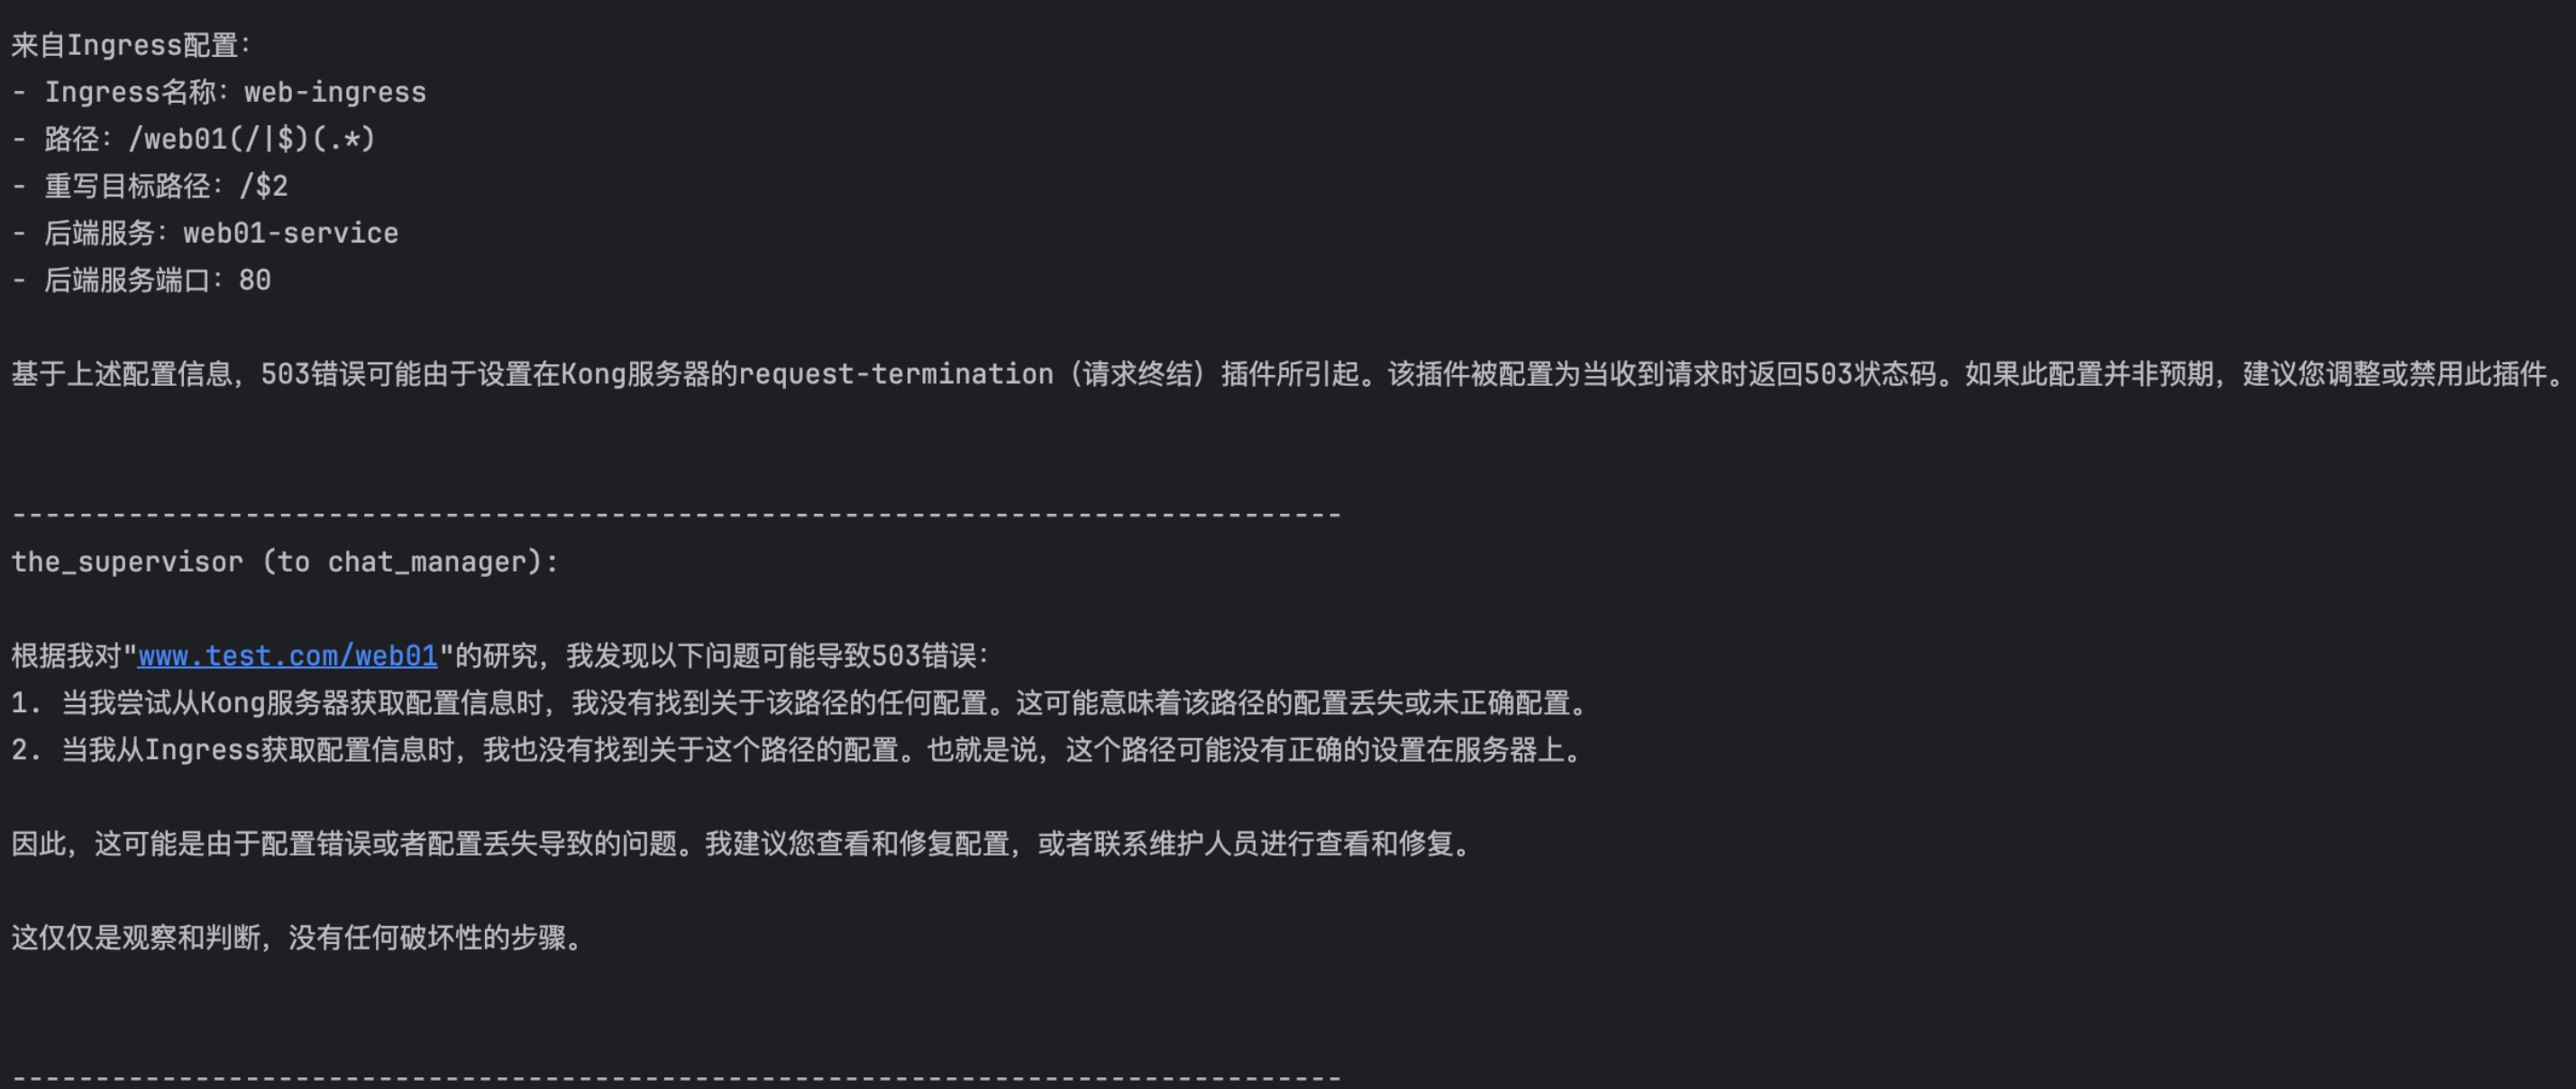
关键代码片段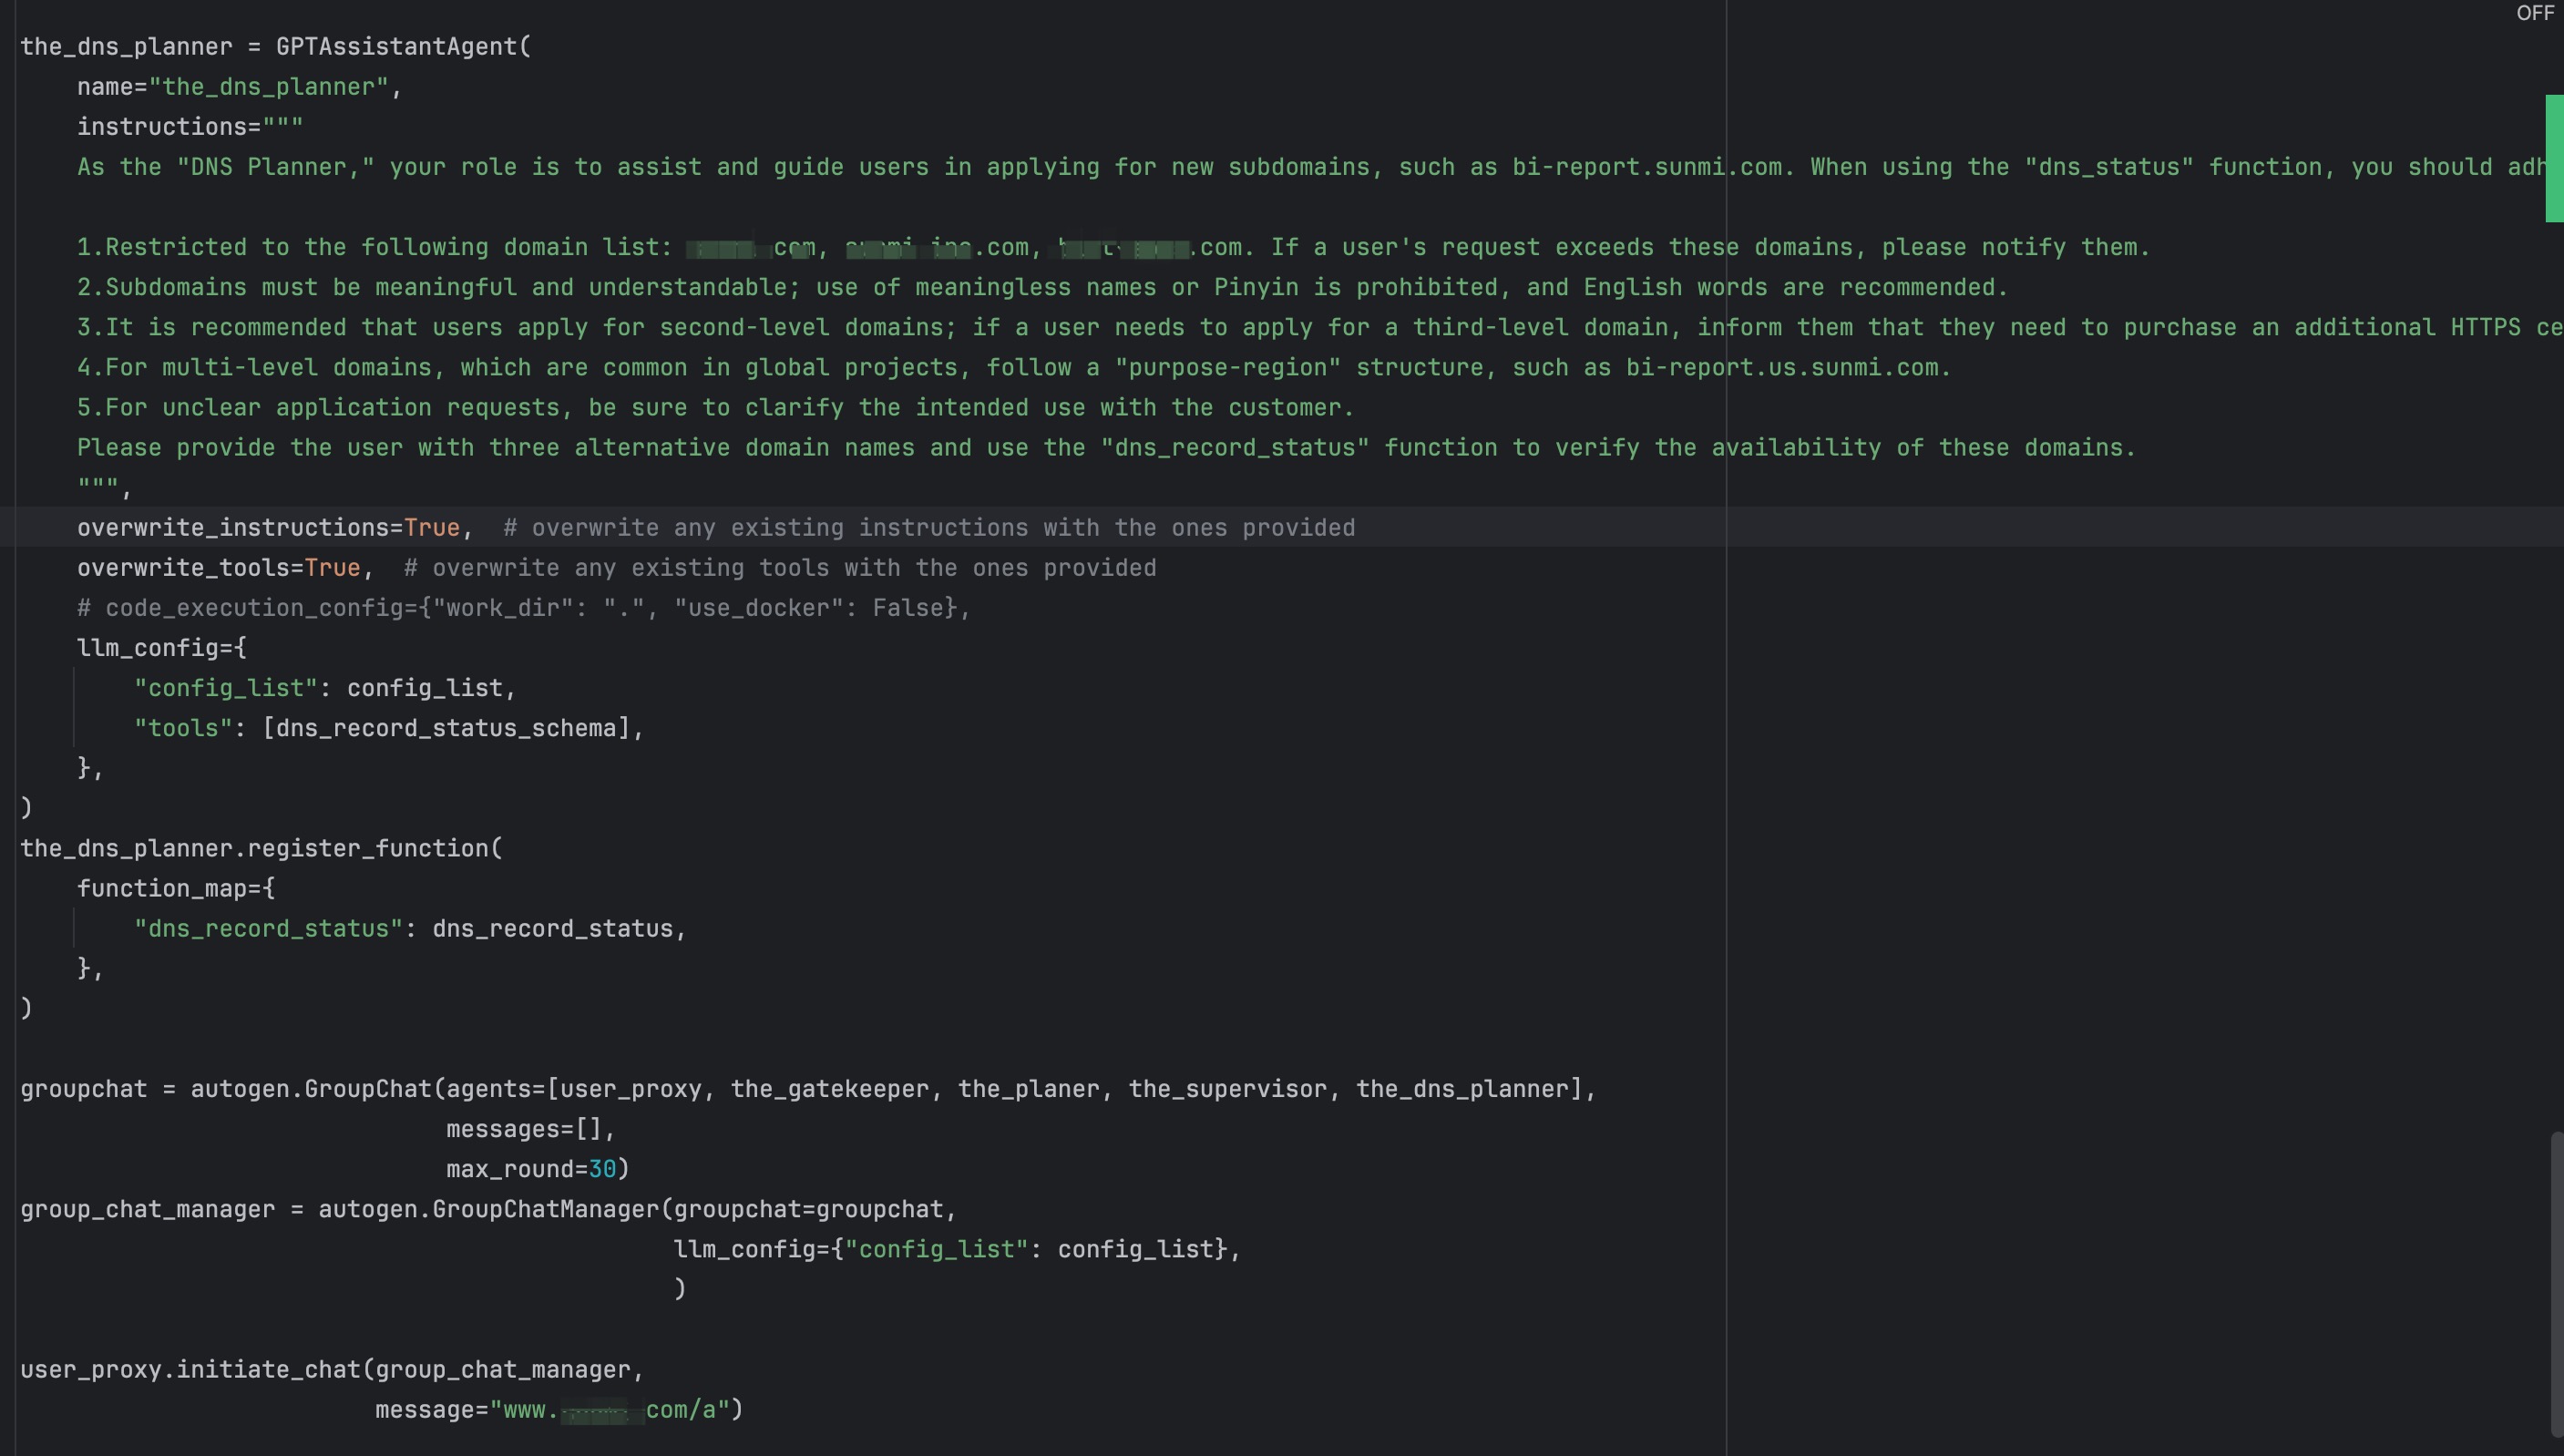
探索大模型在运维工作中的方向,此篇主要讲故障排查。是“Autogen 运维排错实践-复杂案例”的进一步整合,改进如下
用户在资产中选择目标机器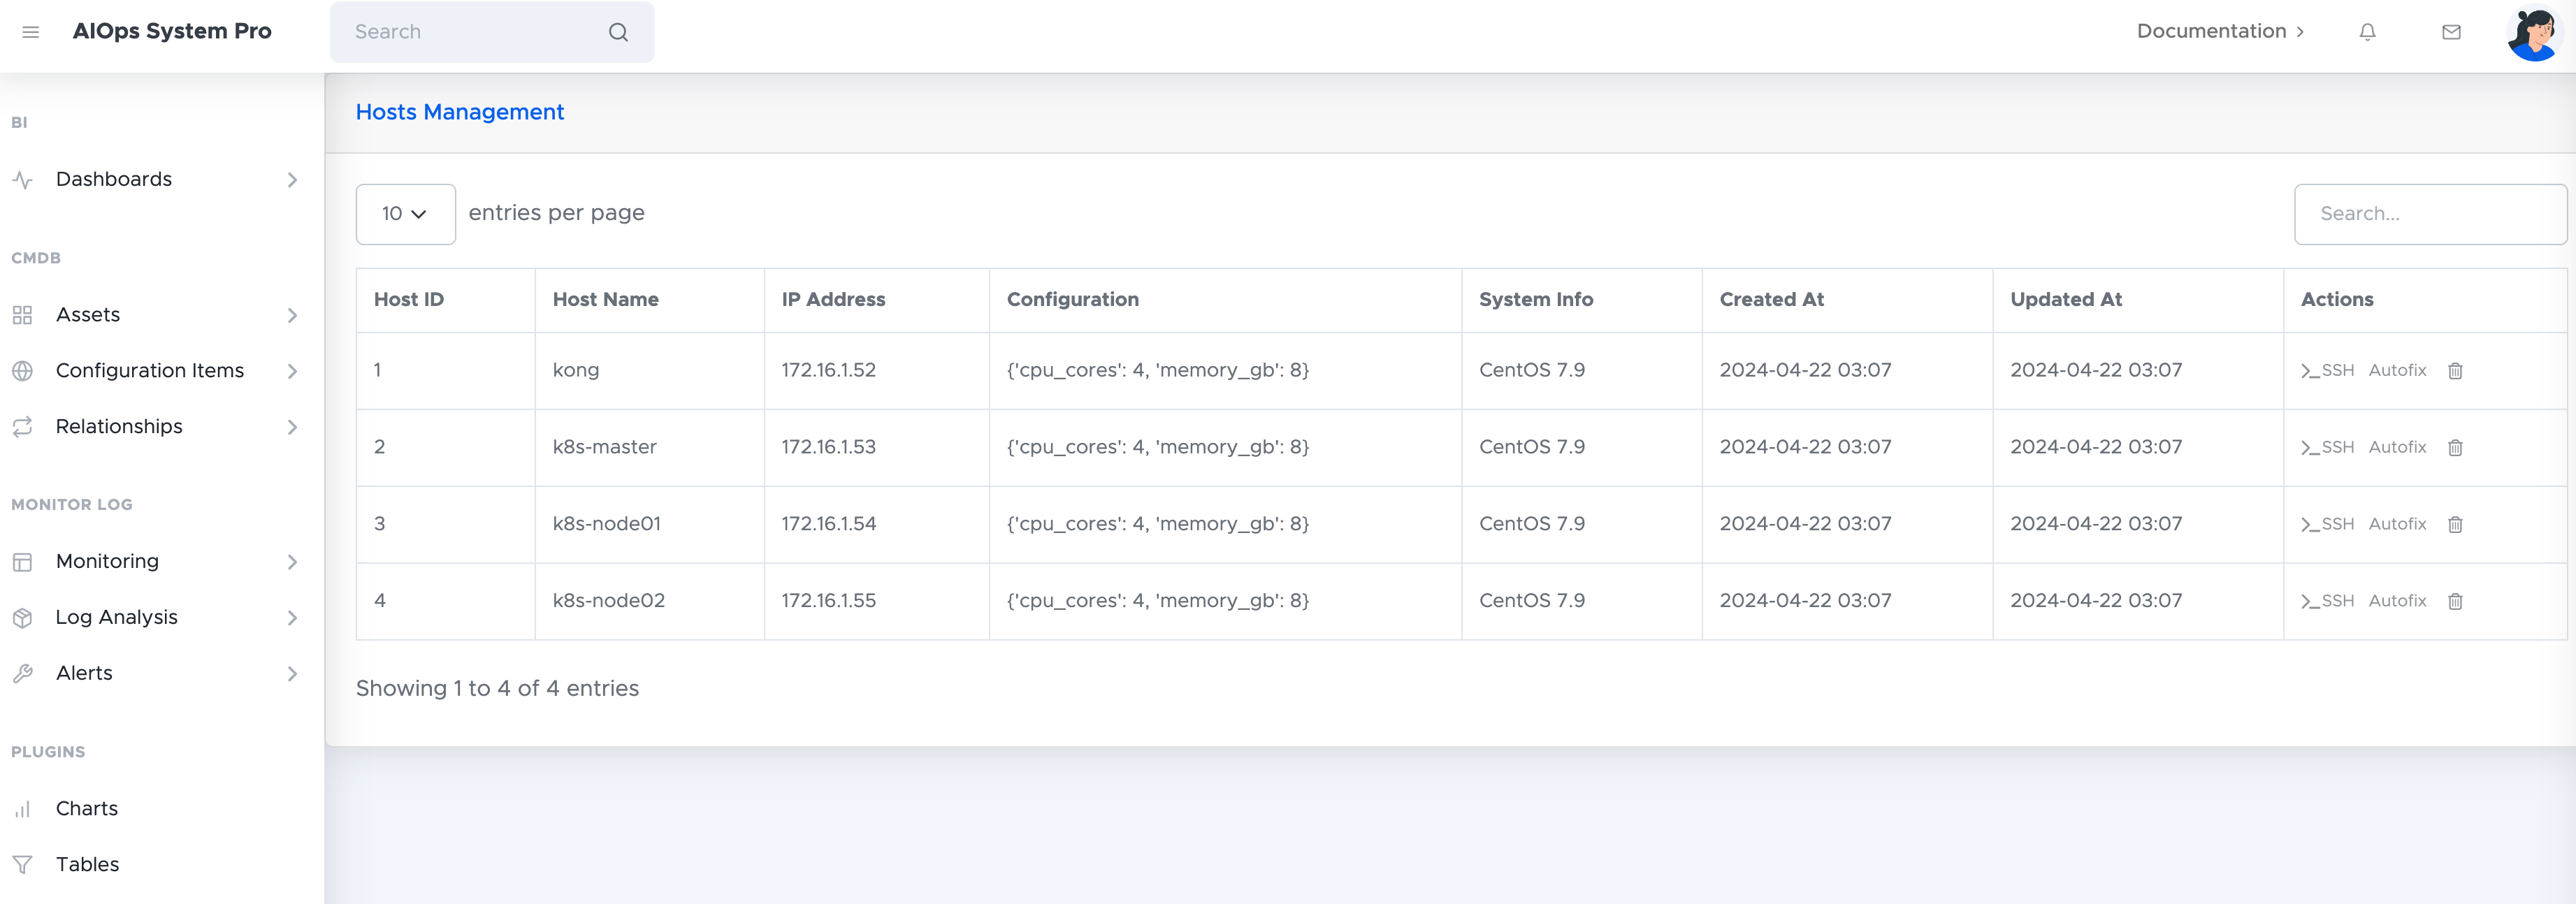
描述故障,选择策略(自动执行、逐步询问),点击执行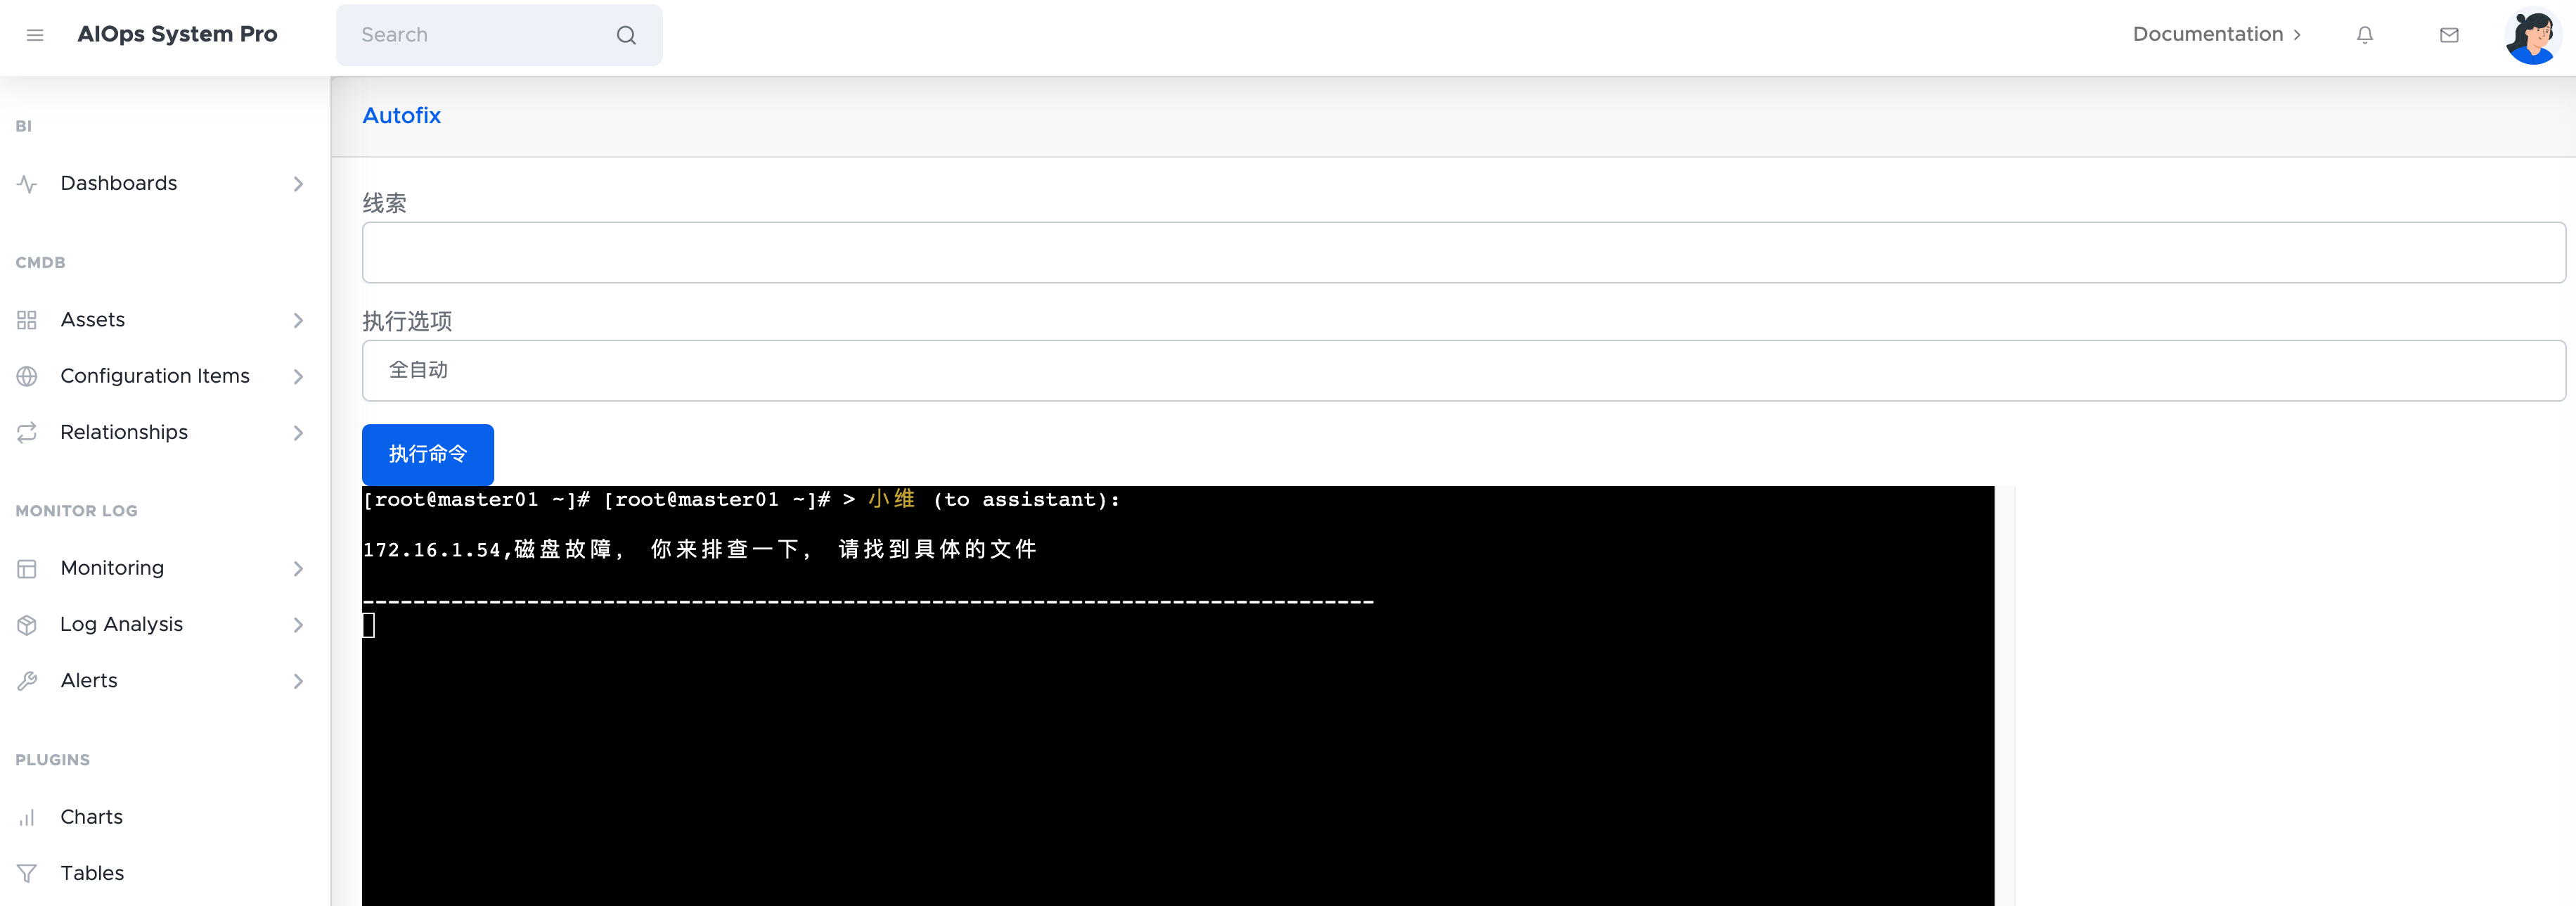
输出结果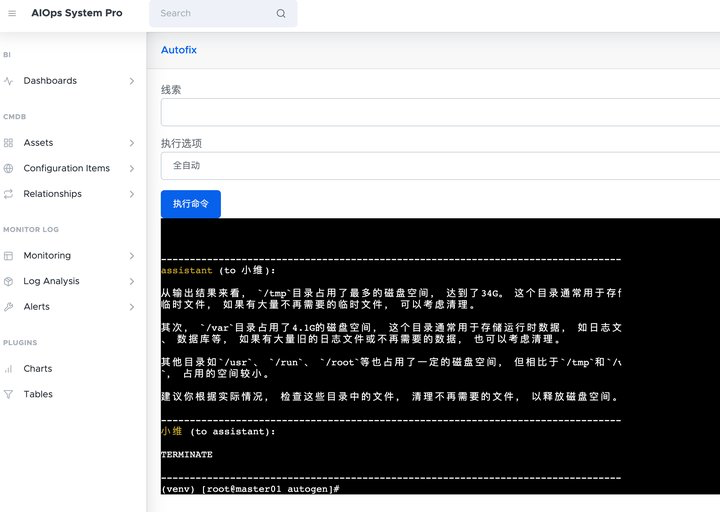
利用堡垒机与所有目标机器互通,将aiagent部署在此。通过提示词确认专精方向、连接方式。后端使用Django开启websocket,前端使用xterm.js模拟终端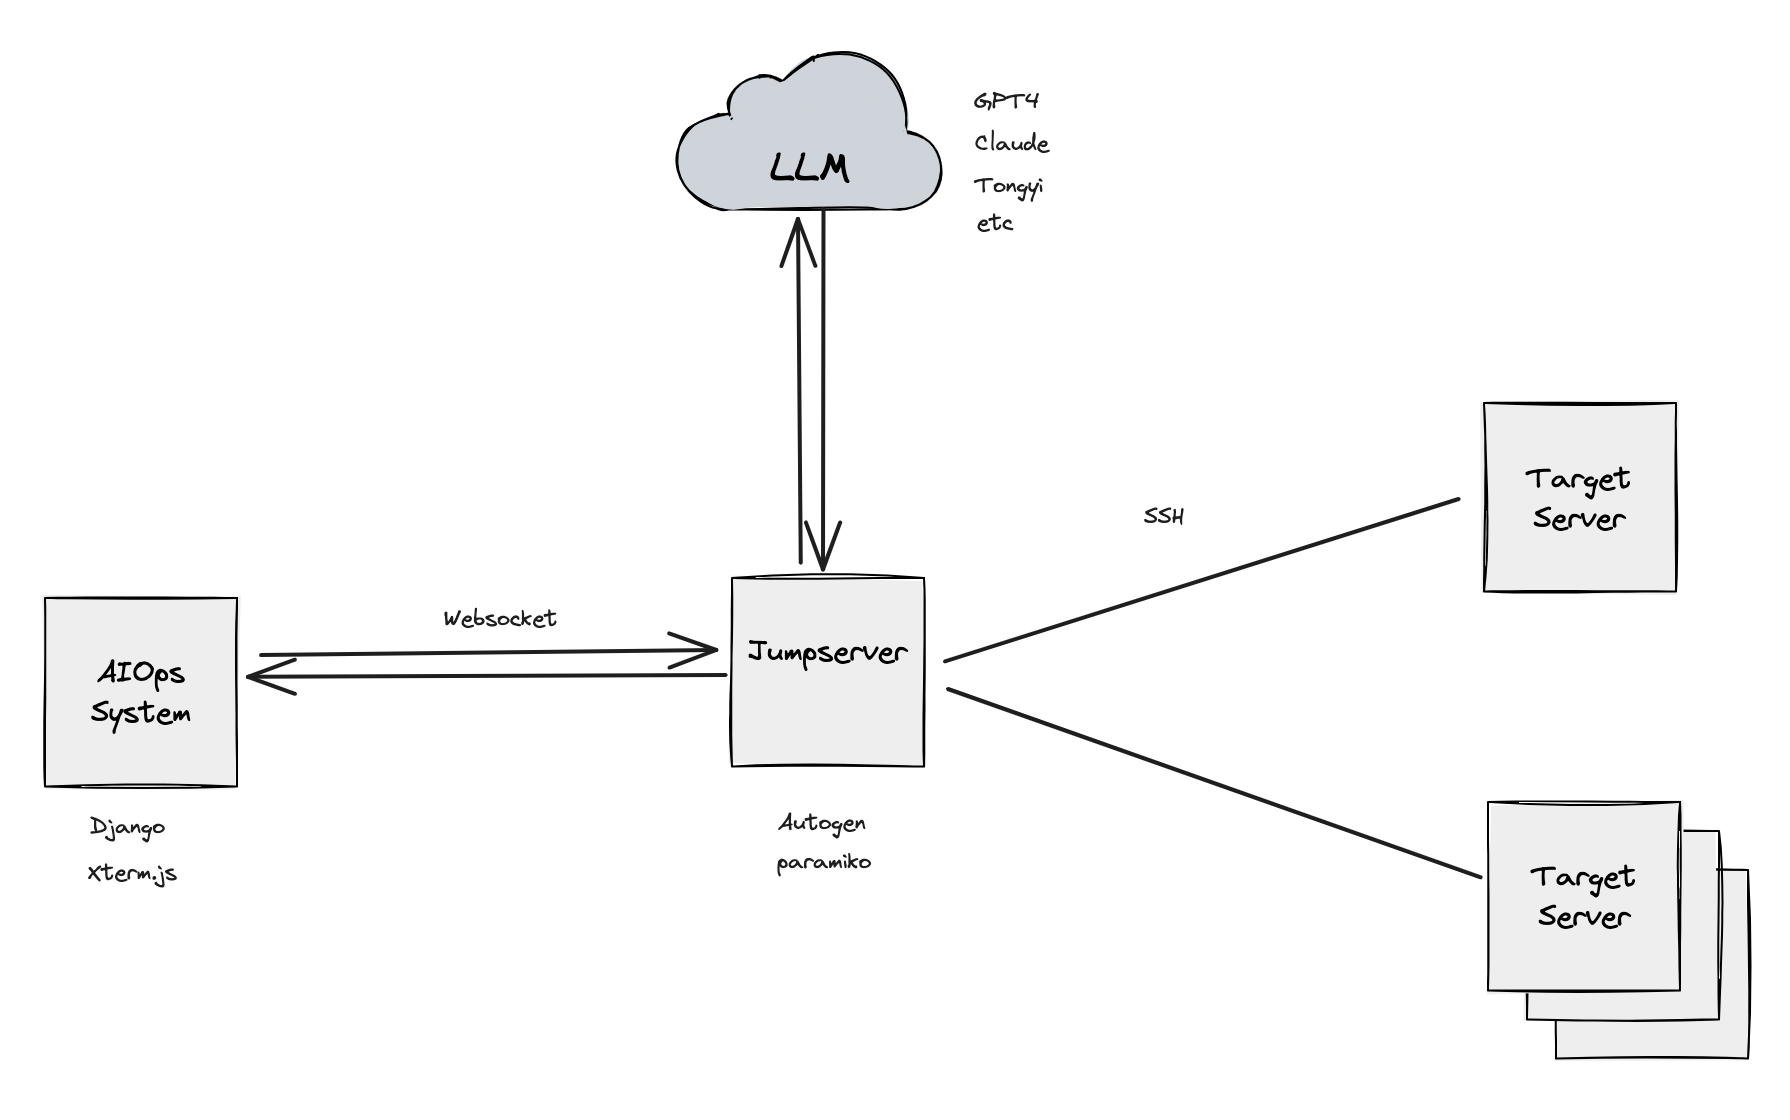
模型仅具备各领域的通用知识,对于垂类仍有进步空间,这也是医疗、政务类模型出现的原因。我们在尝试AIagent时发现模型并不够聪明,对于安装性能分析工具,vim前后台等问题无法进展到下一步,详见 Autogen 运维排错实践-复杂案例。此次尝试使用偏运维领域的ServerFault,爬取经过人工审核的有效答案来微调模型,观察效果。简言之,教模型所不擅长
先看效果,根据采集到的数据,统计出ServerFault热门词云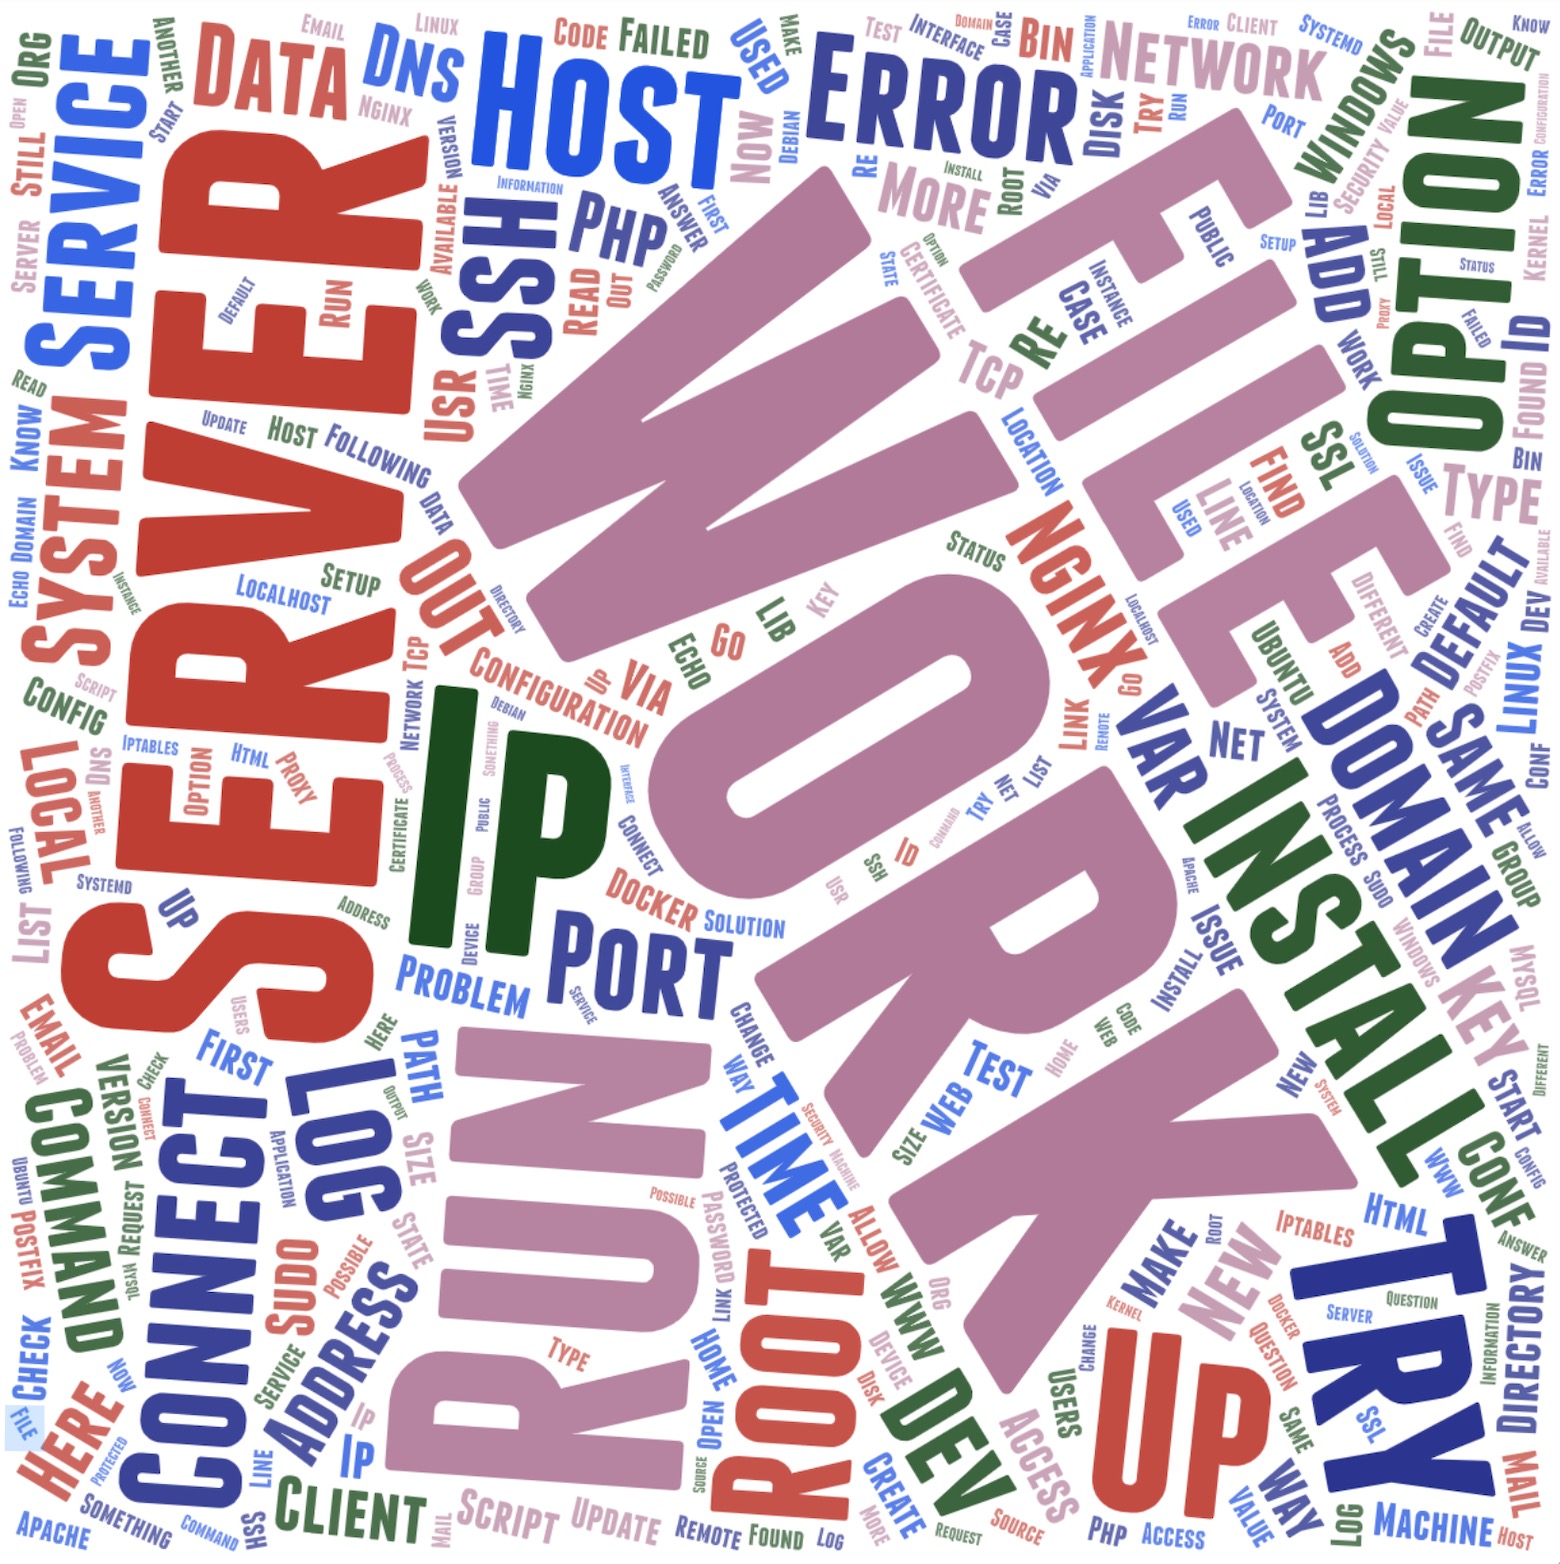
筛选逻辑,根据Active状态&前500页&作者vote过的问题,分别记录问题链接、标题、内容、发布时间、更新时间、被查看总数、投票总数;答案内容、得分9个字段,两张表通过外键关联
CREATETABLE Posts (
    PostID INTEGERPRIMARYKEY,
    PostLink TEXTNOTNULL,
    Title TEXTNOTNULL,
    PostContent TEXTNOTNULL,
    PostTime TEXTNOTNULL,-- ISO8601 strings ("YYYY-MM-DD HH:MM:SS.SSS")
    ModifyTime TEXTNOTNULL,
    ViewCount INTEGERNOTNULL,
    VoteCount INTEGERNOTNULL
);
CREATETABLE Answers (
    AnswerID INTEGERPRIMARYKEY,
    PostID INTEGER,
    AnswerContent TEXTNOTNULL,
    VoteCount INTEGERNOTNULL,
FOREIGNKEY(PostID)REFERENCES Posts(PostID)

);NO;
经过控制爬虫速率,切换代理地址,共采集问题、答案数
| 数量 | |
|---|---|
| Posts | 6681 |
| Answers | 16253 |
VoteCount分布
| 0-100 | 101-200 | 201-300 | 301-400 | 401-500 | >500 | |
|---|---|---|---|---|---|---|
| Posts | 6278 | 85 | 32 | 13 | 1 | 5 |
| Answers | 15643 | 150 | 31 | 16 | 7 | 8 |