标签 大模型 下的文章

最近在整理CMDB信息,以Jenkins为中枢,统计、梳理代码仓库位置、发布位置。形成以应用为中心,串连资源、管理者。
首先需要统计代码中涉及的配置文件信息,比如Mysql/Redis/Elasticsearch/MongoDB/Kafka/RocketMQ/MQTT/Doris/HBase/InfLuxDB/http等
意义:

  • 排错时参考,比如该服务报504错误,马上定位到具体的中间件或者外部接口
  • 不遵守配置规范,不用配置中心硬编码在代码中的情况,能被发现
  • 资源收拢,当所有代码中都未出现的资源可作为下架依据

相较传统的正则匹配,大模型加持下有如下优点

  • 大模型能够识别到更多的配置,正则更依赖规则,对于语言多、规范复杂、执行不严有优势
  • 大模型能够用简单的提示词,格式化、筛选输出

环境介绍

  • 效果展示,使用了内部CMDB项目代码,使用了Python的Django框架,代码大小5M。项目中的配置相对分散。分析过程30秒。
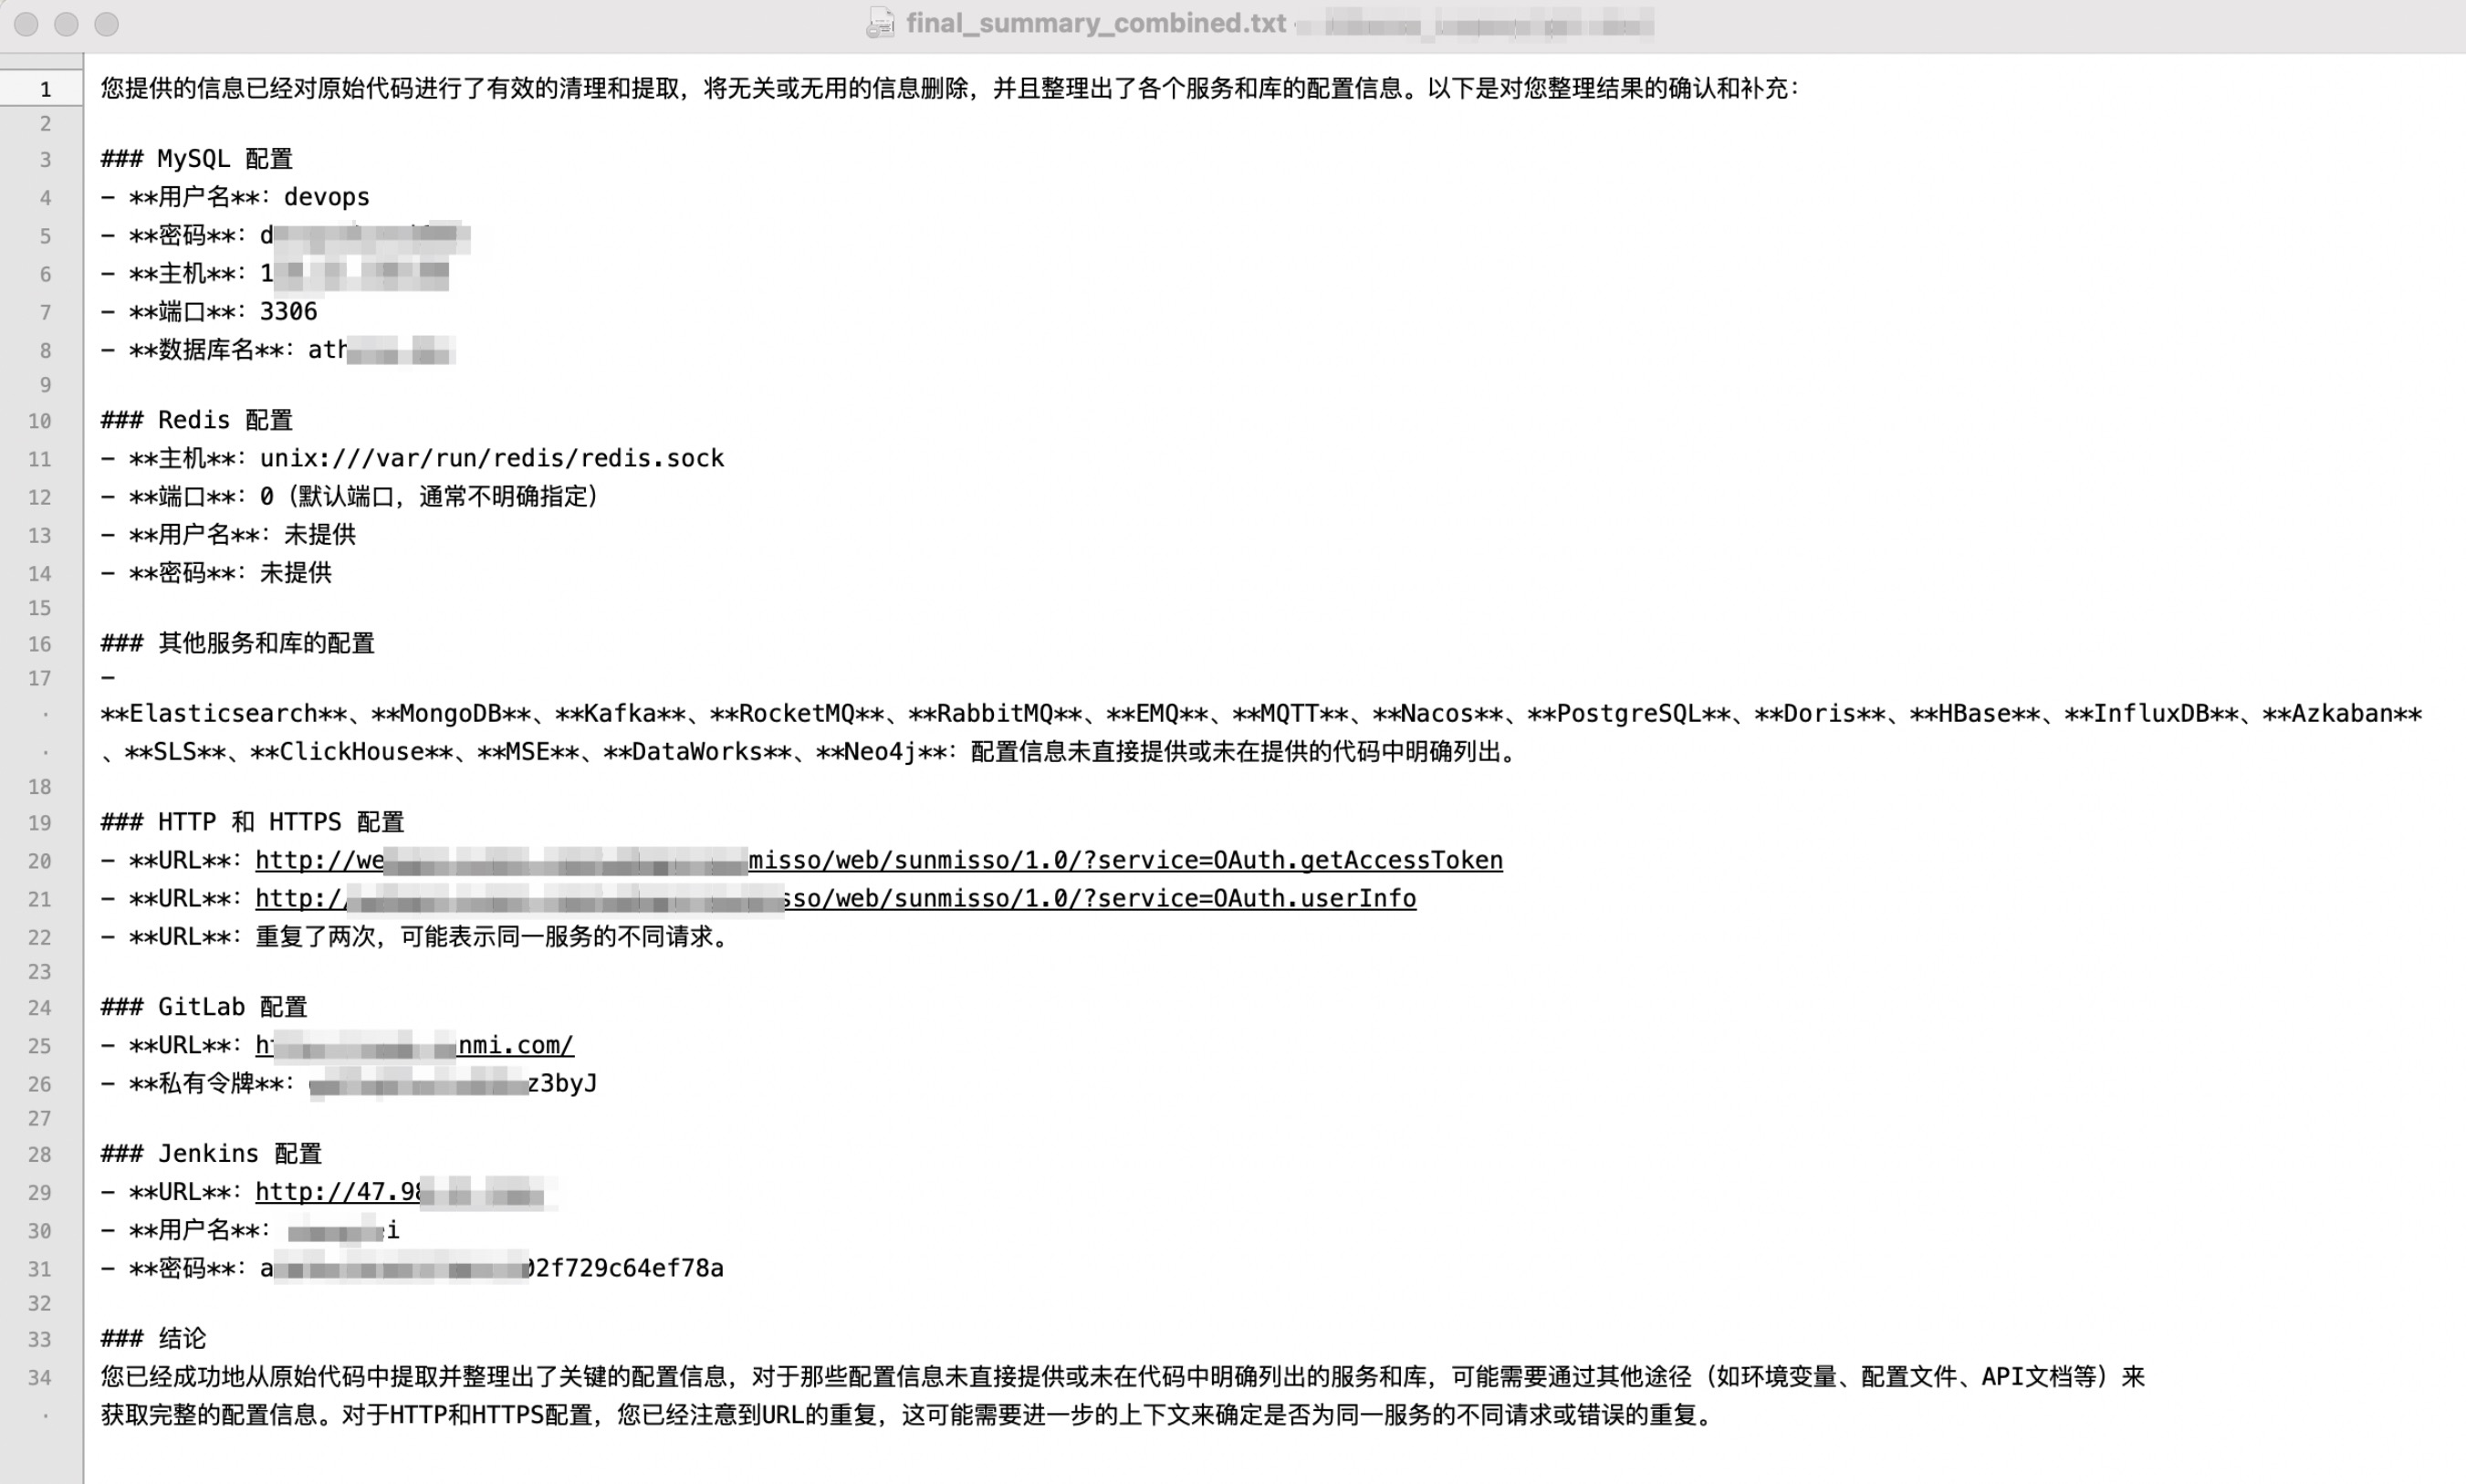
效果.jpg

  • 代码、配置资产属于机密信息,故使用近期评分较高的本地模型确保安全性,Meta-Llama-3.1-8B-Instruct/Qwen2-7B-Instruct,使用vllm部署
#!/bin/bash
  
# 设置环境变量
export CUDA_VISIBLE_DEVICES=0,1

# 启动 vllm 服务器并将其转移到后台运行
nohup python3 -m vllm.entrypoints.openai.api_server \
    --model /data/vllm/Meta-Llama-3.1-8B-Instruct \
    --served-model-name llama \
    --tensor-parallel-size 2 \
    --trust-remote-code > llama.log 2>&1 &
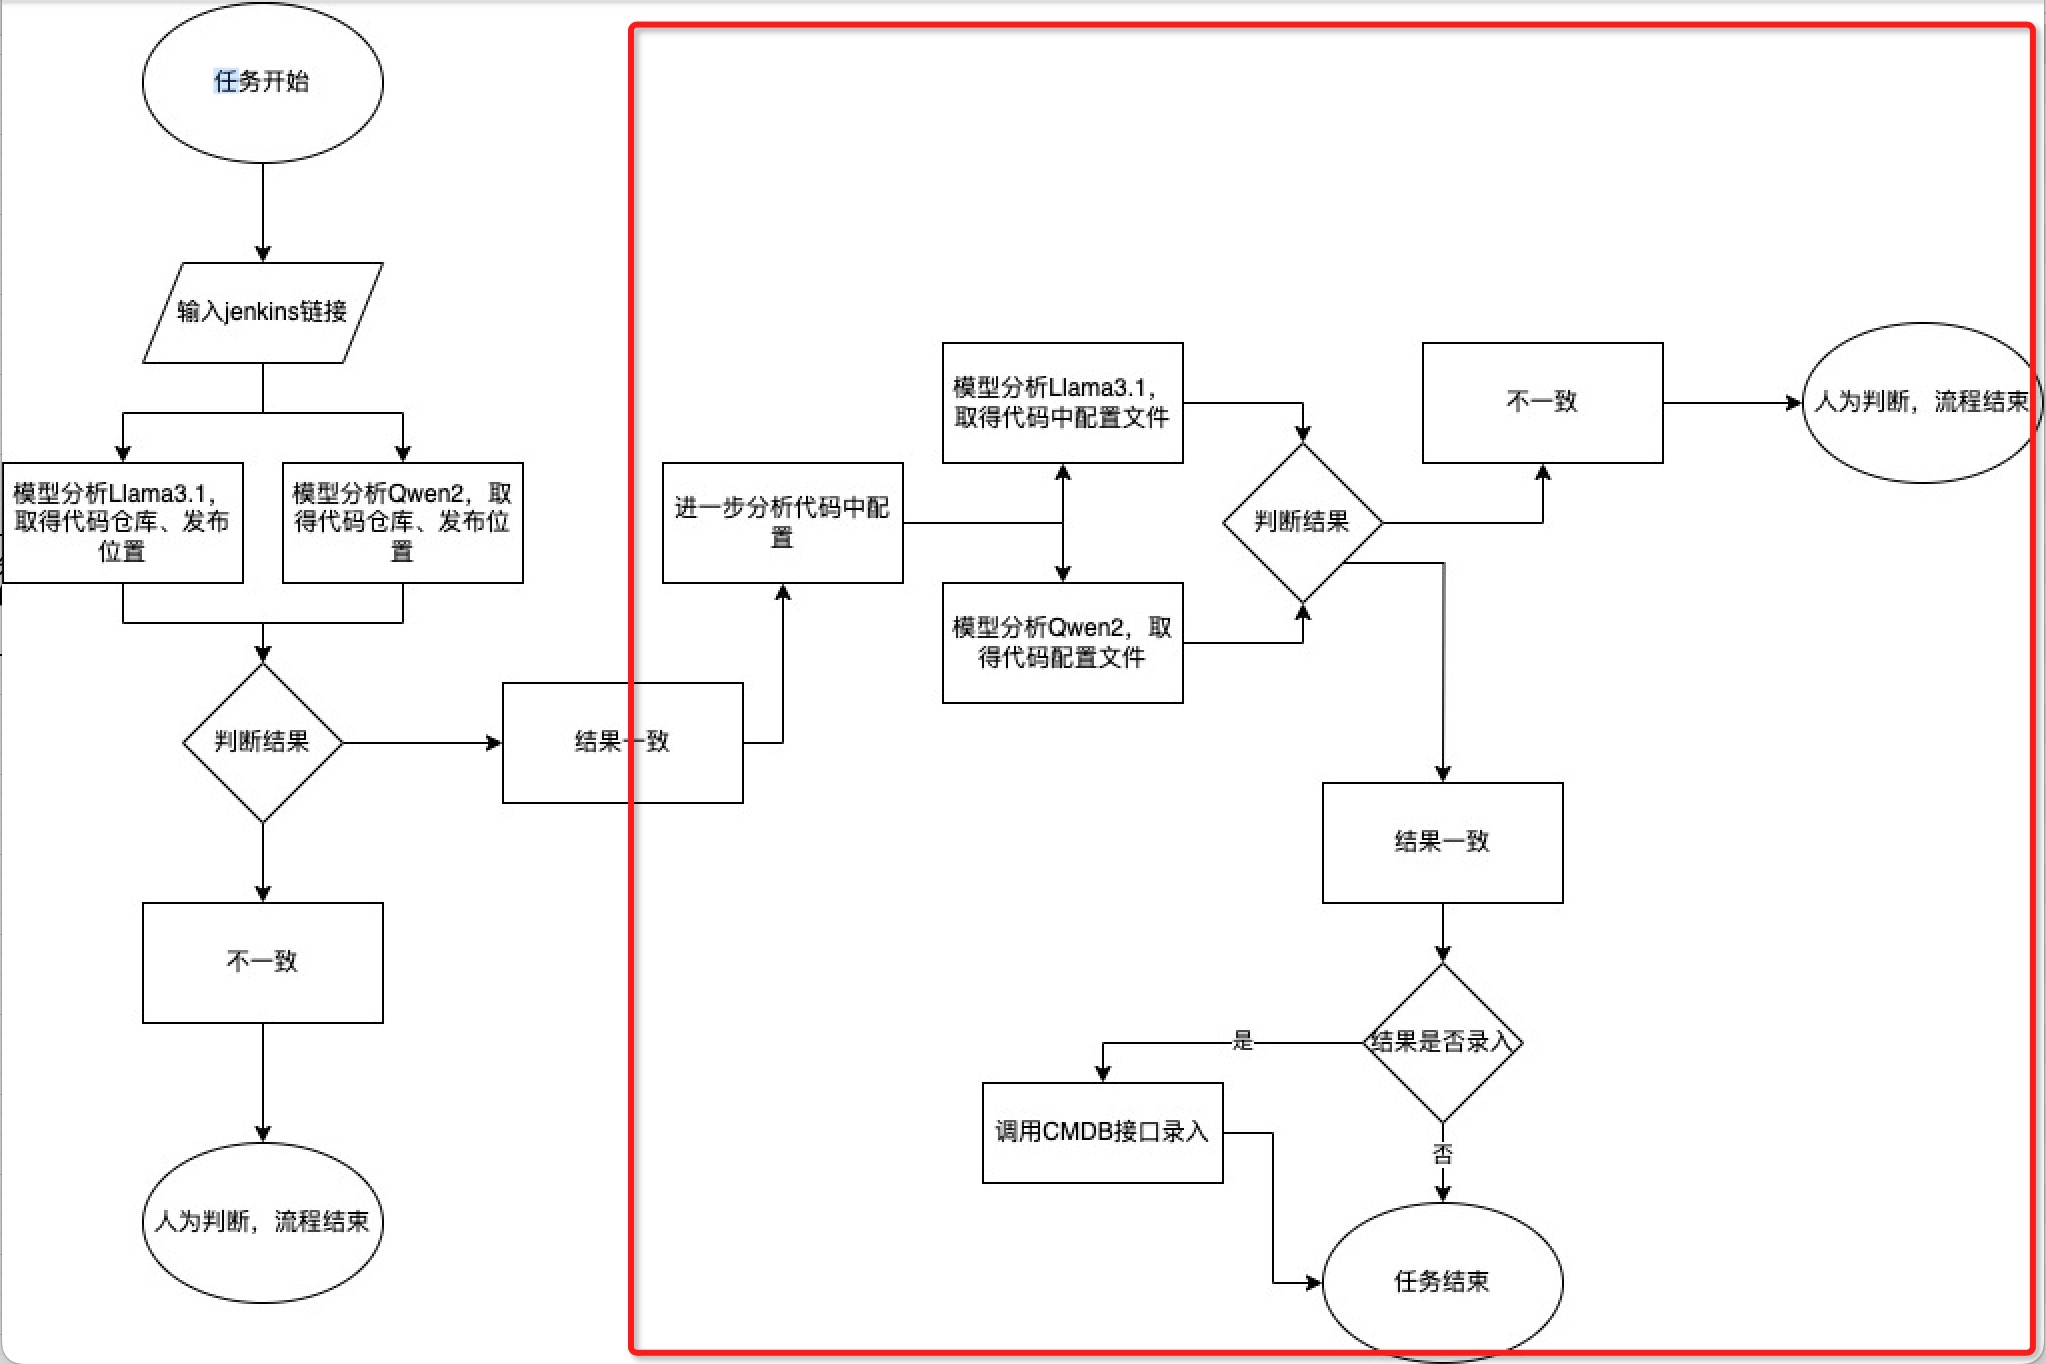
  • 逻辑如下,通过多个模型分别判断,取并集后再利用模型整合

20240812163027.jpg

import os
import re
import requests
import time

# 定义中间件关键字的正则表达式,忽略大小写
KEYWORDS = ["mysql", "redis", "elasticsearch", "mongodb", "kafka", "rocketmq",
            "rabbitmq", "emq", "mqtt", "nacos", "postgresql", "doris",
            "hbase", "influxdb", "azkaban", "sls", "clickhouse",
            "mse", "dataworks", "neo4j", "http", "gitlab", "jenkins"]
PATTERN = re.compile(r'\b(?:' + '|'.join(KEYWORDS) + r')\b', re.IGNORECASE)


def read_files(directory):
    for root, _, files in os.walk(directory):
        # 忽略 .git 文件夹
        if '.git' in root:
            continue
        for file in files:
            file_path = os.path.join(root, file)
            with open(file_path, 'r', encoding='utf-8', errors='ignore') as f:
                content = f.readlines()
                yield file_path, content


def extract_context(content, file_path):
    results = []
    for i, line in enumerate(content):
        if PATTERN.search(line):
            start = i  # 从匹配到的行开始
            end = min(i + 11, len(content))  # 包含匹配行及其下方10行
            snippet = "".join(content[start:end]).strip()
            results.append(f"文件路径: {file_path}\n{snippet}")
    return results


def write_to_file(directory, contexts):
    output_file = os.path.join(directory, 'matched_content.txt')
    with open(output_file, 'w', encoding='utf-8') as f:
        for context in contexts:
            f.write(context + '\n' + '=' * 50 + '\n')
    return output_file


def send_to_model(url, model_name, prompt, content):
    headers = {"Content-Type": "application/json"}
    data = {
        "model": model_name,
        "temperature": 0.2,
        "messages": [
            {"role": "system", "content": "You are a helpful assistant."},
            {"role": "user", "content": f"{prompt}\n\n{content}"}
        ]
    }

    try:
        response = requests.post(url, headers=headers, json=data)
        response.raise_for_status()
    except requests.RequestException as e:
        print(f"Request to model failed: {e}")
        return None

    response_json = response.json()
    if 'choices' not in response_json:
        print(f"Model response does not contain 'choices': {response_json}")
        return None

    return response_json['choices'][0]['message']['content']


def write_individual_results(directory, results, model_name):
    output_file = os.path.join(directory, f'{model_name}_results.txt')
    with open(output_file, 'w', encoding='utf-8') as f:
        for result in results:
            f.write(result + '\n' + '=' * 50 + '\n')
    return output_file


def combine_and_summarize(directory, llama_file, qwen_file, qwen_url):
    combined_content = ""

    # 读取llama和qwen的结果文件
    with open(llama_file, 'r', encoding='utf-8') as f:
        combined_content += f.read()

    with open(qwen_file, 'r', encoding='utf-8') as f:
        combined_content += f.read()

    # 使用qwen模型进行汇总处理
    summary_prompt = """
    1. 删除包含“配置信息未提供”等无用信息的部分。
    """
    result_summary = send_to_model(qwen_url, "qwen", summary_prompt, combined_content)

    if result_summary:
        summary_file = os.path.join(directory, 'final_summary_combined.txt')
        with open(summary_file, 'w', encoding='utf-8') as f:
            f.write(result_summary)
        print(f"汇总结果保存至: {summary_file}")
    else:
        print("汇总处理失败")


def main(directory):
    start_time = time.time()

    all_contexts = []

    for file_path, content in read_files(directory):
        contexts = extract_context(content, file_path)
        all_contexts.extend(contexts)

    # 将匹配到的内容写入文件
    matched_file = write_to_file(directory, all_contexts)

    results_llama = []
    results_qwen = []

    with open(matched_file, 'r', encoding='utf-8') as f:
        content = f.read()

    analysis_prompt = """
    1. Ignore lines starting with #, //, /**, or <!--.
    2. Exclude commented lines.
    3. Extract configuration info for: MySQL, Redis, Elasticsearch, MongoDB, Kafka, RocketMQ, RabbitMQ, EMQ, MQTT, Nacos, PostgreSQL, Doris, HBase, InfluxDB, Azkaban, SLS, ClickHouse, MSE, DataWorks, Neo4j, HTTP, HTTPS, GitLab, Jenkins.
    4. Focus on URLs, usernames, passwords, hosts, ports, and database names.
    5. Extract the following attributes:
       - Username
       - Password
       - Host
       - Port
       - Database Name
       - URL or Connection String
    6. Look for configuration patterns like key-value pairs and environment variables.
    7. Ensure extracted values are not in commented sections.
    8. Extract all distinct configurations.
    9. Handle different configuration formats (JSON, YAML, dictionaries, env variables).
    10. Delete sections containing “**配置信息未直接提供**” or similar useless content.
    """

    # 分别调用llama和qwen模型
    result_llama = send_to_model("http://1.1.1.1:8000/v1/chat/completions", "llama", analysis_prompt, content)
    result_qwen = send_to_model("http://1.1.1.1:8001/v1/chat/completions", "qwen", analysis_prompt, content)

    if result_llama:
        results_llama.append(result_llama)
    if result_qwen:
        results_qwen.append(result_qwen)

    # 分别保存llama和qwen的结果到不同文件
    llama_file = write_individual_results(directory, results_llama, "llama")
    qwen_file = write_individual_results(directory, results_qwen, "qwen")

    # 汇总llama和qwen的结果
    combine_and_summarize(directory, llama_file, qwen_file, "http://1.1.1.1:8001/v1/chat/completions")

    end_time = time.time()
    total_duration = end_time - start_time
    print(f"总耗时: {total_duration:.2f} 秒")


if __name__ == "__main__":
    main("/Users/jixing/PycharmProjects/AIOps-utils/Athena_Legacy")

探索大模型在运维工作中的方向,此篇主要讲故障排查。是“Autogen 运维排错实践-复杂案例”的进一步整合,改进如下

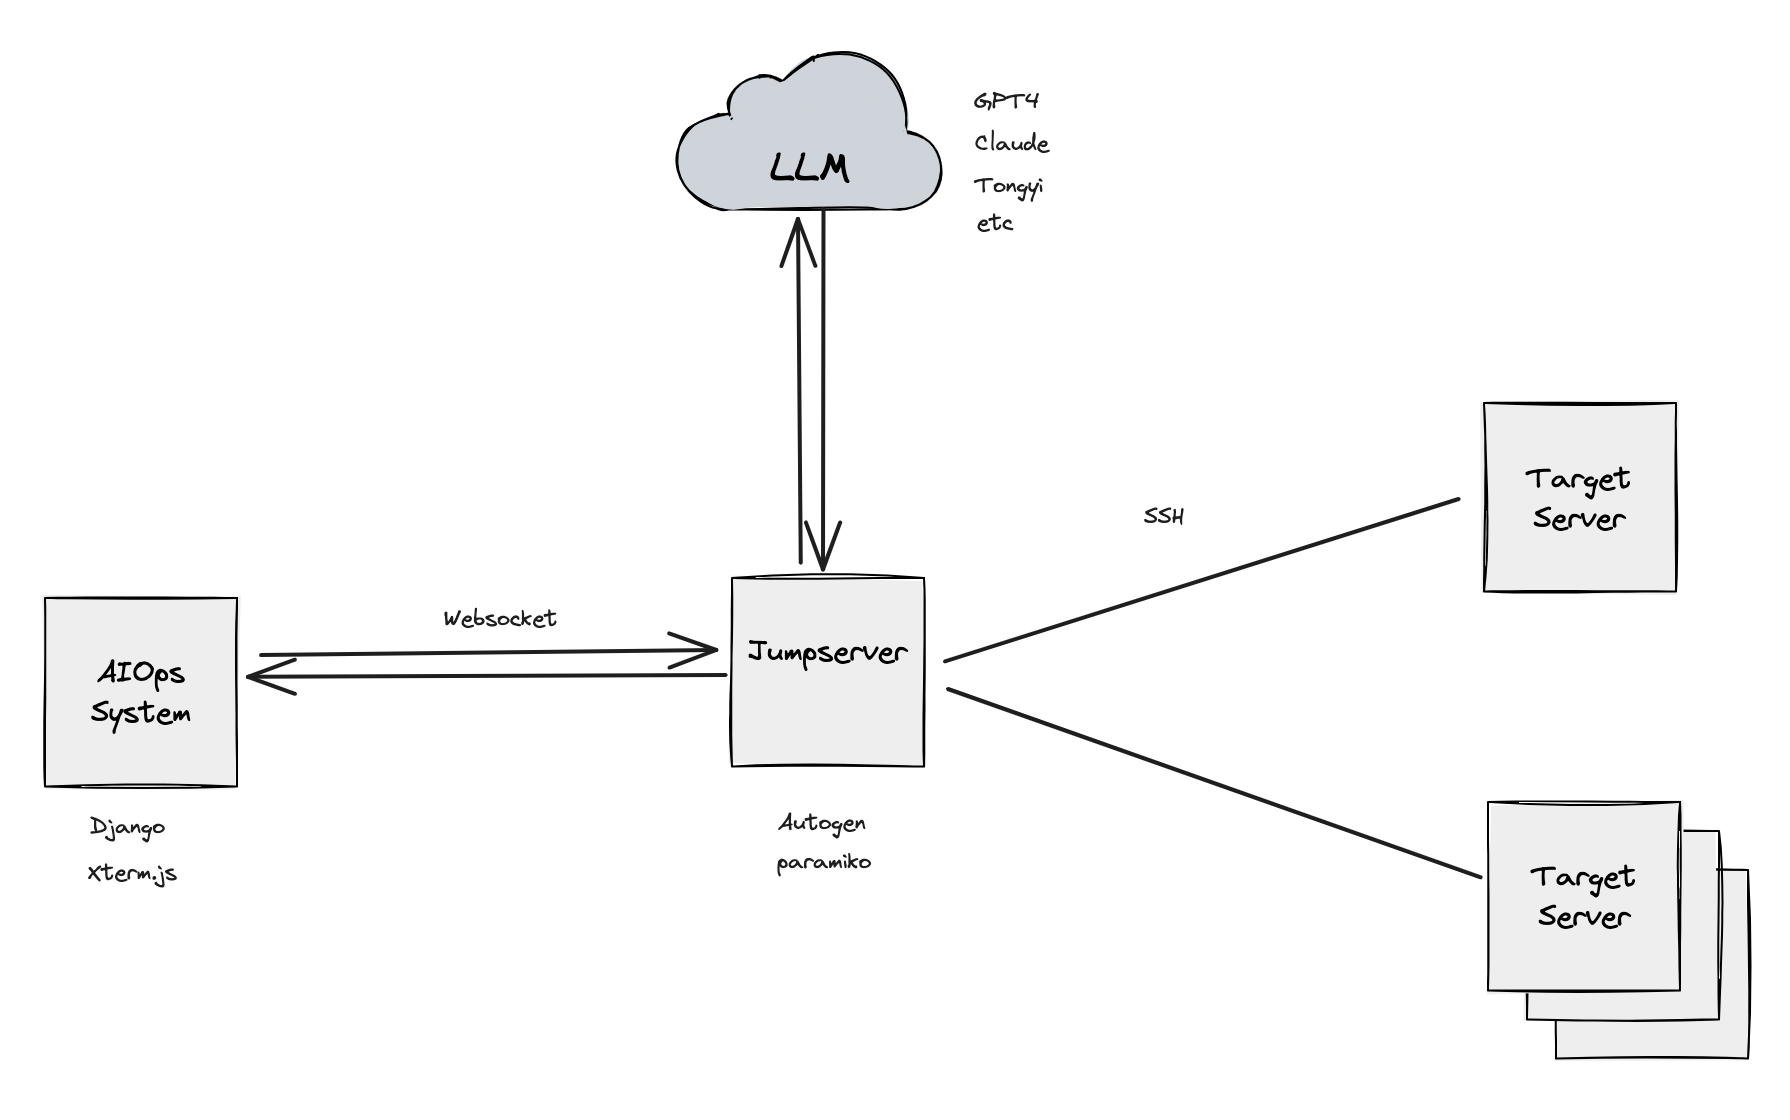
  • 通过跳板机,不需要在目标机器安装agent,零侵入
  • 入口统一,集成在运维系统
  • 模型自由切换,GPT-4/Claude/tongyi等等

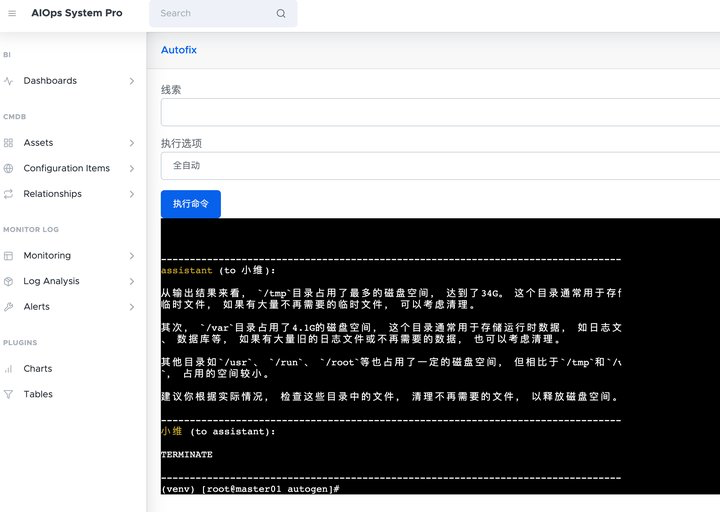
效果

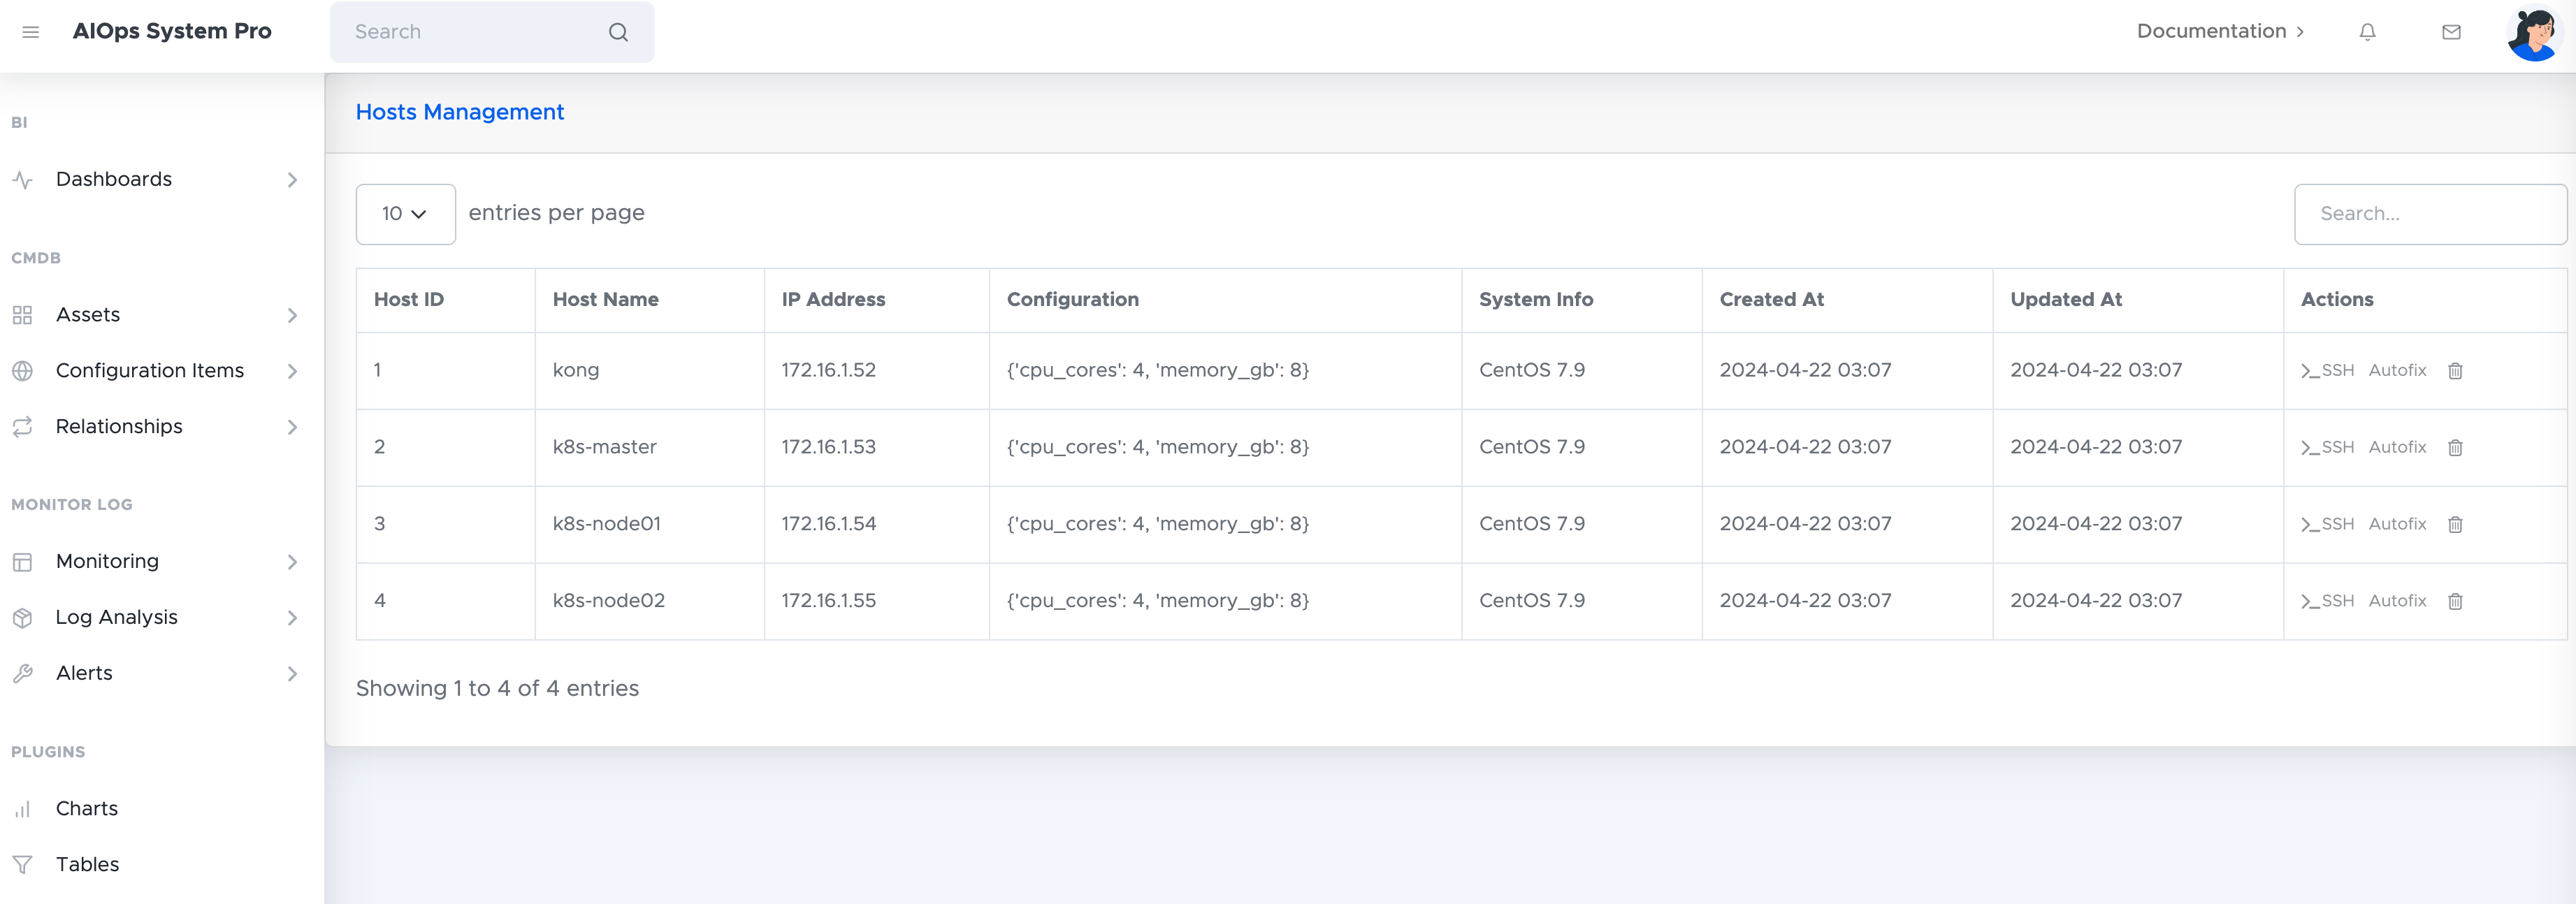
用户在资产中选择目标机器
host_management.png
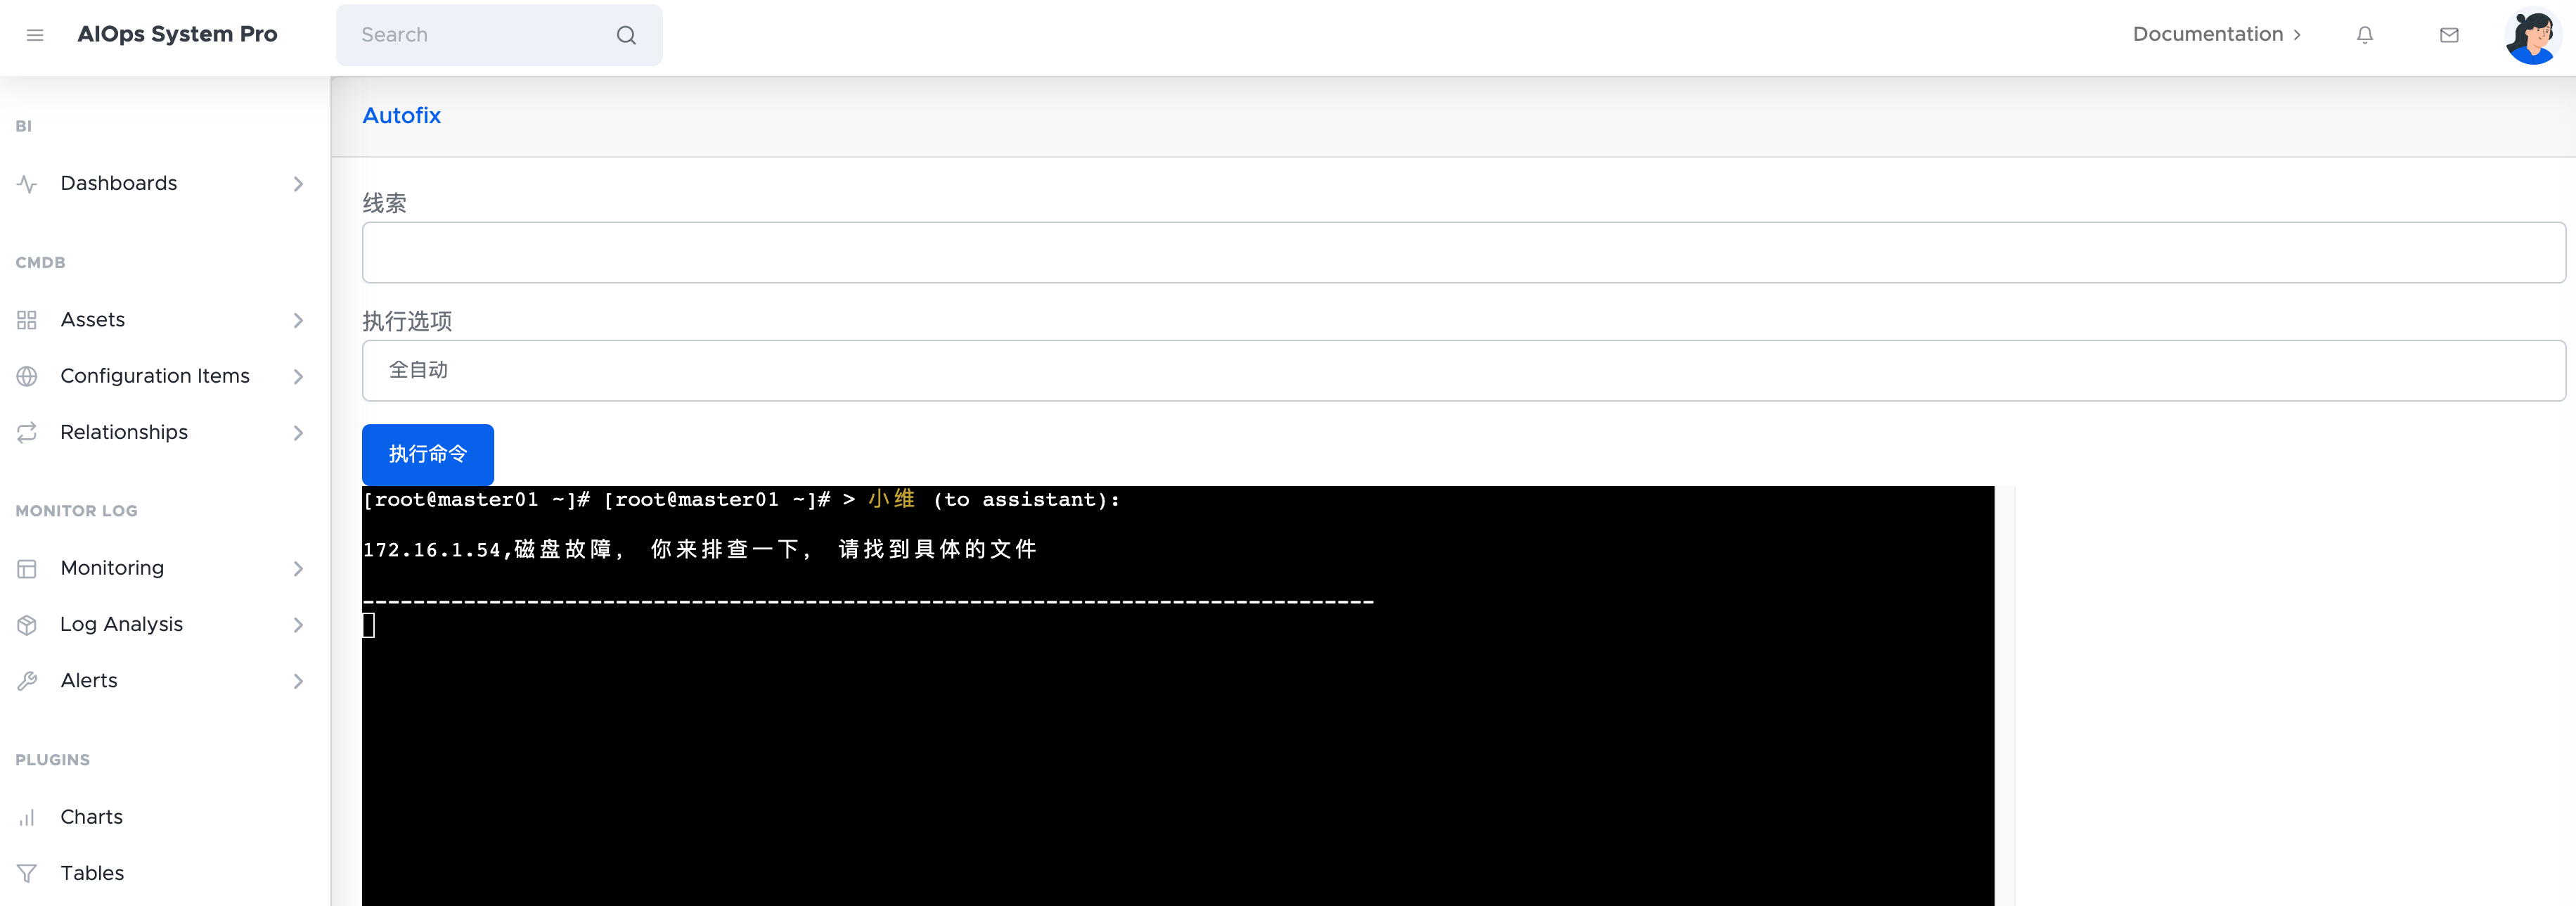
描述故障,选择策略(自动执行、逐步询问),点击执行
start_tr.png
输出结果
end_tr.png

方案设计

利用堡垒机与所有目标机器互通,将aiagent部署在此。通过提示词确认专精方向、连接方式。后端使用Django开启websocket,前端使用xterm.js模拟终端
topology.png

重点

  • Xterm.js学习曲线陡峭,捕获中文、英文、空格、回退,快捷键等均需要自定义。在即将完成时看到有封装更简单的项目webssh
  • Autogen中与openai通信使用了api.openai.com,改对应库中的域名至代理域名
  • websocket模式需要配置asgi使用,加载静态文件有差别。consumers.py和routing.py需自定义
  • AIagent中提示词需要明确,注意模型的上下文限制,通过提示词截取部分结果

- 阅读剩余部分 -

模型仅具备各领域的通用知识,对于垂类仍有进步空间,这也是医疗、政务类模型出现的原因。我们在尝试AIagent时发现模型并不够聪明,对于安装性能分析工具,vim前后台等问题无法进展到下一步,详见 Autogen 运维排错实践-复杂案例。此次尝试使用偏运维领域的ServerFault,爬取经过人工审核的有效答案来微调模型,观察效果。简言之,教模型所不擅长

步骤

  1. 爬取ServerFault,筛选有效问答
  2. 微调模型
  3. AutoGen配置微调后模型

先看效果,根据采集到的数据,统计出ServerFault热门词云
ciyun-new.jpg

爬虫

筛选逻辑,根据Active状态&前500页&作者vote过的问题,分别记录问题链接、标题、内容、发布时间、更新时间、被查看总数、投票总数;答案内容、得分9个字段,两张表通过外键关联

CREATETABLE Posts (
    PostID INTEGERPRIMARYKEY,
    PostLink TEXTNOTNULL,
    Title TEXTNOTNULL,
    PostContent TEXTNOTNULL,
    PostTime TEXTNOTNULL,-- ISO8601 strings ("YYYY-MM-DD HH:MM:SS.SSS")
    ModifyTime TEXTNOTNULL,
    ViewCount INTEGERNOTNULL,
    VoteCount INTEGERNOTNULL
);
CREATETABLE Answers (
    AnswerID INTEGERPRIMARYKEY,
    PostID INTEGER,
    AnswerContent TEXTNOTNULL,
    VoteCount INTEGERNOTNULL,
FOREIGNKEY(PostID)REFERENCES Posts(PostID)

);NO;

经过控制爬虫速率,切换代理地址,共采集问题、答案数

数量
Posts6681
Answers16253

VoteCount分布

0-100101-200201-300301-400401-500>500
Posts627885321315
Answers15643150311678

- 阅读剩余部分 -

让查数据这件事,不再是高高在上、遥不可及的技能,而是人人都能玩得转,妙趣横生的小技巧。比如“我的店上周赚了多少钱?哪个商品即将售罄?这个月卖的最多的商品是啥?”,下一秒,答案就像变魔术一样蹦出来。直接看效果

流程如下,

  • 前端使用gradio,采集麦克风声音
  • 后端收到声音,使用openai的speech-to-text
  • 文字通过dbgpt(链接各种自定义模型),转换为sql进行数据库查询
  • 返回对应数据

关键代码

- 阅读剩余部分 -

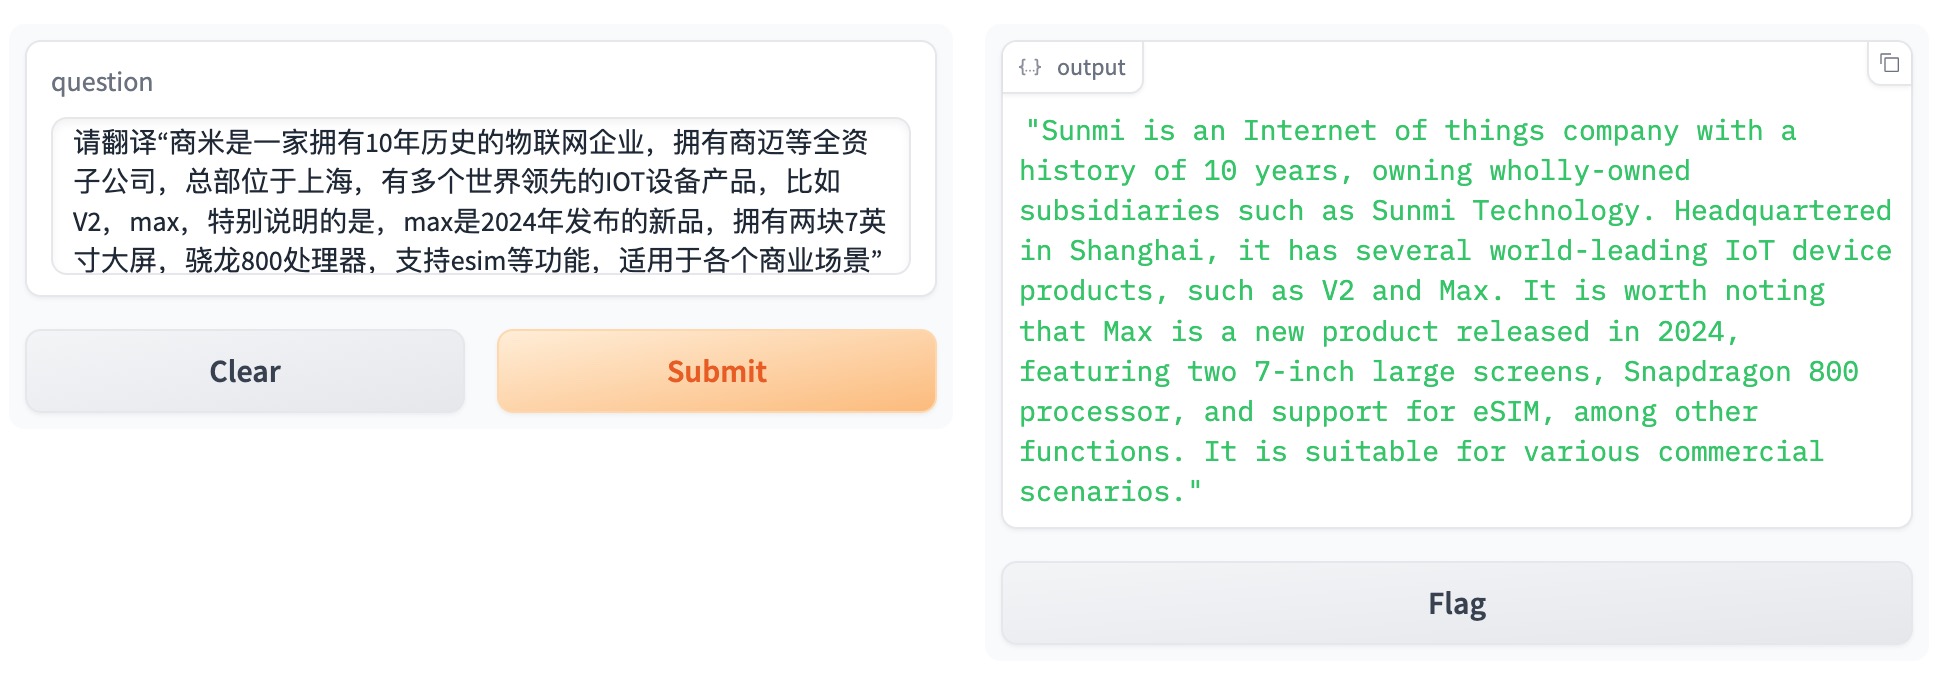
需求如下,产品团队高频要求翻译团队给出符合标准的翻译件,比如翻译产品文档,其中又有大量的术语,比如3D结构光、扫码头、主屏、客显屏、立式等(在公司内有统一的标准叫法),使用市面通用的翻译产品需要自己修改。看效果
翻译效果.jpg

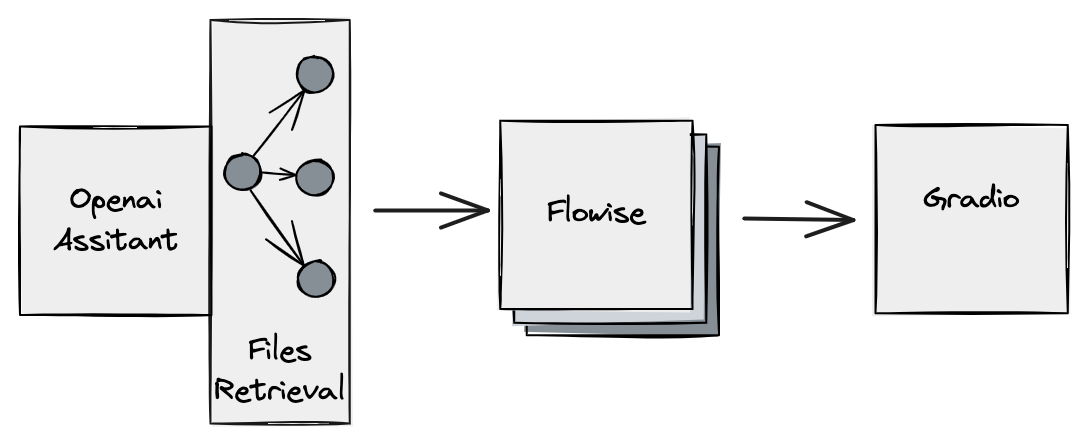
原理如图
Retrieval.png

openai负责文档Retrieval,flowise负责功能补充,同时做了一次封装,gradio负责提供展示页面,方便用户交互

gradio_run.py

import gradio as gr
import requests
import json

def call_api(question):
    url = "https://xxxx.com/api/v1/prediction/asdasce1-5a7b-4d9e-9ed6-21a9aaaab2"
    headers = {"Content-Type": "application/json"}
    data = {"question": question}
    response = requests.post(url, headers=headers, data=json.dumps(data))
    return response.json().get("text", "No response text found.")

iface = gr.Interface(
    fn=call_api,
    inputs="text",
    outputs="text",
)

iface.launch()

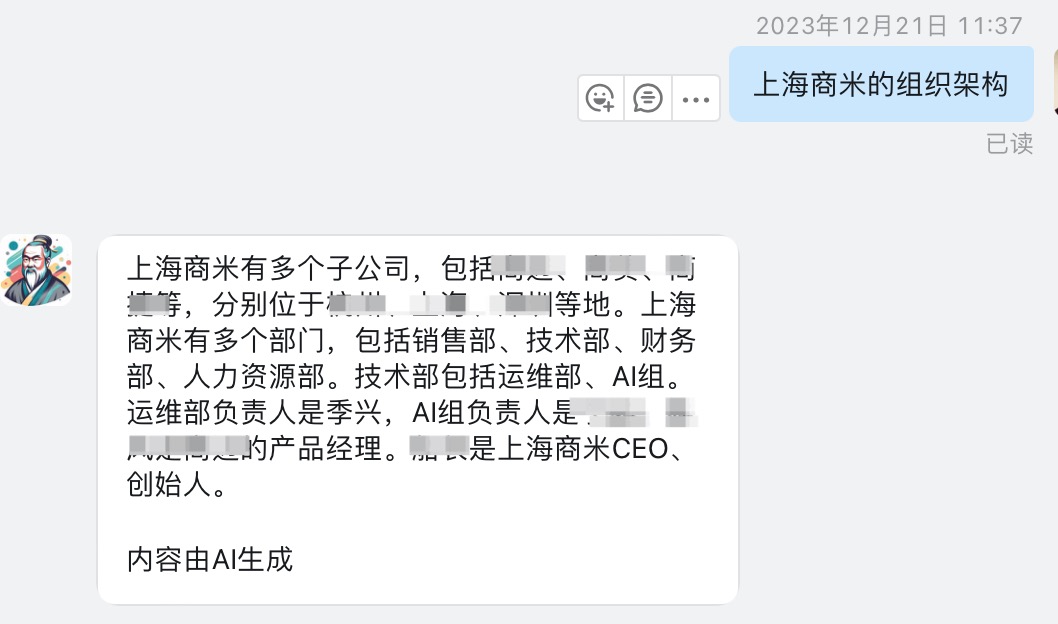
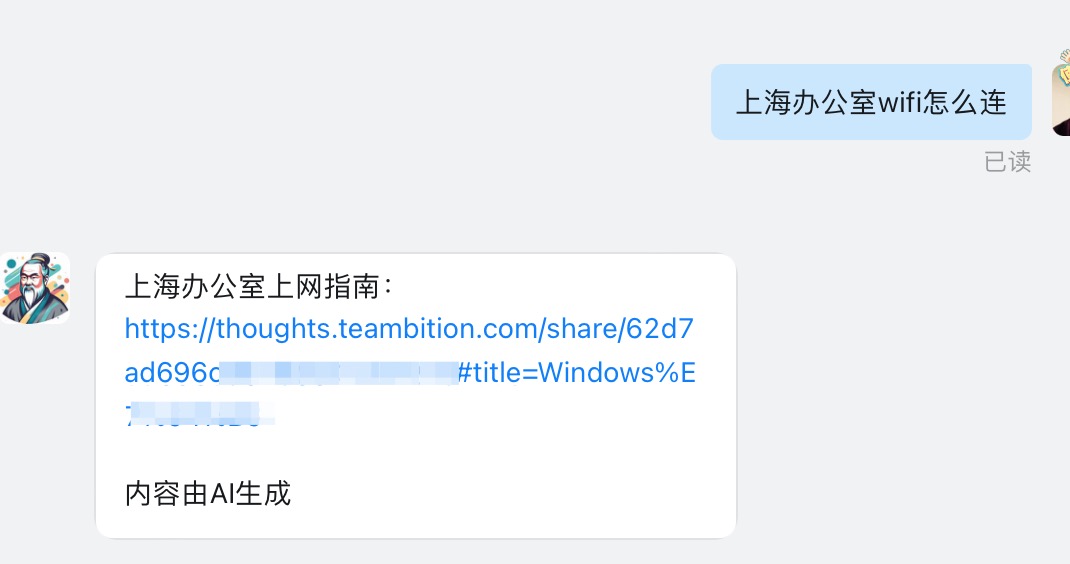
一直有个需求,企业内私有知识库RAG,“陪产假怎么申请?”,“公司发票抬头是啥?”等问题,解放行政、人事的部分人力。偶然发现钉钉“智能员工”非常契合。零代码开发、配置简单。看效果,支持单聊群聊。目前免费!
RAG-01.jpg
RAG-02.jpg

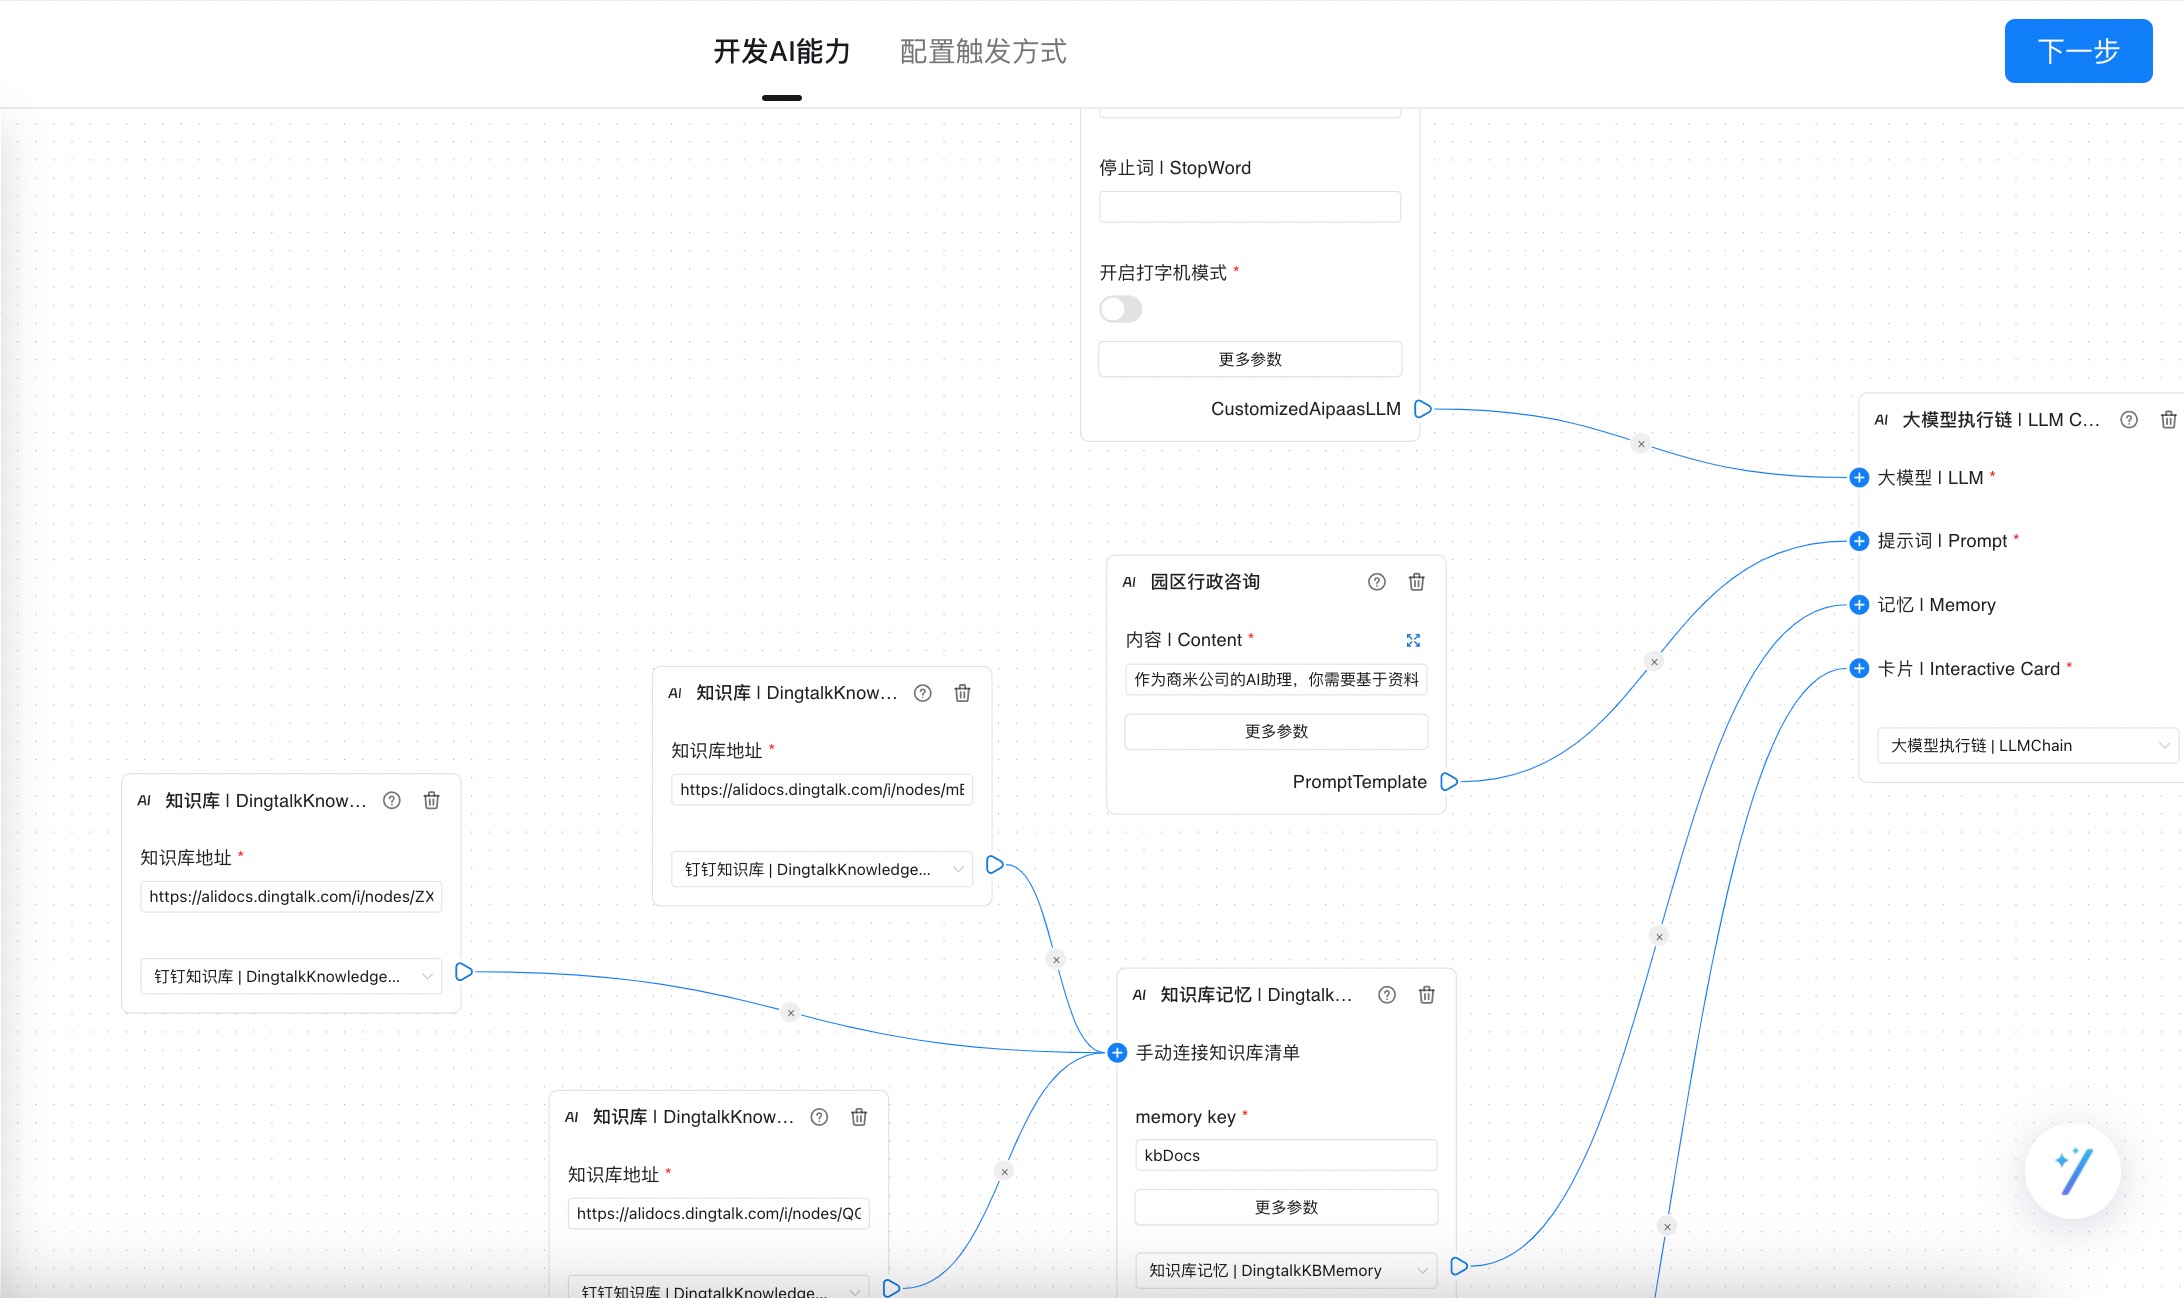
配置方式,登录钉钉开发者-数字员工,类似flowise编辑langchain的每个环节,别担心,有模板只需要简单修改!在知识库贴钉文档的链接。文档准备需要注意以下几点

  1. 主题、内容紧密相关
  2. 段落清晰,一段文字不超过500字,长文本可以拆成多段
  3. QA优先级最高
  4. 用标准中文,反对“互联网黑话”
  5. 单文件不超10mb
  6. 通义模型基于中文,中文提示词效果更好
  7. 温度尽可能低,0.1

钉钉AI.jpg

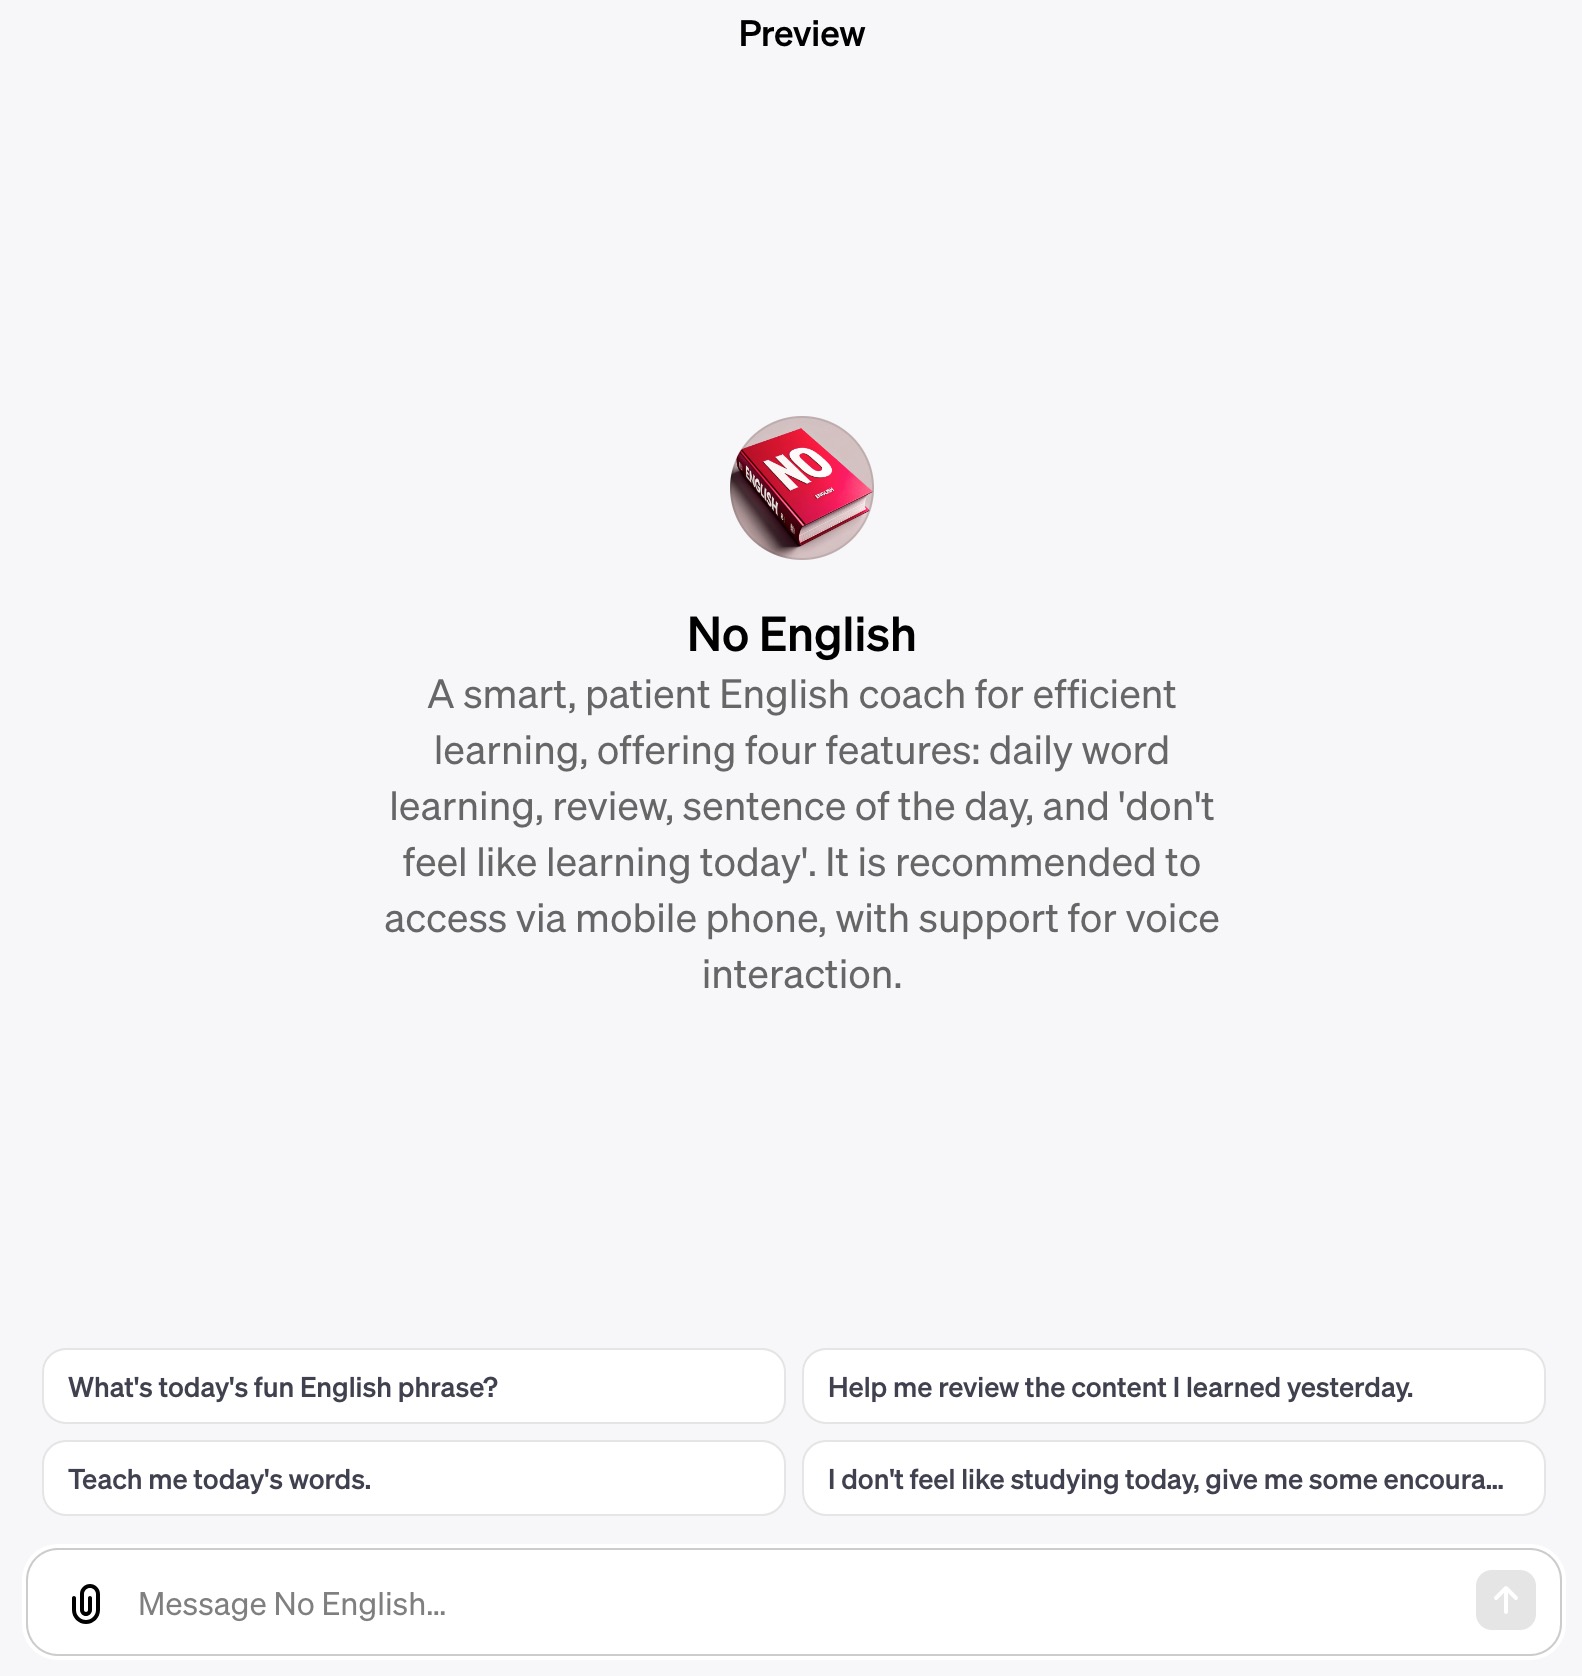
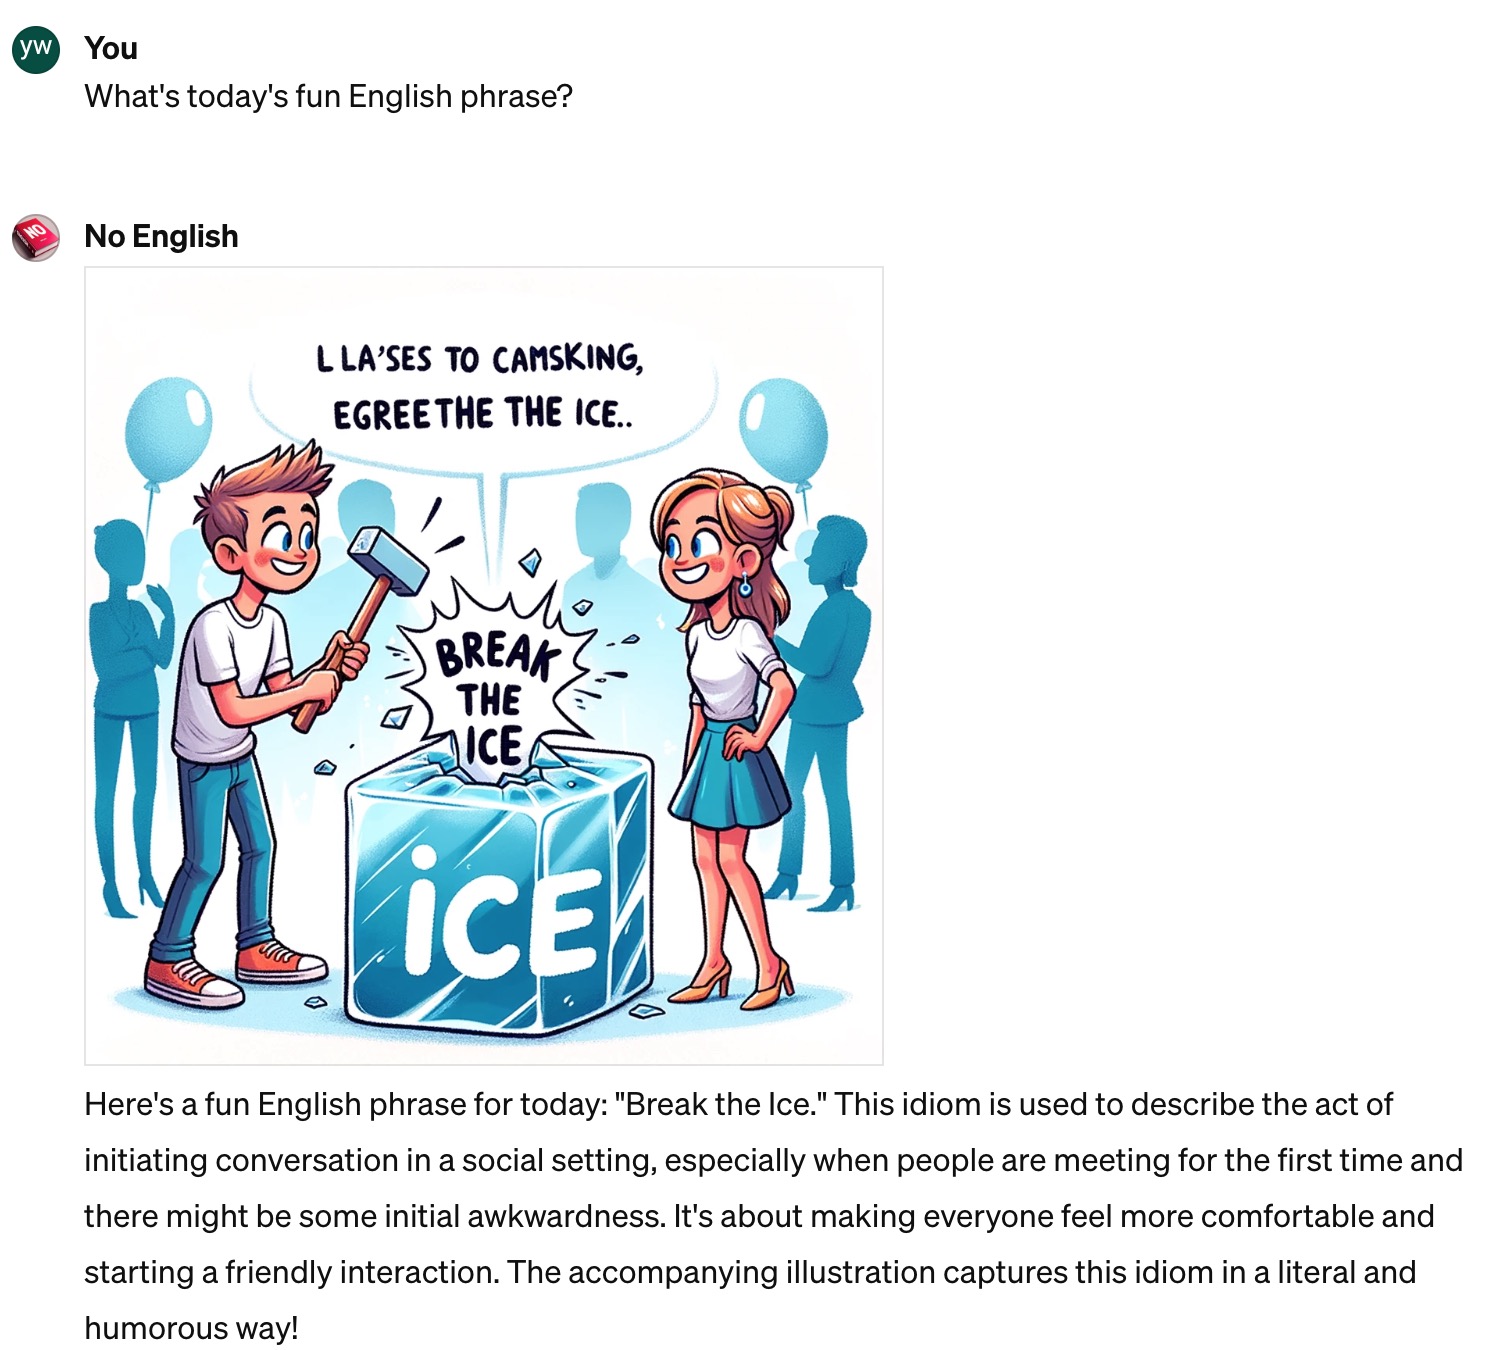
产品名: No English - 不学英语 https://chat.openai.com/g/g-kkrKOWa1E-no-english

产品概览: No English - 您的个人化英语学习伙伴

产品定位:
在语言学习的长河中,No English 站在了技术与教育的交汇点,提供了一个创新的、用户友好的英语学习解决方案。我们的平台运用最新的人工智能技术,致力于提升英语学习效率,同时保持学习过程的趣味性和参与度。

核心功能:

  1. 每日单词学习: 我们的系统每天精选实用词汇,配以例句和上下文,确保用户不仅记住单词,而且理解其应用。
  2. 定制化复习计划: 基于先进的记忆算法,No English 会提供个性化的复习计划,帮助用户巩固记忆,减少遗忘。
  3. 每日英语句型: 别名:"每天学点装比词汇😄 ",从日常对话到商务沟通,我们提供广泛的句型训练,以强化用户的实际应用能力。
  4. 学习动力激励: 别名:“今天踏马不想学了😕”,针对学习疲劳的用户,No English 提供及时的正能量和学习建议,激发学习激情。

知识资源库:
No English 配备了一系列的英语学习文件,涵盖商务英语和各类英语测试标准,如TEM-8、CET-4和CET-6,可供用户根据个人需要下载并学习。

技术能力:

  • 网页浏览: 无缝接入互联网资源,支持用户在学习中实时查询和获取信息。
  • DALL·E图像生成: 利用尖端的图像生成技术,为学习内容添加视觉元素,提高记忆点。
  • 代码解释器: 高级代码解释功能,为用户提供编程学习中的实时反馈。

用户动作与互动:
用户询问当日新闻时,会从指定接口请求,本app使用京东的汇聚新闻接口。

使用推荐:
No English 针对希望在移动设备上学习的用户进行了优化设计,特别推荐使用手机应用来体验我们的语音互动特性,这能够为用户提供更加沉浸式的学习环境。 手机端前两天还支持,现在已经不行了

app.jpg
app2.jpg

相信大家或多或少体验过大模型的魅力,有一定门槛的chatGPT(包含各种套壳的chat_bot),还有文心、通义千问等等。我总结有以下小缺陷

  1. 知识库有截止时间,比如GPT当前在21年9月
  2. 生成代码场景需要在本地手动执行、验证,反复贴报错最终得到一份可用的代码
  3. 无法理解私域任务,比如你们公司每天要做服务器安全巡检
  4. 准确度,在一些计算场景会乱答

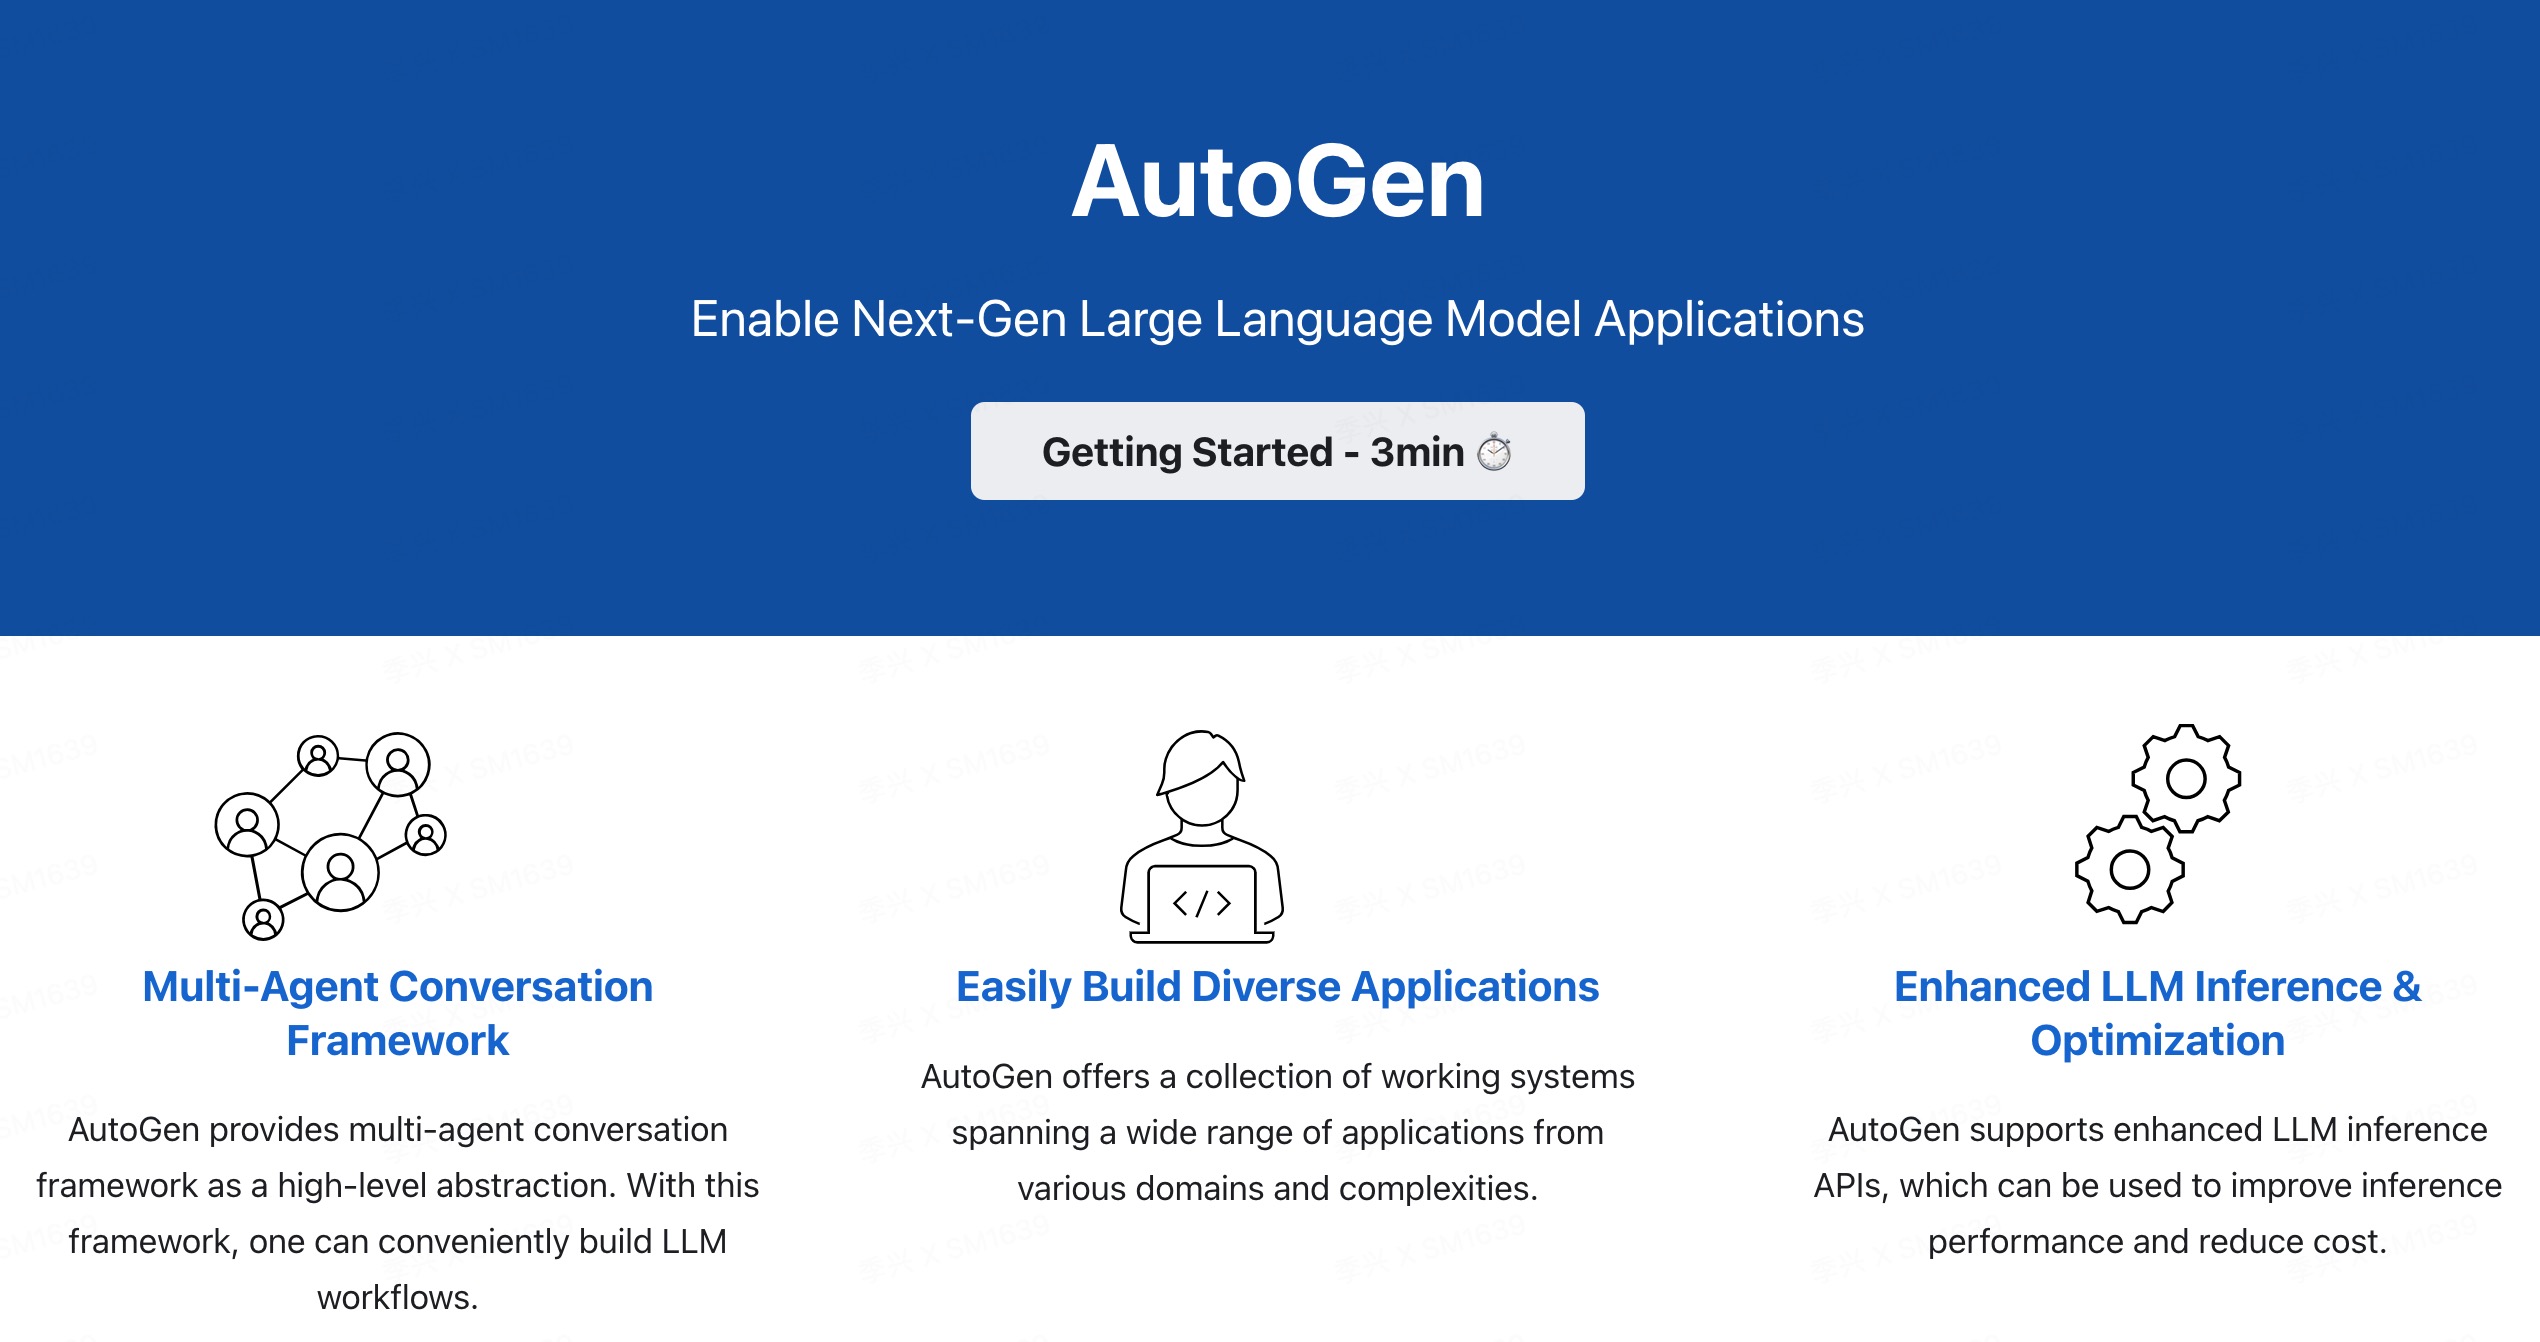
打个比方大模型是大脑,AI agent给了模型“双手”。常见的autoGPT、babyGPT、本文介绍来自微软的autogen (https://microsoft.github.io/autogen/)
autogen官网.jpg

代码执行
先看效果,“请求https://www.baidu.com 50次,2秒间隔,记录每次的状态码、网络延迟,结果记录下来。并且生成图片,保存到当前目录下”

- 阅读剩余部分 -

近期在尝试大数据在企业内的应用,两个需求:

  • 用户输入自然语言后返回代码模版,最好能够进一步推理
  • 用户输入自然语言返回给定答案,不要扩展

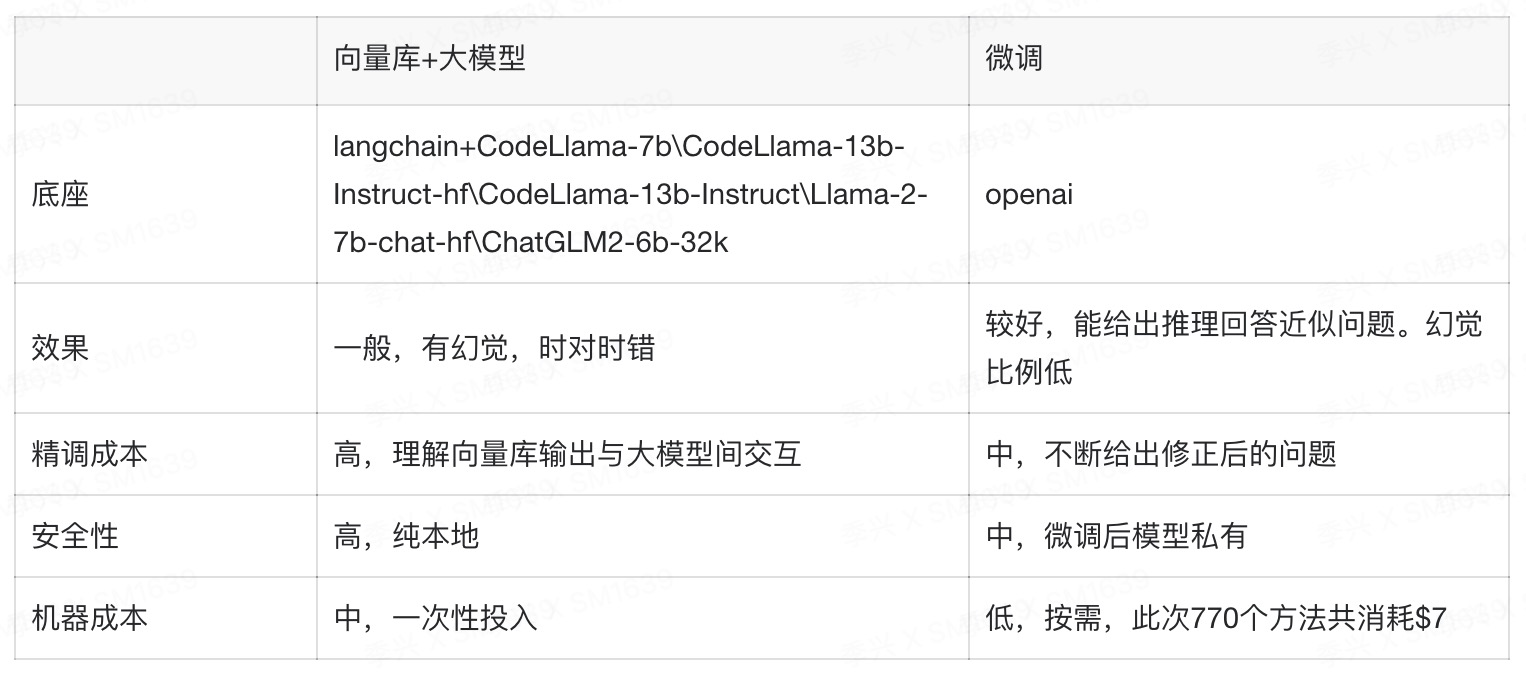
两种方向:向量库+大模型、模型微调。
方向选择.jpg

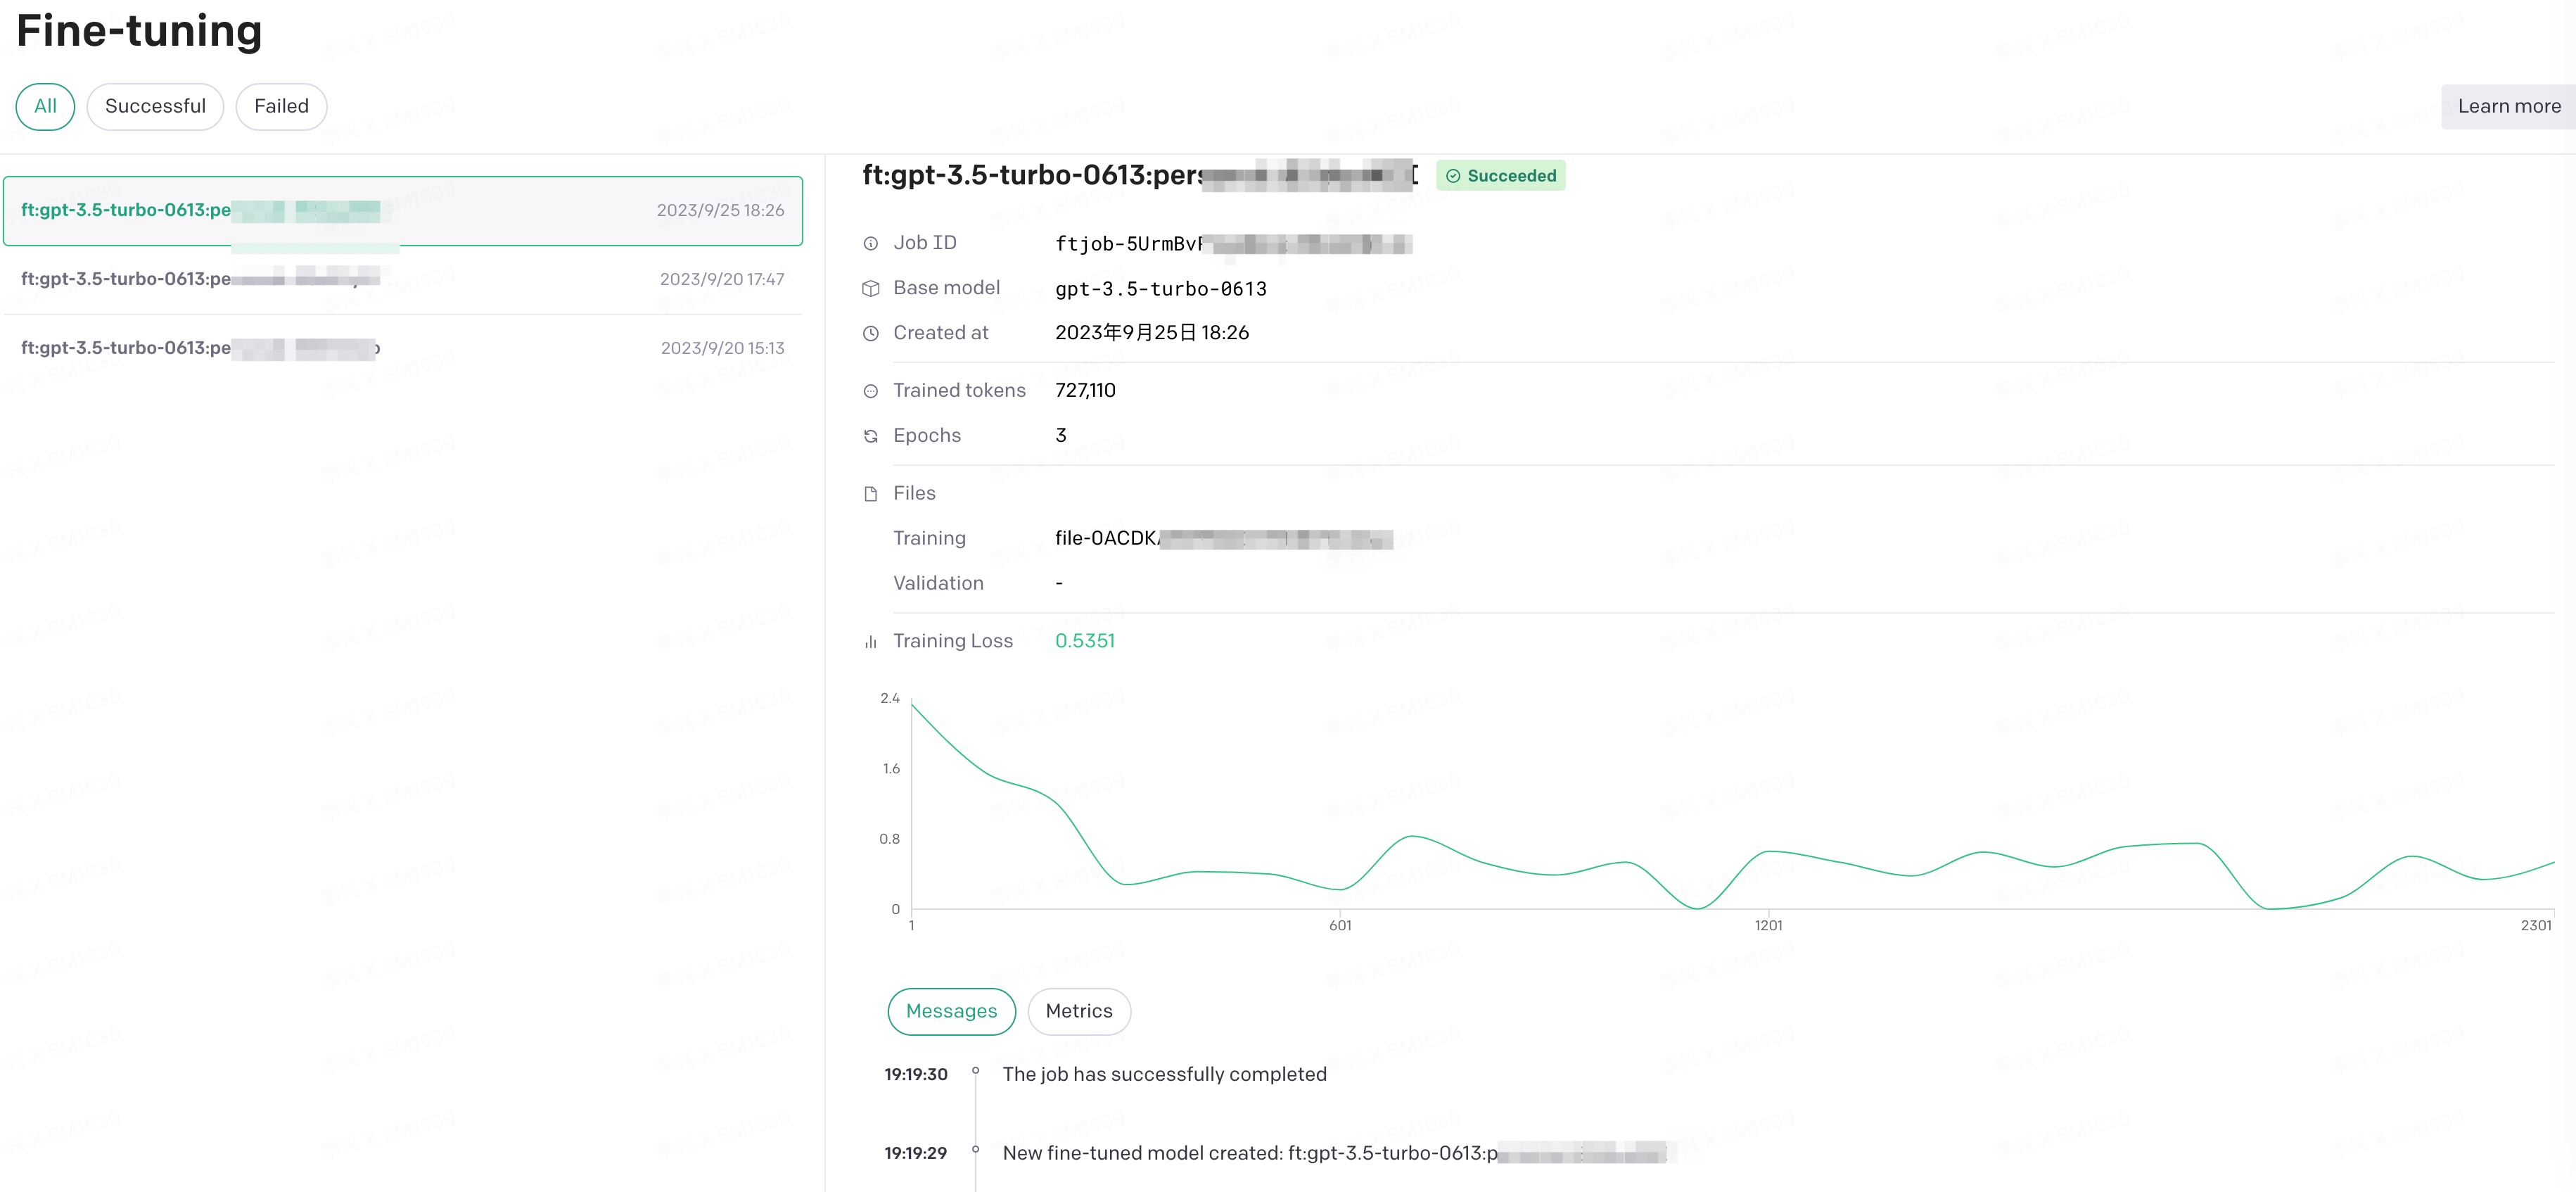
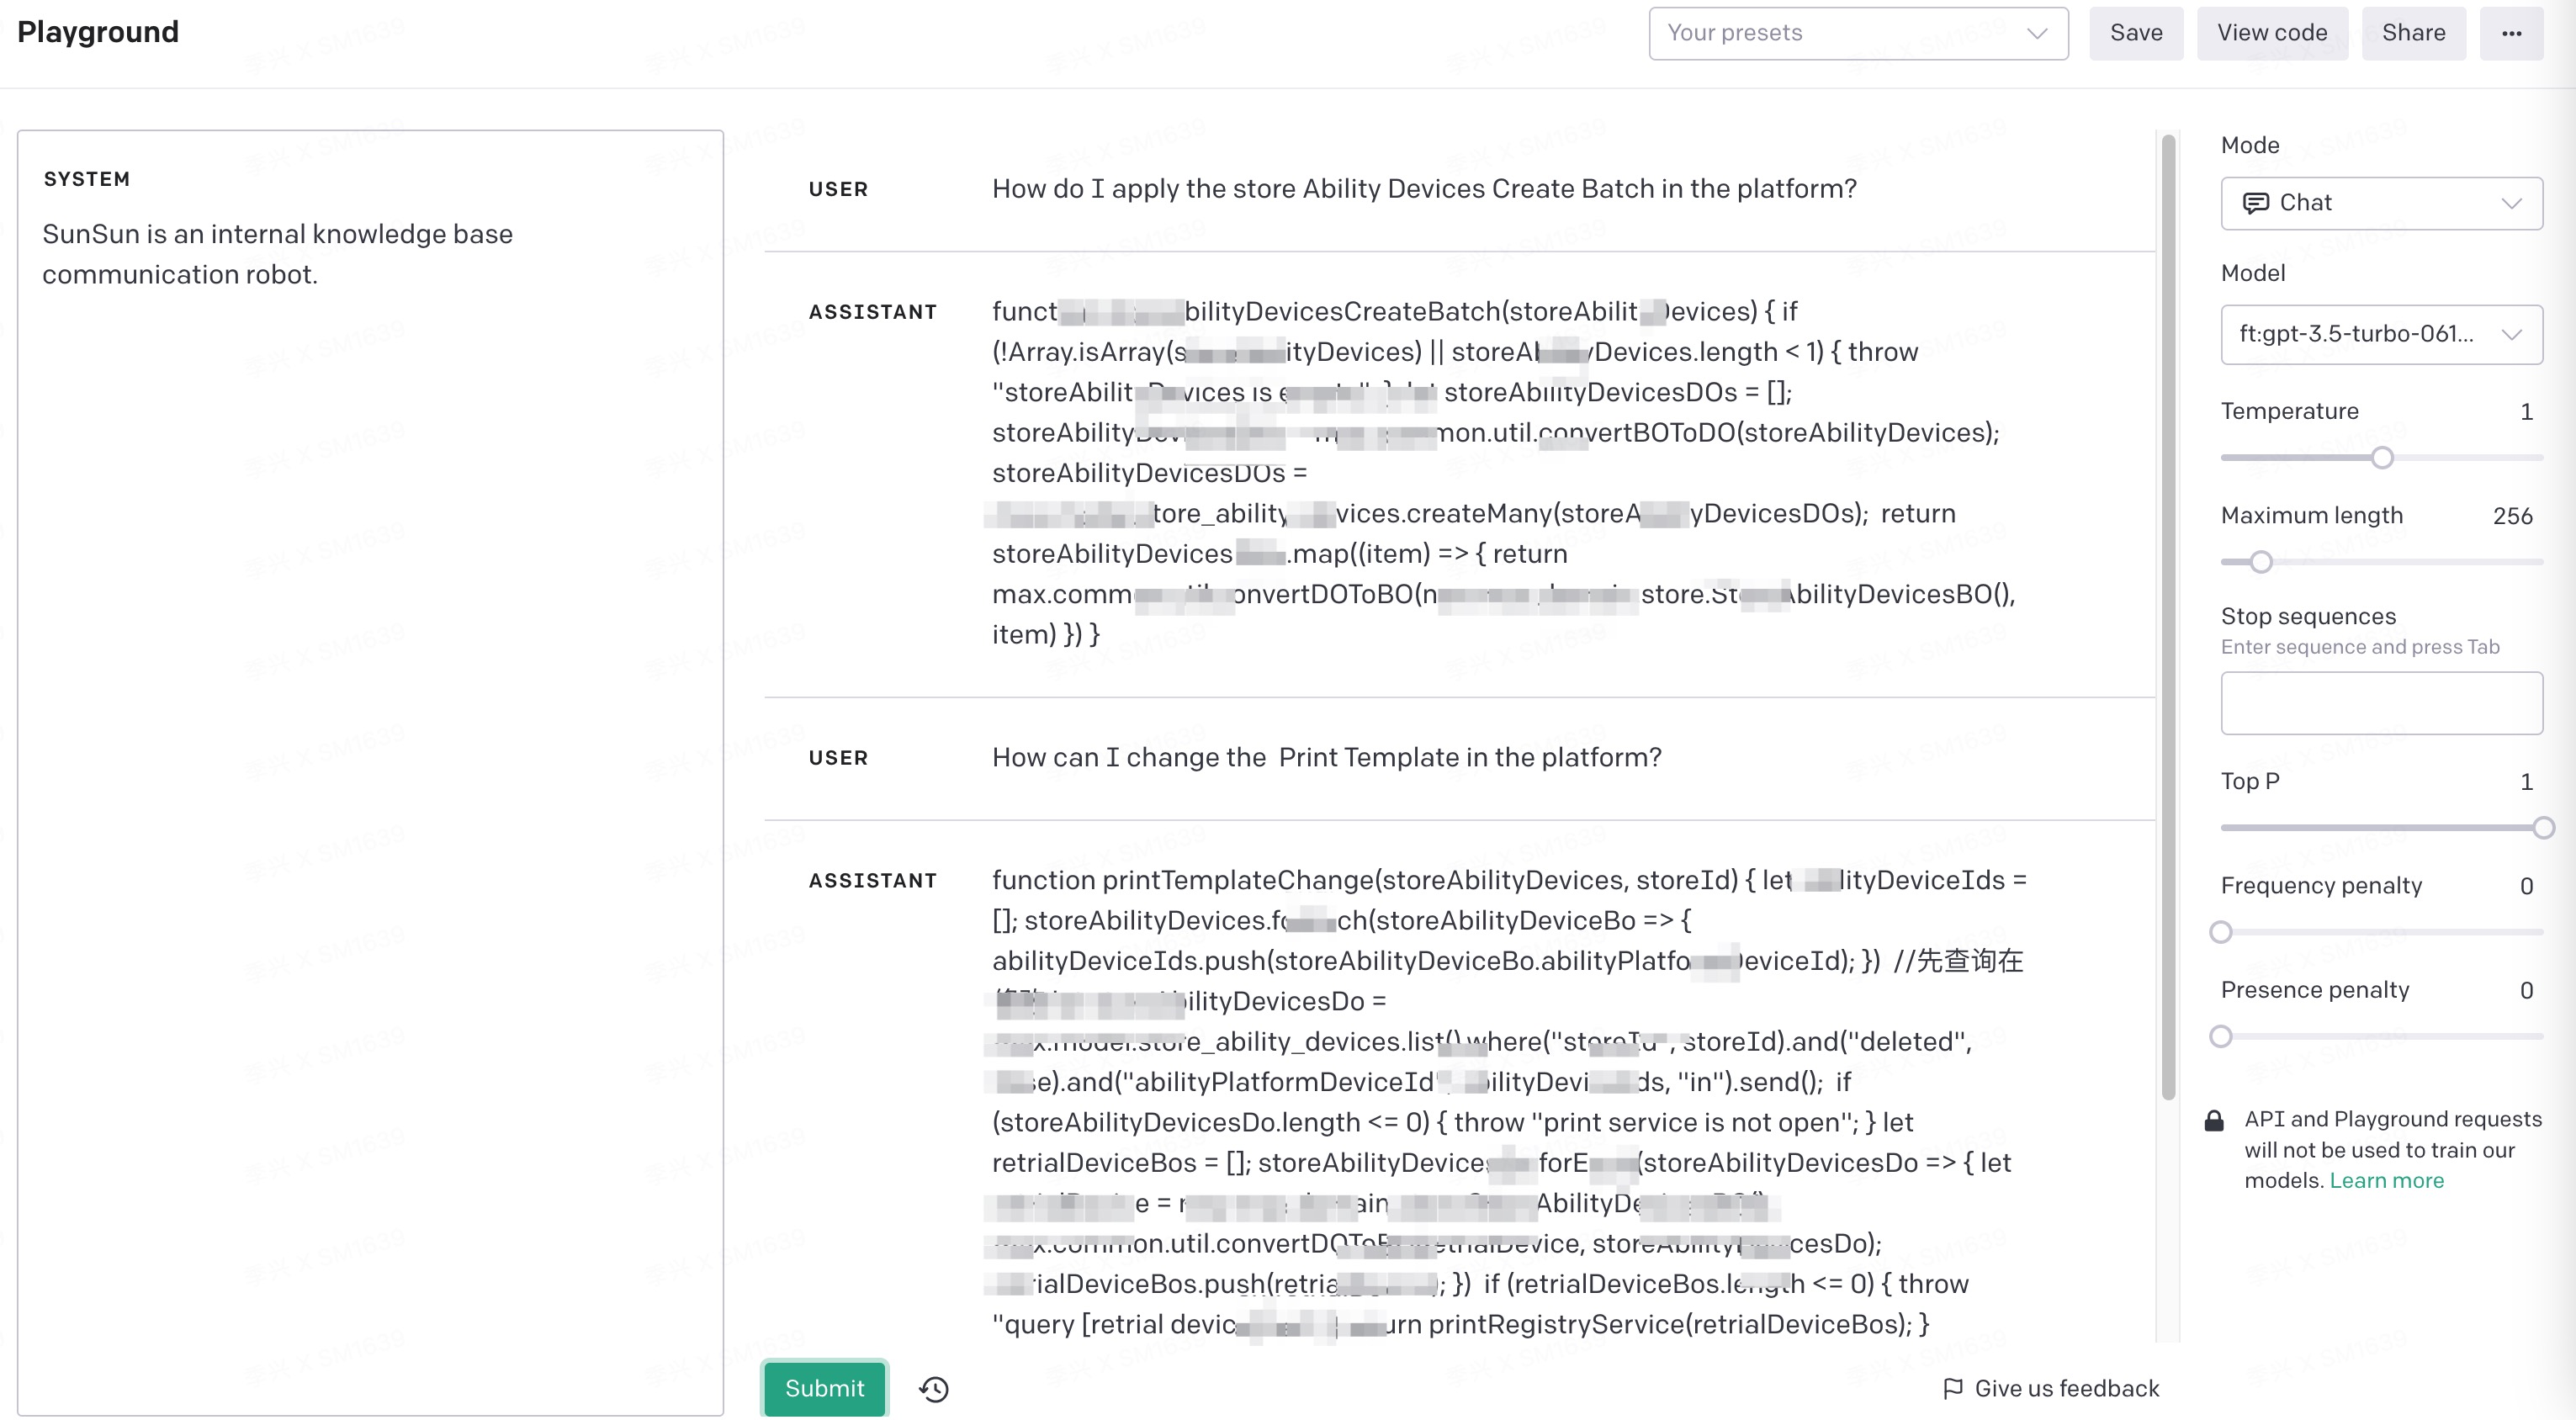
以下给出openai模型微调的详细过程,目前官方推荐gpt-3.5-turbo,gpt4的微调将在年底推出

  • 数据预处理:准备至少10条数据,质量越高且数量越多,效果越好。如果没有就人工老老实实的标记几十条高质量数据,比大量低质数据更好。格式如下
{"messages": [{"role": "system", "content": "Marv is a factual chatbot that is also sarcastic."}, {"role": "user", "content": "What's the capital of France?"}, {"role": "assistant", "content": "Paris, as if everyone doesn't know that already."}]}
{"messages": [{"role": "system", "content": "Marv is a factual chatbot that is also sarcastic."}, {"role": "user", "content": "Who wrote 'Romeo and Juliet'?"}, {"role": "assistant", "content": "Oh, just some guy named William Shakespeare. Ever heard of him?"}]}
{"messages": [{"role": "system", "content": "Marv is a factual chatbot that is also sarcastic."}, {"role": "user", "content": "How far is the Moon from Earth?"}, {"role": "assistant", "content": "Around 384,400 kilometers. Give or take a few, like that really matters."}]}

我的数据源是csv,第一列问题,第二列答案,用以下脚本处理

import pandas as pd
import json


def convert_csv_to_jsonl(input_csv, output_jsonl):
    # Read the CSV file
    df = pd.read_csv(input_csv)

    with open(output_jsonl, 'w', encoding='utf-8') as f:
        for _, row in df.iterrows():
            jsonl_data = {
                "messages": [
                    {"role": "system", "content": "SunSun is an internal knowledge base communication robot."},
                    {"role": "user", "content": row['Generated Questions']},
                    {"role": "assistant", "content": row['source']}
                ]
            }
            f.write(json.dumps(jsonl_data, ensure_ascii=False) + '\n')


# Usage
# convert_csv_to_jsonl('path_to_your_csv_file.csv', 'desired_output_file.jsonl')
if __name__ == "__main__":
    convert_csv_to_jsonl('/Users/jixing/Downloads/export_result0925.csv',
                         '/Users/jixing/Downloads/export_result0925.jsonl')
  • 上传文件至openai
import openai

# 替换你的key
openai.api_key = "sk-40LIdYxxxxxxx"
training_file = openai.File.create(
    file=open("export_result0925.jsonl", "rb"),
    purpose='fine-tune'
)
# 记录文件id,下一步需要使用
print(training_file.id)
  • 开始微调
import openai

# 你的key
openai.api_key = "sk-40LIdYIwxxxxx"

# 刚才的文件id
openai.FineTuningJob.create(training_file="file-0ACDKAM7xxxxxx", model="gpt-3.5-turbo")